In this context, Ibmi Media shall outline how to setup OpenVAS on your Ubuntu or Debian Distribution. It can also be installed on CentOS and other Linux distribution by using their respective installation guidelines.
About OpenVAS
OpenVAS stands also know as Open Vulnerability Assessment System helps the system to check for vulnerability on the Server. It is a great tool similar to Security and Network scanners like Nmap , Metasploit Project and Wireshark.
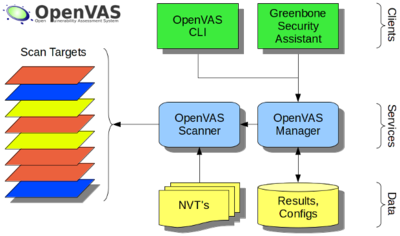
OpenVAS consists of three chunks; OpenVAS Scanner, OpenVAS Manager, and OpenVAS CLI.
OpenVAS is made up of;
i. A scanning System responsible for allowing the functioning of the NVTs.
ii. Network Vulnerability Tests (NVTs) portal which is updated regularly.
iii. An elaborate graphical interface known as the Greenbone Security Assistant which enables the management of the vulnerability scans of a web application.
How to Install and setup OpenVAS on Linux
Below is the steps which our Support Experts followed in getting OpenVAS setup on Debian and Ubuntu:
1. As generally recommended, before proceeding with system software installation of any kind on your Linux server, do not forget to update the system to ensure that it is up to date.
Use the following command;
apt-get update && apt-get upgrade
2. Next, Make sure that the software properties dependencies are installed in the system as well. Use the command below to achieve this;
apt-get install python-software-properties3. Then, you can setup the database system by getting SQLite up and running. use the command below;
apt-get install sqlite3
4. As OpenVAS is not an inbuilt system software package, therefore you must add its PPA to the system's repository management list. use the command;
add-apt-repository ppa:mrazavi/openvas
5. As a norm in Linux, after adding an external PPA to the repository list, the system must be updated by using the command below;
apt-get update
6. Now you can install OpenVAS formally via the command below;
apt-get install openvas
7. As soon as the installation process for OpenVAS is completed successfully, you should start the OpenVAS service by executing the commands;
service openvas-scanner start
service openvas-manager startservice openvas-gsa startAdditionally, it is important to check and there should be an update of the Vulnerability database.
You can use the command below;
openvas-nvt-sync
After the update process of the database is completed successfully, You can access OpenVAS via a web browser with the url.
Setting up OpenVAS to work remotely
In order to be able to access the web interface service known as Greenbone Security Assistant, it must be configured to resolve to the Server IP address.
Our Support Experts modified the configuration which is located at the /etc/init.d/openvas-gsa file and then input the IP address like;
DAEMON_ARGS= --listen "SERVER_IP_ADDRESS"After inputing the IP address, save the file and restart openvas-gsa by using the command below;
service openvas-gsa restart
Common OpenVAS issues
Errors might exist when the firewall is not set correctly. Since OpenVAS use port 443, it is recommended that this port should be open to avoid any firewall issues.
Need support in setting up OpenVAS? Our Support Team can help you Today.
Conclusion
Basically, you can see how we installed OpenVAS and also configured and setting up the appropriate port. Linux command line could be very confusing to use if you are not good in Linux. Our Linux Professional Services team are ready to help.
Conclusion
OpenVAS software framework is a great security tool checking if the system is vulnerable by means of scanning and Management. It helps to safeguard the server from unauthorized access.
To Install OpenVAS on Ubuntu:
By default, the OpenVAS package is not available in the Ubuntu 16.04 repository, so you will need to add OpenVAS PPA to your system's repository list.
1. Add the OpenVAS PPA.
$ sudo add-apt-repository ppa:mrazavi/openvas
2. Update the repository.
$ sudo apt-get update
3. Finally, install OpenVAS.
$ sudo apt-get install openvas
4. Once OpenVAS has finished installing, start the OpenVAS service with the following commands:
$ sudo systemctl start openvas-scanner
$ sudo systemctl start openvas-manager
$ sudo systemctl start openvas-gsa


