Usually, we use the SQL Server evaluation edition for test purposes before deployments.
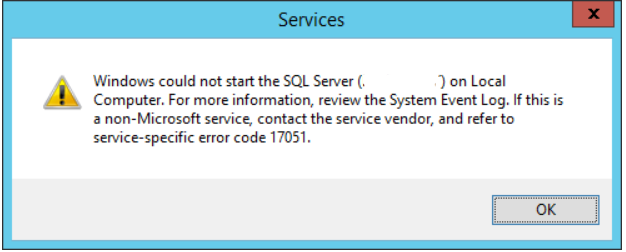
If the validity of the Evaluation period exceeds, then SQL Server will shut down and will not come online. This is where SQL Error 17051 comes up!
To keep it running we need to activate this SQL Server instance to a licensed version.
Here at Ibmi Media, as part of our Server Management Services, we regularly help our Customers to resolve related SQL queries.
In this context, we shall look into how to upgrade SQL Server Evaluation edition to Enterprise, Standard, or Developer edition.
Nature of SQL Error 17051 ?
Recently, one of our customers had his SQL Server Instances suddenly stop working and shut down automatically. The services were not back online.
In addition, it was even impossible to launch SQL Server Management studio.
On further check on windows event viewer, we saw multiple event IDs for SQL Server like Event ID 7024, Event ID 17051, and so on.
If the SQL Server evaluation period expires, we will get this error.
In the event viewer, the event id 7024 says something wrong with the application SQL Server.
The SQL Server error log shows:
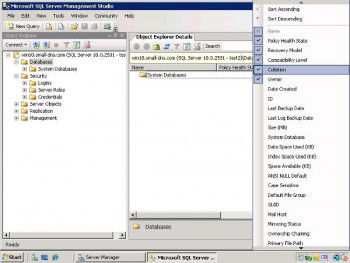
Error: 17051, Severity: 16, State: 1.SQL Server evaluation period has expired.We ensure the version of SQL Server is SQL Server Evaluation version on this database server. We can launch the property window of SQL Server service in SQL Server Configuration Manager to find it.
Then we upgrade the SQL Server evaluation edition to bring it online to work as before.
To start this, we need SQL Server setup files to perform this upgrade.
Follow the below steps to activate the expired SQL Server evaluation version to either standard, enterprise, or developer edition.
How to Upgrade SQL Server Evaluation Edition to Enterprise Edition ?
1. Initially, we decide on the edition, copy its setup files to the target SQL Server machine.
2. Then we launch SQL Server Installation Center to run this upgrade.
Run them using a sysadmin account.
3. Double click on Setup.exe file to start the upgrade. We will get SQL Server Installation Center once we run setup.exe file.
4. Click on the "Maintenance" tab and then click on the “Edition Upgrade” option.
5. Once we click on Edition upgrade, we will have a screen to enter the product key of SQL Server.
6. Verify the correct product key and click on Next to proceed.
7. Then we will get a pop-up "Evaluation period has expired".
Click OK to proceed.
8. Next will be to accept the License Terms.
Click Next after selecting the "I accept license terms" checkbox.
9. Verify the SQL Server instance and click Next to proceed.
Now the edition will show as Evaluation.
10. Once we click Next, rules will be checked by the setup and we can see the progress bar.
The final window is to recheck and verify the details. Once done, click on the "Upgrade" button to start the upgrade.
Eventually, the process will end up with a new upgraded edition.
We activate SQL Server to run it on our server and it upgrades the Enterprise edition.
In addition, we can check the new edition by launching the property window of the SQL Server service in the SQL Server Configuration window.
Now we can go ahead and launch SQL Server Management Studio and establish a database connection to check all details to ensure everything is perfect on the database server.
[Need help with fixing SQL errors? We are available 24*7. ]
Conclusion
This article covers method to resolve SQL Error 17051.
This SQL error sometimes happens when the SQL Server Evaluation period has expired.
To fix Microsoft SQL Server Management Studio error:
1. Now as per the error message you open the Event Viewer and see that the Event with ID 17051, which shows SQL Server Evaluation period has expired under Details section.
2. Now, you recall that the Instance that you had installed was under Evaluation of 180 days, because you didn’t applied any Product Key. So, now how can you make it live again? All you need is a Product key of SQL Server and some clicks.
3. Open the SQL Server Installation Center and click on Maintenance link, and then click on Edition Upgrade.
4. Now on the Upgrade window Click Next and you will reach the Product Key page, apply the Key and click Next.
5. On the Select Instance page, select the SQL Instance that you want to fix and Click next. It will take some time and finally you will see a final window and click Upgrade.
6. Finally you will see the successful window, click on Close button.
Also, you can use following command line installation option to skip this specific rule to allow the upgrade process to complete successfully:
a) Open Command Prompt (CMD)
b) Go to the folder where SQL Server Setup, setup.exe file is located (like C:\Program Files\Microsoft SQL Server\110\Setup Bootstrap\SQLServer2012\)
c) Apply following command:
setup.exe /q /ACTION=editionupgrade /InstanceName=MSSQLSERVER /PID=<appropriatePid> /SkipRules= Engine_SqlEngineHealthCheckThe <appropriatePid> should be the 25 digit Key.
The above command line runs SQL Server setup in silent mode.
Now Restart the SQL Server Service for this Instance, and you will see it running fine.
Finally, go back to SSMS and now you can connect to the SQL Instance.