Need to install Puppet on CentOS 7? This guide will show you how.
Puppet is a great DevOps programs for managing multiple servers.
Here at Ibmi Media, as part of our Server Management Services, we regularly help our customers to perform Software Installation on their CentOS Servers.
Today, you will learn how to install Puppet on CentOS 7.
More information about Puppet?
Puppet is an open-source Server automation framework and application.
In a more clearer sense, Puppet is an automated administrative engine for your Linux, Unix, and Windows systems, which helps to automate the performance of administrative tasks (such as adding users, installing packages, and updating server configurations) based on a centralized specification.
Basically, it helps users to Spend less time on manual tasks.
Steps to install Puppet on CentOS 7?
To install Puppet, follow the following steps;
1. System Preparation.
To begin, make some installation and configuration on both the Servers puppet master and pupper agent.
Start by logging into your Server as a root user and configure the hosts of your server.
Run the command below to edit the "/etc/hosts" file;
vim /etc/hostsThen, add the following lines to the file;
10.0.15.15 master.ibmimedia.com
10.0.15.16 agent.ibmimedia.com
After which you can save and exit the file.
Now you can test the configuration by running the ping command as shown below;
ping master.ibmimedia.com
ping agent.ibmimedia.com
The output will show that the Server IP addresses resolving to the master and agent domain according to the hosts configuration.
2. NTP Server configuration
To ensure that the time between the Master and agent server is in synchronized state, install the NTP packages on both servers by running the command below;
yum -y install ntp ntpdateNext, choose the NTP pool by running the command below;
sudo ntpdate 0.centos.pool.ntp.orgNow you can start the NTP services to start on boot. Run the commands below to do this;
sudo systemctl start ntpd
sudo systemctl enable ntpd
This will compete NTP installation and configuration.
3. How to Disable SELinux
Here, edit SELinux configuration file "/etc/sysconfig/selinux" by running the command below;
vim /etc/sysconfig/selinuxIn this file, change the line;
SELINUX=enforcingto;
SELINUX=disabledNow save and exit this file.
4. Adding Puppet Repository
To add puppet repository to the system, run the rpm command below;
rpm -Uvh https://yum.puppetlabs.com/puppet5/puppet5-release-el-7.noarch.rpmThen reboot the servers with the command below;
reboot5. Puppetserver Installation and Configuration
To install Puppetserver on the "master.ibmimedia.com" server, run the yum command below;
sudo yum -y install puppetserverAfter the installation process is completed, it needs to be configured.
Start with configuring the memory allocation for puppetserver. In this instance, we shall set the max memory allocation to 1GB. Then edit puppetserver configuration by running the command below;
vim /etc/sysconfig/puppetserverIn this file, modify the line as shown below;
JAVA_ARGS=”-Xms1g -Xmx1g ….”Then save and close this file.
Next, go to the puppet configuration directory and modify the "puppet.conf" file with the following commands;
cd /etc/puppetlabs/puppet
vim puppet.conf
In here, you can add the following configuration as shown below;
[master]
dns_alt_names=master.ibmimedia.com,puppet
[main]
certname = master.ibmimedia.com
server = master.ibmimedia.com
environment = production
runinterval = 1h
Then save and exit this file.
Next, start and enable the puppetserver to start on boot by running the commands below;
systemctl start puppetserver
systemctl enable puppetserver
Now, Puppetserver installation and configuration will be completed.
6. Firewall implementation
If your system is using firewalld, you can add puppetserver port "8140" to the list by running the firewall-cmd command shown below;
firewall-cmd –add-port=8140/tcp –permanent
firewall-cmd –reload
7. Puppet Agent Installation and Configuration
To install puppet agent on the "agent.ibmimedia.com" server, run the command below;
yum install -y puppet-agentAfter the installation process, go to the "/etc/puppetlabs/puppet" directory and edit the "puppet.conf" file by running the commands below;
cd /etc/puppetlabs/puppet
vim puppet.conf
Then add the following details to the file;
[main]
certname = agent.ibmimedia.com
server = master.ibmimedia.com
environment = production
runinterval = 1h
Now save and exit this file.
Next, register the puppet agent to the puppet master. To do this run the following command on the puppet agent shell;
/opt/puppetlabs/bin/puppet resource service puppet ensure=running enable=trueNow, the puppet agent will be up and running on the server.
Next, go to the puppet master shell and run the command below;
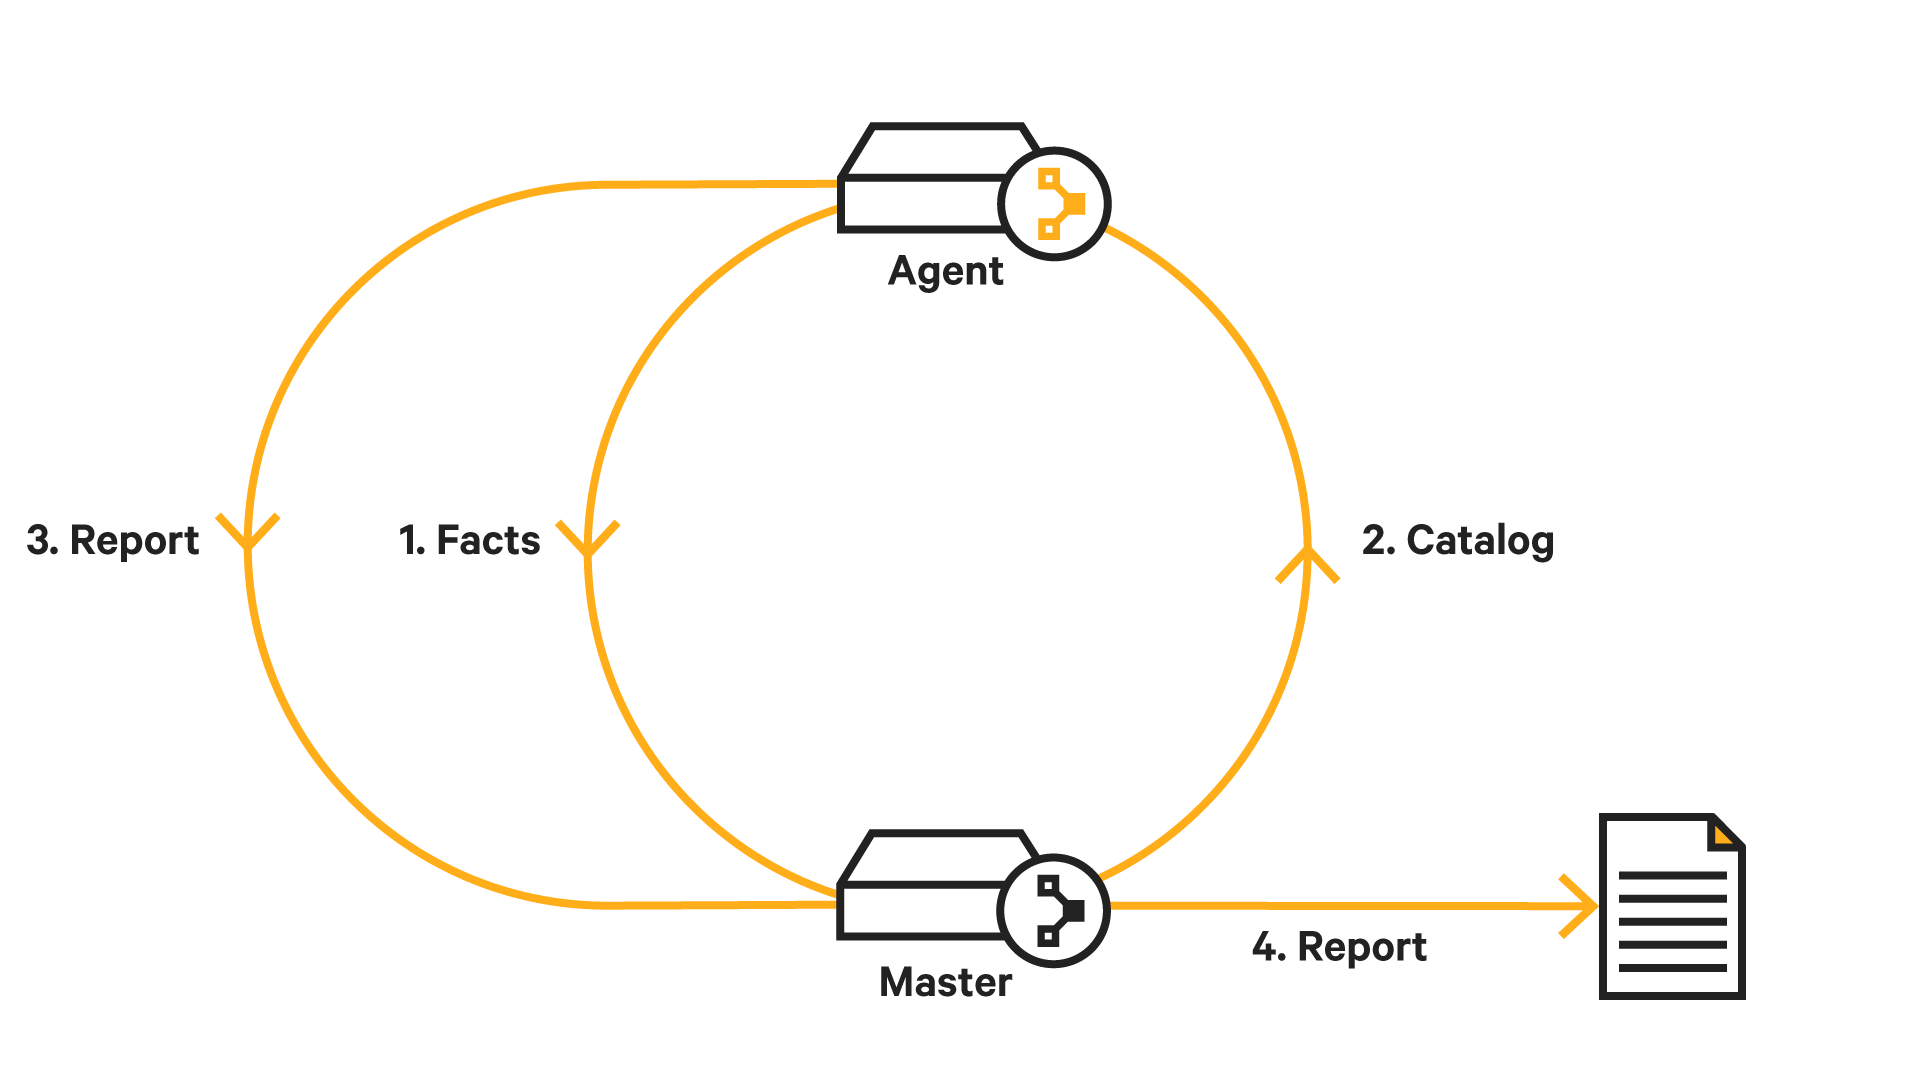
/opt/puppetlabs/bin/puppet cert listThis will output the pending Certificate Signing Request (CSR) from the puppet agent server "agent.ibmimedia.com".
Next run the command to sign the certificate;
/opt/puppetlabs/bin/puppet cert sign agent.ibmimedia.com8. Testing the Puppet Agent Configuration
To verify the Puppet Agent Configuration, run the command below;
/opt/puppetlabs/bin/puppet agent –testNow you will get an output like this;
The Puppet agent pulled the configuration from the puppet master and applied it to the server without any error.9. How to create the first Manifest?
For the purpose of testing, we will create a simple manifest.
Navigate to the directory "/etc/puppetlabs/code/" and create a new manifest file named "site.pp". This should be done on the puppet master server. Run the following commands;
cd /etc/puppetlabs/code/
cd environments/production/manifests
Then, create the new manifest file with the command;
vim site.ppInside this file, enter the following configuration;
node ‘agent.ibmimedia.com’ {
package { ‘httpd’:
ensure => “installed”,
}
service { ‘httpd’:
ensure => running,
enable => true
}
}
Now save and exit this file.
To open the puppet agent server shell, run the command shown below;
/opt/puppetlabs/bin/puppet agent –testWhat this command does is to retrieve a new manifest configuration file from the puppet master and then apply it to the agent server.
Now you can access the puppet agent via a web browser by typing its IP address as shown below;
http://10.0.15.16/This will display a default HTTP page.
Need support in performing CentOS Installations and tasks? We are available to help you today.
Conclusion
This article will guide you through the steps you need to follow to get Puppet installed and configured on CentOS 7 Machine.
This article will guide you through the steps you need to follow to get Puppet installed and configured on CentOS 7 Machine.
Related Post