Are you trying to install KVM on CentOS 7? This guide will help you all the way!
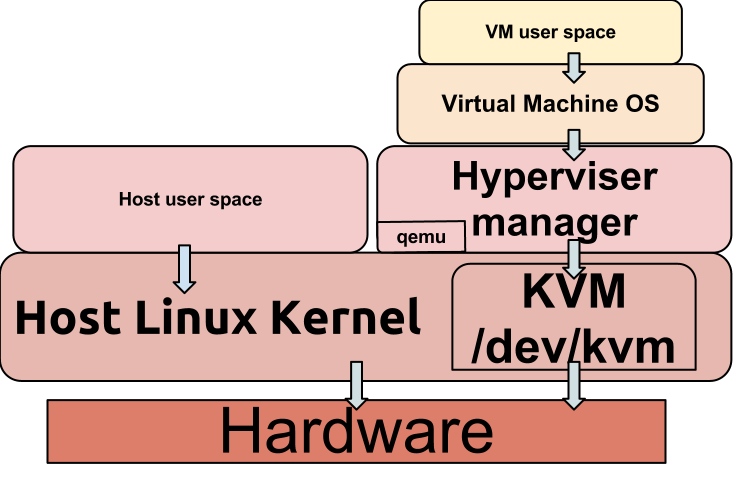
Kernel-based Virtual Machine (KVM) is an open source virtualization technology built into Linux®.
Here at Ibmi Media, as part of our Server Management Services, we regularly help our customers to perform Software Installation tasks on their servers.
Today, we shall look into how to install KVM on CentOS 7.
More information about KVM.
KVM is an abbreviation of Kernel-based Virtual Machine. It helps to transform Linux into a hypervisor that allows a host machine to run multiple, isolated virtual environments called guests or virtual machines (VMs).
As a solution for virtualization, KVM is embedded directly in the Linux kernel, which does not concede any other solutions in functionality and succeeds them in usability.
KVM's system supports all major operating systems including Linux and Windows.
Steps to follow to install KVM on CentOS 7?
Follow the following steps to install and configure KVM.
i. KVM Installation on CentOS 7
To install KVM, simply run the commands below;
yum -y install epel-release
yum -y install qemu-kvm qemu-img virt-manager libvirt libvirt-python libvirt-client virt-install virt-viewer bridge-utils
ii. How to start libvirtd on CentOS 7?
You can start Libvirt utilities such as Virt Manager by running the commands below;
systemctl enable libvirtd
systemctl start libvirtd
systemctl status libvirtd
This will enable the libvirtd service to start automatically on boot.
iii. How to verify KVM installation on CentOS 7?
Now, verify the installation by running the command below;
lsmod | grep -i kvmThis will display the output as shown below;
kvm_intel 139116 4
kvm 388635 1 kvm_intel
iv. How to configure Bridge Interface on CentOS?
Before creating virtual machines (VMs), you need to create the bridge interface first. Here, if the virtual machines is to be accessed from outside of your hypervisor network, then the bridge interface will be required. To do this, run the commands below;
cd /etc/sysconfig/network-scripts/
cp ifcfg-eno16777736 ifcfg-br0
Then also run the command as shown below;
vim ifcfg-eno16777736The file will look like this;
TYPE=Ethernet
BOOTPROTO=static
DEVICE=ifcfg-eno16777736
ONBOOT=yes
BRIDGE=br0
Next, modify the bridge file, "ifcfg-br0" and assign the following details as follows;
vim ifcfg-br0The file will look like this;
TYPE=Bridge
BOOTPROTO=static
DEVICE=br0
ONBOOT=yes
IPADDR=192.168.100.21
NETMASK=255.255.255.0
GATEWAY=192.168.100.1
DNS1=192.168.100.11
Now, replace the IP address and DNS server information according to your setup. Then enable the bridge interface by restarting the network services. To do this, run the command below;
systemctl restart networkTo check the Bridge interface, run the command below;
ip addr show br0Need support in fixing CentOS Server issues? We are available to help you today.
Conclusion
This article will guide you through the process of installing kernel-based virtual machine (KVM) on your CentOS 7 machine.
This article will guide you through the process of installing kernel-based virtual machine (KVM) on your CentOS 7 machine.
Related Post