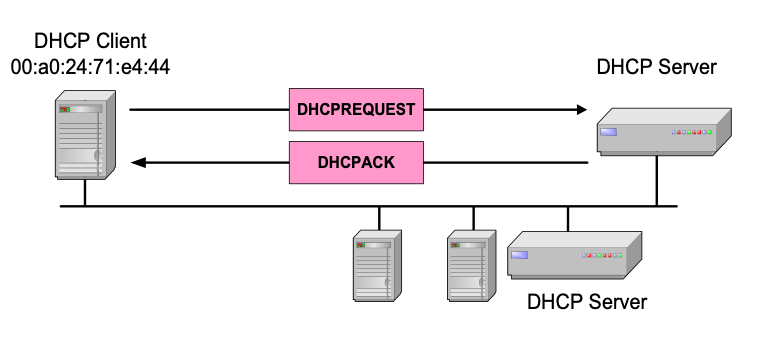
A DHCP server is responsible for giving IP addresses and other networking configuration parameters to devices on a network in a dynamic way. Its aim is to enable communication with other IP address on other networks.
Here at Ibmi Media, as part of our Server Support Services, we regularly help our customers to perform DHCP related tasks.
In this context, we shall look into the process of installing DHCP server on Windows server 2019.
Steps to install DHCP server on Windows server 2019?
To install DHCP server on Windows server 2019, you need to follow the following steps accordingly;
1. Roles and Features addition from the Server Manager.
Start by accessing the "Server Manager" to begin the process of Installation. To do this, click on the button "Windows" and then enter in "Server Manager" followed by selecting the app which you will see.
Now, you can click on "Add Roles and Features" in the "Server Manager" window. This will display a pop-up window where you have to click on the "Next" button to continue.
2. Installing Role-Based or Feature-Based
In the next page, you will see where you can choose the "Role-Based" or "Feature-Based" installation radio button followed by clicking "Next" button to proceed.
3. Choosing Host and Selecting Server Roles.
In the new page, you have to choose the server where DHCP Server will be installed on which will server as the Host. In our case, we choosed the local server. Next, click "Next".
This will open a new page with the title "Select Server Roles" where you will see a list of roles to install. Now choose the "DHCP Server".
4. Adding Features and Confirming Selections
After choosing "DHCP Server" as per the previous step, a new pop-up window will come up with the title "Add features that are required for DHCP Server?". In this case, click on "Add Features" followed by clicking "Next".
Now a new page with title "DHCP Server" will appear and click on "Next" to continue.
Next, a page will come up with title "Confirm installation selections" where you can see the list provided. Now confirm the DHCP Server and other options listed. Then click "Install" and wait for the installation to go through. After the installation process, click on "Close" to continue.
5. Post Deployment Configuration of DHCP
This will be done in three phases as shown below;
i. Phase One
Begin by opening the Server Manager where you need to find the option "DHCP" located at the left pane of the window. Next, you will see a yellow marked warning which says "Configuration required for DHCP Server at ...". Now, click on the link "More" at the end of the Warning statement.
ii. Phase two
After the first phase, a new window will be displayed with the title "All Server Task Details and Notifications". Below this, you will see the line "Post-deployment Configuration". Next, click on "Complete DHCP Configuration" at the end of the line. Now you will see the installation wizard where you should click "Next" to proceed.
iii. Phase three
On the Wizard page, you will see three options. You can continue with the Administrator’s credentials, an alternate user's credentials, and also AD Authorization. If working with a standalone server which is not in any Active Directory Domain, you can choose "skip AD authorization" radio button. Next, you can save your selection by clicking on "Commit". Allow the process to finish and once done, click on "Close" to exit.
6. DHCP Server Configuration
Now, navigate to the Server Manager where you should click on "Tools". Next select "DHCP" which will open the DHCP Configuration Window.
7. Choosing New Scope and Giving it a name
Now from the left pane of the window, click on the drop-down and make a right-click on "IPv4". Then choose "New Scope" to open a new Wizard window. Here a new scope wizard window will pop up where you should click "Next". Now give it a name as well as its description accordingly. After which you should click on "Next" to continue.
8. Entering the desired IP address range
Now enter the start and end IP addresses, Length as well as the Subnet Mask. Next, click on "Next" to continue.
9. Excluding IP addresses.
If you wish to exclude any IPs in the range specified for devices such as printer or other equipment, you can easily add them.
10. Setting Lease Duration and other DHCP options
The Lease duration is the period of time which DHCP Server will give a specific computer an IP before changing it or issuing another one when logged in again. Here you can set the value and click on "Next". This will lead you to the next page where you should click on "Next" to continue.
11. Setting the default Gateway of the Subnet
Here you can key in the default Gateway which the clients will be assigning during lease time. Then click on "Add" beside it and click on "Next" to proceed.
12. Entering the DNS and Domain Name
To enable resolving of the FQDN to IP addresses, a DNS configuration is necessary. You can set it and then click on "Next" to proceed.
13. Setting WINS Server (Optional)
Sometimes you might need to use the WINS Server in your environment. If so, then enter in the details and continue by clicking on "Next".
14. Activating Scope and Completing the Scope Configuration
To activate the scope already configured, simply click on "Next" in this step. To activate it at a later time click on the second radio option available.
Now the configuration of DHCP Server is complete. In cases where you have segmented your LAN/Network into VLANS, you can create other scopes for the VLANS. Additionally, configure your router in order to get IPs from the DHCP Server as it should be.
15. Confirming is Scope is available as configured
Here you can check the configuration status of the SCOPE via your DHCP Configuration.
16. How to configure DHCP Client on Windows?
After the configuration of DHCP Server on Windows, you can now configure DHCP client for the Windows Machine in order to obtain an IP address from DHCP Server.
TO achieve this, follow the steps below to configure client on Windows;
i. On the Same Network
Make sure that the client and Server are on the same network to enable they can connect with each other. Then proceed with configuring the windows client to obtain IP address automatically.
ii. Via Network Settings
To do this, simply go to your taskbar and click on the Network icon and choose "Network & Internet Settings". Now, a pop-up window will be displayed on the "Settings" window. Here, choose "Ethernet" on the left pane of the window. Next, on the right pane below "Related Settings", choose "Change Adaptor Options". Now a window with your Adaptors will pop up. Right-click the right Adaptor and choose "Properties". A new window will pop up.
Now on the new window, click on "Internet Protocol Version 4", and then click on "properties". Once again, on the new pop-up window, leave everything as it is, and click "OK" to complete.
iii. Via Command Prompt
Here, you can open your command prompt and invoke the command to "ask" to get a new IP from the DHCP Server.
iv. Confirming Leases from DHCP Server
To end, confirm that you are receiving our IPs from the DHCP Server configured, open up the DHCP Server Manager in the Server, and check on the leases.
Need support in setting up DHCP Server on your machine? We are available to help you today.
Conclusion
Are you trying to install DHCP server on Windows server 2019? Here is a step by step guide to do it.
Are you trying to install DHCP server on Windows server 2019? Here is a step by step guide to do it.