Once you start with the websites, you might encounter different types of issues in the near time. Developing troubleshooting skills comes in handy to resolve such issues for a healthy website. Similarly, getting issues on WordPress sites is not a surprise. While browsing WordPress sites, there might be showing errors like "Error establishing a database connection". It is difficult for a programmer, developer, or regular user to know the exact issue with these details.
To resolve such issues, getting the details on the issue comes in handy. For that, there are debugging methods for WordPress sites. It results in the details of the issue with the related logs which helps to resolve it quickly. Using a plugin is also a way to resolve the issues.
Here at Ibmi Media, as part of our Server Management Services, we regularly help our Customers to perform related WordPress configuration queries.
In this context, we shall look into the WordPress debug mode and enable it on WordPress to get details of errors, which further helps to resolve the issue.
About WordPress Debug Mode
In WordPress, you might like a new theme and install it that might not be compatible and conflict with other tools. Other cases such as changing database user, user password, database name might be wrong on the configuration file "wp-config.php". So there might be any error that causes the error on the core PHP of the WordPress site.
Sometimes, your website might show the error as "Error establishing a database connection".
Here, there might be any error which needs to be found to resolve the issue. Here comes the debug Mode, that helps to find the error logs to resolve the issue at the earliest for a healthy site.
How to enable the WordPress Debug Mode ?
Here, you are going to learn the different methods to enable the WordPress debug mode which will display the error logs to resolve the issue. One of the methods is to change the configuration manually or you can use a plugin which will automatically add the code on the configuration file.
1. Installing a Plugin
- To enable the debug automatically, you can install the plugin by searching "WP Debugging" on the plugin section of the WordPress admin dashboard.
- Next, Install and activate the plugin.
- Then go to the tools section, you can find WP Debugging there. Tick "Set WP_DEBUG to true" to enable the debugging.
- This will display the errors on the site. As it might confuse the other users, you want to hide the errors on the site by ticking "Set WP_DEBUG_DISPLAY to false, default is true".
- It will create a file "debug.log" where you can check the errors.
- After resolving the issue, deactivate the plugin so the website can run smoothly with the provided contents.
2. How to manually enable the Debugging Mode ?
Most programmers or developers like to manually enable the debug mode by editing the configuration file "wp-config.php". It is located in a public folder where all the site contents are available such as /var/www/html/test.com.
- Now open the configuration file "wp-config.php" where you can add the line of code for the debugging. Be default, you can find the code line just above the line "/* That's all, stop editing! Happy publishing. */ .
- You can edit the file by adding the code line "define( 'WP_DEBUG', true );" to enable the debugging
- As soon as you add that line, all the PHP errors and vulnerabilities will be displayed on the website.
- While browsing the website, it might confuse the other users. So you want to hide the errors on the site by adding the other two lines of code. One of which will create a file containing the errors details on the wp-content directory and other code will stop displaying the errors on the site. Such line of codes are :
- To create a file containing the errors details on the wp-content directory:
- define( 'WP_DEBUG_LOG', true );
- To stop displaying the errors on the site:
- define( 'WP_DEBUG_DISPLAY', false );
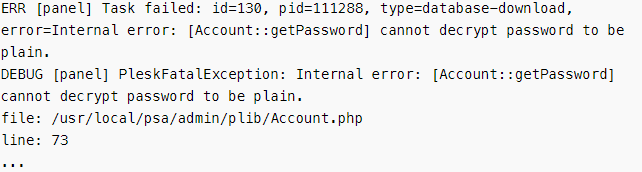
- Go to the wp-content directory, and run the cat command to display the errors on the debug.log file.
- After the issue gets resolved, set "'WP_DEBUG', false" or remove those lines of code added for the debugging purpose.
[Need help to fix WordPress configuration issues ? We can help you. ]
Conclusion
This article covers the procedure of debugging a WordPress site to enable you easily detect the errors and resolve the issue as soon as possible. In fact, WordPress provides a debug tool to help discover what may be the cause of an error on your website. This tool can display information on your live website. You can then check that log file to determine the cause of the issue you're attempting to resolve.
This article covers the procedure of debugging a WordPress site to enable you easily detect the errors and resolve the issue as soon as possible. In fact, WordPress provides a debug tool to help discover what may be the cause of an error on your website. This tool can display information on your live website. You can then check that log file to determine the cause of the issue you're attempting to resolve.


