Some Outlook users might run into issues when adding new email accounts to Outlook.
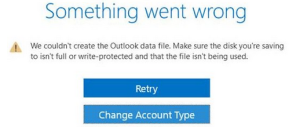
One of these errors prevents you from adding an account to Outlook and returns the "We couldn't create the Outlook data file" message.
Here at Ibmi Media, as part of our Server Management Services, we regularly help our Customers to resolve related Outlook errors.
In this context, we shall look into methods to resolve this Outlook error.
Nature of Outlook error "We Couldn't Create The Outlook Data File"
As earlier mentioned, Outlook users are experiencing an issue where they cannot add a new email to Outlook.
Generally, We will see a "We couldn't create the outlook data file" error every time we try to add an email.
The main causes of this error includes:
1. Outlook bug: The most common cause of this error is a bug in the Microsoft Outlook. This bug prevents users from adding an account from the Add account option. We will see this error only if we click File and select Add account option. So a simple solution is to use another way of adding our account.
2. Simplifies Account Creation Wizard: This comes up on the start of Outlook, then that can cause this issue as well. This wizard is a newly added feature and it had bugs as well. Disabling the Simplified Account Creation Wizard resolves the issue in this case.
3. Gmail account: The error seems to only occur when we are trying to add a Gmail account to Outlook.
The exact cause of this is unknown, however, it might have something to do with Gmail’s security options.
How to fix Outlook error "We Couldn't Create The Outlook Data File" ?
1. Check whether hard disk is full
To check available hard disk space, by following the steps given below:
i. Initially, open the File Explorer from taskbar.
ii. Next, click on This PC from the left side menu.
iii. Finally, under Devices and drives, we can see all our currently attached hard disks.
Check how much space is available on each by reading the text below them.
If the hard disk is full, we can make some space on hard disk in a number of different ways:
i. Run the Disk Cleanup tool.
ii. Delete Windows cache.
iii. Download and run CCleaner.
iv. Uninstall applications we do not need or use.
2. Remove Write Protection from a Hard Disk
One of the easiest ways of removing write protection from a disk is by using the Diskpart utility:
i. Firstly, type diskpart in Run prompt and press OK.
ii. Later, type in the following command and press Enter after each one:
list disk
select disk (number)
attributes disk clear read-only
iii. . Once the Diskpart utility finished clearing the Read-only protection, we can type in exit and hit Enter to close the command prompt.
3. Use Manage Profiles
Since the problem is most likely caused by a bug in the Microsoft Outlook that prevents us from adding an account via the Add Account option, we can try using the alternative way of adding the account.
So, follow the steps given below to add a new account through the manage profiles process:
i. Open Outlook.
ii. Then, click File from the top left corner.
iii. Next, click Account settings. A new drop-down menu should appear.
iv. Next, select Manage Profiles. Confirm any additional prompts.
v. Then, lose Outlook to make sure Outlook is not blocking any changes.
vi. Then, a new dialogue box should appear. Select Email accounts.
vii. Finally, click New.
Now, select the appropriate options and add in email account from here. Everything should work fine once we are done.
4. Using Mail Option (Alternative to Method 1)
This is an alternative option of the method 1. If for some reason, we do not want to use Outlook to add the email account, then we can use the Mail option from the Control Panel as well.
i. Firstly, type “control panel” in Run prompt and press Enter.
ii. Then, click Small icons from the drop-down menu from View By option.
iii. Next, click Mail.
iv. Next, select Outlook profile and click OK.
v. Then, a new dialogue box should appear. Select Email accounts.
vi. Finally, click New.
Now, select the appropriate options and add in email account from here.
5. Disable Simplified Account Creation
Disabling this simplified account creation will replace it with the regular account creation wizard which might solve the issue. We can easily disable the Simplified Account Creation via the Registry editor.
Follow the steps given below:
i. Firstly, ype regedit in Run prompt and press Enter.
ii. Now, navigate to the following path using the left navigation pane:
HKEY_CURRENT_USER\SOFTWARE\Microsoft\Office\16.0\Outlook\setup
iii. Locate and click setup from the left pane.
iv. Then, right click on an empty space from the right pane, select New and then select DWORD (32-bit) Value.
v. Next, name the newly created entry as DisableOffice365SimplifiedAccountCreation and press Enter.
vi. Now, double click the newly created key and make sure it has 1 as its value.
vii. Finally, click OK.
Close the registry editor and try to add the account again.
[Still Stuck with this Outlook error? We are here for you. ]
Conclusion
This article covers different methods to fix the Outlook error 'We Couldn't Create The Outlook Data File'.
Main Causes of 'We couldn't create Outlook Data File' error:
This error is fairly well known among Outlook users, so people have found possible causes that led to this error happening.
1. Gmail account: The error seems to only occur when you’re trying to add a Gmail account to Outlook. The exact cause of this is unknown, however, it might have something to do with Gmail’s security options.
2. Outlook bug: A common cause of this issue is a bug within Outlook itself. The bug prevents you from adding an email account via the Add account option.
3. Simplified Account Creation Wizard: This is a relatively new Outlook feature. Generally, whenever a new feature is added to an application, it's bound to cause errors and bugs.
How to Remove Outlook Write Protection from a Hard Disk ?
One of the easiest ways of removing write protection from a disk is by using the Diskpart utility:
1. Hold the Windows and R keys down on your keyboard at the same time.
2. Type in diskpart and press OK.
3. Type in the following command and press Enter after each one:
i. list disk
ii. select disk (number)
iii. For example, if your Drive 1 is protected, you're going to type in select disk 1.
attributes disk clear read-only
4. Once the Diskpart utility finished clearing the Read-only protection, you can type in exit and hit Enter to close the command prompt.