USB device passthrough to Hyper-V - How to get this done
This article covers how to perform Hyper-V USB Passthrough. A USB passthrough is referenced when a keyboard has female USB ports for other devices to be plugged into the keyboard. USB passthroughs requires more than one USB port to be used by the keyboard in order to pass the USB through to the PC, often requiring an additional connection to the host system for powered ports.
What does Hyper-V USB passthrough Mean?
Hyper-V USB passthrough functionality allows you to access the USB device from within a virtual machine. There is a way to enable USB passthrough on Hyper-V for a memory stick, but you’ll have to use Windows storage subsystem.
Known issues with Hyper-V USB device passthrough organized with native methods:
1. Platform restrictions: said methods rely upon Windows storage subsystem so using them to set up Hyper-V USB passthrough on Linux (or any other OS that’s not Windows) is out of question, sadly.
2. An extremely limited list of supported devices: for the native methods to work, your USB peripheral must be recognized as a “Mass Storage Device”. No exceptions.
3. No sharing: once your device is set in passthrough mode, you can access it only from the guest OS. That’s why using these methods to permanently connect a USB to Hyper-V is definitely not the best idea.
4. Poor choice for a cloud: with these methods, the USB device is always locked to a specific host PC while there's no way to anchor a cloud-based Hyper-V guest system or preestimate where it's going to run for your next session.
Advantages of using RDP for Hyper-V USB passthrough:
1. Works for literally any hypervisor you can name;
2. Instant access to USB devices, once RDP connection is up;
3. Group Policy feature for overall control;
4. All USB devices plugged into your host PC are accessible from a virtual machine.
To enable USB device in Hyper-V with the Enhanced Session Mode:
1. On a host computer, you go to the Hyper-V Manager, right-click the name of the host and choose Hyper-V Settings.
2. In the Setting window, you will see the Server and User sections. Select Enhanced Session Mode Policy in the Server section and allow the enhanced session mode by checking the corresponding box.
3. Now, choose "Enhanced Session Mode" in the User section and check the “Use enhanced session mode” box.
4. Click OK and the changes will be saved.
To allow Hyper-V access to attached USB devices:
1. Start the Hyper-V Manager and double-click the name of your virtual machine.
2. In the pop-up window, click “Show Options” to configure your VM’s future connections.
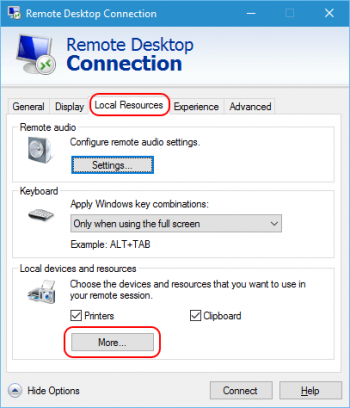
3. After that, go to the tab “Local resources” and click “More” in the section “Local devices and resources”.
4. Then, check the boxes “Other supported Plug and Play devices” and “Devices that I plug in later”. Hit OK.
5. If you want this configuration to be saved for all future connections, check the corresponding box in the “Display” tab. Click “Connect” to implement the changes.

Recover orphan innodb database from ibd file - How to perform this task
This article covers how to recover the orphan InnoDB database from the ibd file.
Orphan InnoDB database incident mostly happened when:
1 – user accidentally remove ibdata1 file. (mostly in /var/lib/mysql/ibdata1).
2 – ibdata file courrupted.
To Recover Orphaned InnoDB Tables:
1. Restart the MySQL service to recreate ibdata1, then take a backup of your database folder.
2. Login to MySQL.
3. Create a dummy database with the same name. Then, create a dummy table with the same name as the corrupted one (don’t mind the table structure for now).
4. Stop the MySQL service, copy the .frm file from the backup you took to replace the .frm file.
5. Start MySQL and have a look at the structure of your table - it should now be in place! However, don’t get too happy yet.
6. Issue a SHOW CREATE TABLE statement and copy its contents, then create the table with them.
7. Stop MySQL, copy the .ibd file from the backup directory to /var/lib/database_name and replace the existing .ibd file from the dummy table.
8. Now it’s time for Percona’s tools to shine - download and install the Percona Data Recovery Tool for InnoDB , then run the following (here -o represents the full location of your ibdata1 file, -f represents the full location of your .ibd file, -d represents the database name and -t represents your table name):
ibdconnect -o /var/lib/mysql/ibdata1 -f /var/lib/mysql/database_name/table_name.ibd -d database_name -t table_name9. Now, run a checksum check against InnoDB - make sure you get no error messages (you might need to run this tool several times):
innochecksum /var/lib/mysql/ibdata110. Finally, you should be good to go - simply start MySQL.
Remove Nginx on linux in Vesta control panel - Step by Step process to do it
This article covers how to remove Nginx on Linux in the Vesta control panel.
Vesta control panel (VestaCP) is an open source hosting control panel, which can be used to manage multiple websites, create and manage email accounts, FTP accounts, and MySQL databases, manage DNS records and more.
To uninstall VestaCP on CentOS, follow the steps below:
1. Connect to your server via SSH as root
2. Stop the Vesta service with service vesta stop:
$ service vesta stop 3. Delete Vesta packages/software repository:
# yum remove vesta*and
# rm -f /etc/yum.repos.d/vesta.repo4. You may also want to remove /usr/local/vesta folder:
# rm -rf vesta5. Now we have to remove the cron jobs for the user admin.
Let's list first the cron jobs:
# crontab -u admin -l
MAILTO=admin@ibmimedia.com
CONTENT_TYPE="text/plain; charset=utf-8"
15 02 * * * sudo /usr/local/vesta/bin/v-update-sys-queue disk
10 00 * * * sudo /usr/local/vesta/bin/v-update-sys-queue traffic
30 03 * * * sudo /usr/local/vesta/bin/v-update-sys-queue webstats
*/5 * * * * sudo /usr/local/vesta/bin/v-update-sys-queue backup
10 05 * * * sudo /usr/local/vesta/bin/v-backup-users
20 00 * * * sudo /usr/local/vesta/bin/v-update-user-stats
*/5 * * * * sudo /usr/local/vesta/bin/v-update-sys-rrd
40 2 * * * sudo /usr/local/vesta/bin/v-update-sys-vesta-all
03 3 * * * sudo /usr/local/vesta/bin/v-update-letsencrypt-ssl
6. Remove the cron jobs via crontab -u admin -e:
# crontab -u admin -e7. Save and exit:

DirectAdmin User too large delete on background - Methods to resolve this error
This article covers method to fix the error, DirectAdmin: User too large delete on background. Basically, this error occurs when the sum of the disk usage of any user exceeds a certain threshold.
To prevent time-outs in your browser when deleting excessively large accounts, DirectAdmin will execute the deletion by adding the command to the background’s task.queue, instead of performing the execution on the foreground.
To fix DirectAdmin: User too large delete on background error, you can connect to the server through SSH using root access, then go to DirectAdmin's installed directory as below:
cd /usr/local/directadmin/conf/
Then edit the directadmin.conf file in the directory by running
vi directadmin.conf
If the variable "get_background_delete_size" value exists in the directadmin.conf file, it will be set to 10 GB by default (get_background_delete_size=10240).
If the variable cannot be found in the file, simply add it in.
You can modify the value of 10240 to define the value that you wish to set.

Best Ubuntu APT Repository Mirror - How to get it
This article covers methods to find the best APT mirror on the Ubuntu server.
To Find Best Ubuntu APT Repository Mirror Using Apt-smart:
Apt-smart is yet another command line tool written in Python. It helps you to find APT mirrors that provides best download rate for your location. It can smartly retrieve the mirrors by querying the Debian mirror list, Ubuntu mirror list and Linux mint mirror list and choose best mirror based on the country in which the user lives in. The discovered mirrors are ranked by bandwidth and their status (like up-to-date, 3-hours-behind, one-week-behind etc).
Another notable feature of Apt-smart is it will automatically switch to any other different mirrors when the current mirror is being updated. The new mirrors can be selected either automatically or manually by the user. Good thing is Apt-smart will backup the current sources.list before updating it with new mirrors.
To Install Apt-smart in Ubuntu:
Make sure you have installed Pip and run the following commands one by one to install Apt-smart:
$ pip3 install --user apt-smart
$ echo "export PATH=\$(python3 -c 'import site; print(site.USER_BASE + \"/bin\")'):\$PATH" >> ~/.bashrc
$ source ~/.bashrc
To List all mirrors based on rank:
To list all available ranked mirrors in the terminal, run:
$ apt-smart --list-mirrorsOr,
$ apt-smart -lTo Automatically update mirrors:
Instead of manually finding and updating the best mirror in Ubuntu, you can let Apt-smart to choose a best Apt mirror and automatically update the sources.list with new one like below:
$ apt-smart --auto-change-mirrorTo get help, run:
$ apt-smart --help

Amazon Redshift - Its features and how to set it up
This article covers an effective method to set up Amazon Redshift. Amazon Redshift is a fully managed, petabyte-scale data warehouse service in the cloud. This enables you to use your data to acquire new insights for your business and customers. The first step to create a data warehouse is to launch a set of nodes, called an Amazon Redshift cluster.
Amazon Redshift is a relational database management system (RDBMS), so it is compatible with other RDBMS applications. Amazon Redshift and PostgreSQL have a number of very important differences that you need to take into account as you design and develop your data warehouse applications.
Amazon Redshift is based on PostgreSQL.
Amazon Redshift is specifically designed for online analytic processing (OLAP) and business intelligence (BI) applications, which require complex queries against large datasets.
What is the difference between Amazon Redshift and Amazon Redshift Spectrum and Amazon Aurora?
Amazon Simple Storage Service (Amazon S3) is a service for storing objects, and Amazon Redshift Spectrum enables you to run Amazon Redshift SQL queries against exabytes of data in Amazon S3.
Both Amazon Redshift and Amazon RDS enable you to run traditional relational databases in the cloud while offloading database administration.
Customers use Amazon RDS databases primarily for online-transaction processing (OLTP) workload while Redshift is used primarily for reporting and analytics.


