Configuration verification failed in Nagios - Fix it Now
This article covers fixes to this Nagios Configuration failed problem.
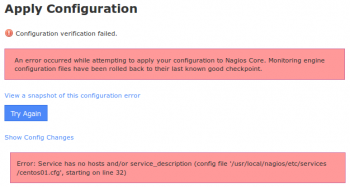
When you click the Show Errors link a message is shown that indicates the problem in the config files along with a line number for the config file. However when looking at the config file in a text editor, the line number does not appear to relate to the problem.
The Apply Configuration process is as follows:
i. New config files are temporarily written to disk
ii. Nagios verifies the config files are valid
iii. Temporary config files are made permanent
iv. Nagios service is restarted
When the verification step fails, the temporary files are discarded. Hence when you go to look at the file to look at the line number it references it is not valid as the temporary files now longer exist.
To fix Nagios Configuration Problem:
1. Open CCM
2. Tools > Config File Management
3. Click the Delete Files button
4. It will say "Successfully deleted all Host / Service Config Files"
5. Click the Write Configs Button
5. It will show an output of all the files it creates, in large deployments this step may take a long time .
6. Click the Verify Files button
7. The output should end with the error message you have experienced previously.
At this point, you can open an SSH session to your Nagios XI server and open the file in a text editor to investigate the problem.
Add Cron Job in VestaCP - How to do it
This article covers steps to add cron jobs in VestaCP. Using VestaCP, you can add mail accounts, databases, Cron jobs, and a whole lot more with just a few clicks. Cron jobs help automize certain commands that need to run regularly, this ensures everything runs smoothly.
Vesta Control Panel (VestaCP) is an open source hosting control panel that can manage multiple websites, create and manage email accounts, create and manage FTP accounts. Also, manage MySQL database and DNS records.
How to setup a CRON job using VestaCP ?
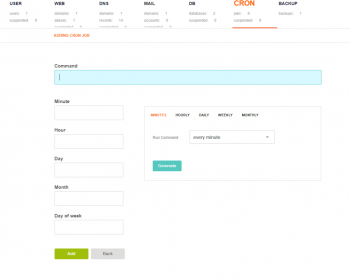
1. Move to the “CRON” tab then mouse over the plus symbol and click on “Add Cron Job”;
2. Enter the command you would like to execute and make sure to include the necessary privileges such as sudo if your command requires it. Use the frequency generator on the right side of the options to set how often you would like the command to execute.
3. Finally, click Generate to confirm the frequency and then click Add to finish adding the Cron job.
Note: Before adding a cron job be sure to test it out first to ensure it works.
Vital Command Line commands for Linux Admins with examples
This article covers a few Vital Command Line for Linux Admins. The Linux command line is a text interface to your computer. Allows users to execute commands by manually typing at the terminal, or has the ability to automatically execute commands which were programmed in “Shell Scripts”.
Common commands in Linux:
1. su command
The su command exists on most unix-like systems. It lets you run a command as another user, provided you know that user's password. When run with no user specified, su will default to the root account. The command to run must be passed using the -c option.
2. which command
which command in Linux is a command which is used to locate the executable file associated with the given command by searching it in the path environment variable. It has 3 return status as follows: 0 : If all specified commands are found and executable.
3. Who am I command line?
whoami command is used both in Unix Operating System and as well as in Windows Operating System. It is basically the concatenation of the strings “who”,”am”,”i” as whoami. It displays the username of the current user when this command is invoked. It is similar as running the id command with the options -un.
4. What does W command do in Linux?
w is a command-line utility that displays information about currently logged in users and what each user is doing. It also gives information about how long the system has been running, the current time, and the system load average.
Facts about the demand in Linux admins?
1. The job prospects for Linux System Administrator are favorable.
2. According to the US Bureau of Labor Statistics (BLS), there is expected to be a growth of 6 percent from 2016 to 2026.
3. Candidates who have a firm hold on cloud computing and other latest technologies have bright chances.

Install NDOUtils in Ubuntu - Do it now
This article covers how to install NDOUtils in Ubuntu. NDOUtils is basically the Database Output for Nagios Core.
NDOUtils stands for Nagios Data Output Utilities which is an addon that allows you to move status and event information from Nagios to a MySQL Database for later retrieval and processing.
NDOUtils consists of the following parts:
1. The NDOMOD event broker module. This module is intended to be loaded by the Nagios process at runtime. Its only role is to dump all events and data from Nagios to a TCP socket or a regular file or Unix domain socket on the local filesystem somewhere. If you want Realtime transfer of data to MySQL, dump the data to a TCP or Unix domain socket. If you want delayed transfer of data into MySQL (i.e. you need to transfer the data to another host first), dump the data to a regular file.
2. The NDO2DB daemon. This standalone daemon reads input (that was produced by the NDOMOD broker module) from a TCP or Unix domain socket, parses that data, and then dumps it into one or more MySQL databases. The daemon is capable of handling multiple client connections simultaneously, so you can have multiple instances of the NDOMOD module writing to the same TCP or Unix domain socket at the same time.
3. The FILE2SOCK utility. This simple utility reads data from a standard file and dumps it to either a TCP or a Unix domain socket. This is useful if you are having the NDOMOD module write to a standard file that you later want to send to the NDO2DB daemon. If the module and the daemon are running on different machines, you can periodically use SSH to transfer the file from the monitoring machine to the machine running the NDO2DB daemon, and then use the FILE2SOCK utility to send the contents of that file to the TCP socket or Unix domain socket that the NDO2DB daemon is reading.
4. The LOG2NDO utility. This utility is used for importing historical log archives from NetSaint and Nagios and sending them to the NDO2DB daemon. It takes a single log file as its input and can output data to either a TCP socket, a Unix domain socket or standard output.
To compile the NDO broker module, NDO2DB daemon, and additional utilities:
1. Run the commands below;
./configure
make all
2. If the configure script is unable to locate your MySQL development libraries, you may need to help it out by using the --with-mysql-lib option.
Here's an example:
./configure --with-mysql-lib=/usr/lib/mysql
NDOUTILS Tuning Kernel Parameters includes:
NDOUTILS uses a single message queue to communicate between the broker module and the NDO2DB daemon. Depending on the operating system, there may be parameters that need to be tuned in order for this communication to work correctly.
1. kernel.msgmax is the maximum size of a single message in a message queue
2. kernel.msgmni is the maximum number of messages allowed in any one message queue
3. kernel.msgmnb is the total number of bytes allow in all messages in any one message queue
How to initialize the Database for NDOUtils installation:
Before you start using NDOUtils, you should create the database where you will be storing all Nagios related information.
Note: Only MySQL Databases are supported!
i. Create a database for storing the data (e.g. nagios)
ii. Create a username/password that has at least the following privileges for the database:
SELECT, INSERT, UPDATE, DELETE
iii. Run the DB installation script in the db/ subdirectory of the NDO distribution to create the necessary tables in the database.
cd db
./installdb
iv. Make sure the database name, prefix, and username/password you just created and setup match the variable specified in the NDO2DB config file.
Domain Password Policy in the Active Directory - How to Set it up
This article covers an effective method to configure Domain Password Policy in the Active Directory which ensures a high level of security for user accounts.
Group policy with password policy should be assigned to domain level, not OU, you can have multiple GPO's with password policies in domain level however only one policy will be applied to all users in their priority.
Basic Password Policy Settings on Windows:
Let's consider all available Windows password settings.
There are six password settings in GPO:
1. Enforce password history – determines the number of old passwords stored in AD, thus preventing a user from using an old password.
However, the domain admin or user who has been delegated password reset permissions in AD can manually set the old password for the account;
2. Maximum password age – sets the password expiration in days. After the password expires, Windows will ask the user to change the password. Ensures the regularity of password changes by users;
You can find out when a specific user’s password expires using the PowerShell:
Get-ADUser -Identity j.werder -Properties msDS-UserPasswordExpiryTimeComputed | select-object @{Name="ExpirationDate";Expression= {[datetime]::FromFileTime($_."msDS-UserPasswordExpiryTimeComputed") }}.
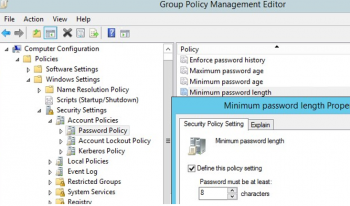
3. Minimum password length – it is recommended that passwords should contain at least 8 symbols (if you specify 0 here, the password is not required);
4. Minimum password age – sets how often users can change their passwords. This setting won’t allow the user to change the password too often to get back to an old password they like by removing them from the Password History after the password has been changed several times in a row. As a rule, it is worth to set 1 day here in order users can change a password themselves if it gets compromised (otherwise an administrator will have to change it);
5. Password must meet complexity requirements – if the policy is enabled, a user cannot use the account name in a password (not more than 2 symbols of a username or Firstname in a row), also 3 types of symbols must be used in the password: numbers (0–9), uppercase letters, lowercase letters and special characters ($, #, %, etc.). Also, to prevent using weak passwords (from the password dictionary), it is recommended to regularly audit user passwords in the AD domain;
6. Store passwords using reversible encryption – user passwords are stored encrypted in the AD database, but in some cases you have to grant access to user passwords to some apps. If this policy setting is enabled, passwords are less protected (almost plain text). It is not secure (an attacker can get access to the password database if the DC is compromised; an read-only domain controllers (RODC) can be used as one of the protection measures).
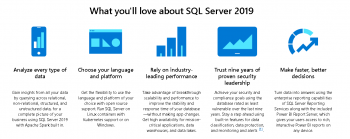
Features Of SQL Server 2019 - More Insight
This article covers the main features of SQL Server 2019. SQL Server 2019 features Data virtualization and SQL Server 2019 Big Data Clusters.
With Read, write, and process big data from Transact-SQL or Spark. Easily combine and analyze high-value relational data with high-volume big data. Query external data sources. Store big data in HDFS managed by SQL Server.
The Main Features of SQL Server 2019 includes:
1. Intelligent Query Processing Enhancements.
2. Accelerated Database Recovery (ADR).
3. AlwaysEncrypted with secure enclaves.
4. Memory-optimized Tempdb metadata.
5. Query Store custom capture policies.
6. Verbose truncation warnings.
7. Resumable index build.
8. Data virtualization with Polybase.
How do I start SQL Server?
In SQL Server Configuration Manager, in the left pane, click SQL Server Services. In the results pane, right-click SQL Server (MSSQLServer) or a named instance, and then click Start, Stop, Pause, Resume, or Restart.
To uninstall SQL Server from Windows 10, Windows Server 2016, Windows Server 2019, and greater, follow these steps:
1. To begin the removal process navigate to Settings from the Start menu and then choose Apps.
2. Search for sql in the search box.
3. Select Microsoft SQL Server (Version) (Bit).
4. Select Uninstall.


