Enable WSGI module support in VestaCP - Do it Now
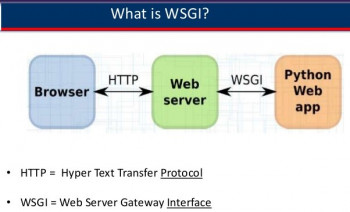
This article covers how to enable WSGI module support in VestaCP for our customers. WSGI is the Web Server Gateway Interface. It is a specification that describes how a web server communicates with web applications, and how web applications can be chained together to process one request. Also, it implements the web server side of the WSGI interface for running Python web applications.
To enable WSGI support on a Debian or Ubuntu on Vesta Control Panel:
1. Install wsgi apache module
$ apt-get install libapache2-mod-wsgi
$ a2enmod wsgi
2. Download wsgi template
$ cd /usr/local/vesta/data/templates/web
$ wget http://c.vestacp.com/0.9.8/ubuntu/wsgi/apache2.tar.gz
$ tar -xzvf apache2.tar.gz
$ rm -f apache2.tar.gz
3. Create new package or set wsgi as apache template in the existing package
4. Add new user and assing him package with wsgi template
5. Add new domain and check the result
Importance of WSGI ?
1. WSGI gives you flexibility. Application developers can swap out web stack components for others. For example, a developer can switch from Green Unicorn to uWSGI without modifying the application or framework that implements WSGI.
2. WSGI servers promote scaling. Serving thousands of requests for dynamic content at once is the domain of WSGI servers, not frameworks. WSGI servers handle processing requests from the web server and deciding how to communicate those requests to an application framework's process. The segregation of responsibilities is important for efficiently scaling web traffic.
Facts about WSGI:
1. what WSGI stands for (Web Server Gateway Inteface)
2. A WSGI container is a separate running process that runs on a different port than your web server
3. Your web server is configured to pass requests to the WSGI container which runs your web application, then pass the response (in the form of HTML) back to the requester.

Configure PostgreSQL on Linux in Vesta control panel - How to do it
This article covers how to install and setup PostgreSQL on Vesta Control panel running RHEL, CentOS, Debian, or Ubuntu server. PostgreSQL is an advanced version of SQL which provides support to different functions of SQL like foreign keys, subqueries, triggers, and different user-defined types and functions.
To set up PostgreSQL on a RHEL or CentOS:
1. Install PostgreSQL packages
yum install postgresql postgresql-server postgresql-contrib phpPgAdmin
* If you have remi installed then don't forget to explicitly enable it.
yum install --enablerepo=remi postgresql postgresql-server postgresql-contrib phpPgAdmin
2. Initialize database cluster
service postgresql initdb
3. Download hba configuration
wget http://c.vestacp.com/0.9.8/rhel/pg_hba.conf -O /var/lib/pgsql/data/pg_hba.conf
4. Start the server
service postgresql start
5. Set oracle user password
su - postgres
psql -c "ALTER USER postgres WITH PASSWORD 'pgp4sw0rd'"
exit
6. Enable pgsql databases support in vesta.
open /usr/local/vesta/conf/vesta.conf and set DB_SYSTEM to 'mysql,pgsql'
7. Register pg instance in control panel
v-add-database-host pgsql localhost postgres pgp4sw0rd
8. Download phpPgAdmin configuration
wget http://c.vestacp.com/0.9.8/rhel/pga.conf -O /etc/phpPgAdmin/config.inc.php
wget http://c.vestacp.com/0.9.8/rhel/httpd-pga.conf -O /etc/httpd/conf.d/phpPgAdmin.conf
9. Restart web server
service httpd restart
To set up PostgreSQL on a Debian or Ubuntu:
1. Install PostgreSQL packages
apt-get install postgresql postgresql-contrib phppgadmin
2. Download hba configuration
wget http://c.vestacp.com/0.9.8/debian/pg_hba.conf -O /etc/postgresql/*/main/pg_hba.conf
3. Restart the server
service postgresql restart
4. Set oracle user password
su - postgres
psql -c "ALTER USER postgres WITH PASSWORD 'pgp4sw0rd'"
exit
5. Enable pgsql databases support in vesta.
open /usr/local/vesta/conf/vesta.conf and set DB_SYSTEM to 'mysql,pgsql'
6. Register pg instance in control panel
v-add-database-host pgsql localhost postgres pgp4sw0rd
7. Download phpPgAdmin configuration
wget http://c.vestacp.com/0.9.8/debian/pga.conf -O /etc/phppgadmin/config.inc.php
wget http://c.vestacp.com/0.9.8/debian/apache2-pga.conf -O /etc/apache2/conf.d/phppgadmin
8. Restart web server
service apache2 restart

MRTG Reports SNMP_Session Errors in Nagios - Fix it now
This article covers how to fix Nagios issue, MRTG Reports SNMP_Session Errors while using Nagios.
You can see this error when running MRTG at the command line such as:
LANG=C LC_ALL=C /usr/bin/mrtg /etc/mrtg/mrtg.cfg --lock-file /var/lock/mrtg/mrtg_l --confcache-file /var/lib/mrtg/mrtg.ok
When this Nagios error happens, you will receive error similar to this:
Subroutine SNMP_Session::pack_sockaddr_in6 redefined at /usr/local/share/perl5/Exporter.pm line 66.
at /usr/bin/../lib/mrtg2/SNMP_Session.pm line 149.

Core Configuration Manager Displaying Issues in Nagios XI
This article covers how to resolve the issue with Nagios XI that stops displaying the core configuration manager or the components inside the core configuration manager.
If this is the case, When using Core Configuration Manager (CCM), the interface does not work as expected, it does not appear to display correctly and generally it feels like there is a bug. This issues is related to the web browsers implementation of JavaScript. If possible, use a browser that more closely implements the ECMAScript Language Specification.
A quick way to see if this is the problem is to see if you experience the same issue using another web browser.
To fix this Nagios configuration Problem:
1. In the event of the the Core Config Manager not visible or components missing from the page, this generally relates to a proxy and the following steps may resolve this issue:
pear config-set http_proxy http://proxy:port
2. Make sure to change proxy:port to match your proxy server, example:
pear config-set http_proxy http://192.168.44.20:8080
3. Then execute the following:
pear install HTML_Template_IT
After performing these steps go back to CCM and see if it works.

Enable Leech Protection in cPanel - Do it with ease
This article covers step by step process to configure Leech Protection in cPanel. Basically, Leech Protection is an easy to configure security feature by cPanel. Leech Protect is a security feature offered within cPanel that allows you to detect unusual levels of activity in password-restricted directories on your website.
Importance of Leech Protection in cPanel:
1. Leeching is when users publicly post their username and password, unauthorized visitors can use those credentials to access secure areas of your website.
2. With the Leech Protection feature in cPanel, you can limit the number of times a user can access a secure area of your website within a two-hour period.
3. After you set the maximum number of logins within a two-hour period, the system redirects or suspends users who exceed it.
4. This is useful, also, say someone is trying to login to restricted areas of your website by guessing combinations of usernames and passwords.
To Enable Leech Protection in cPanel:
1. Click Leech Protection under Security in cPanel.
2. Click on the name of the directory that you want to protect. You can click the folder icon next to the folder name to open the folder.
3. Under Set up Leech Protection, enter the number of logins allowed per username in a two-hour period.
4. To redirect users who exceeded the maximum number of logins within a two-hour period, enter a URL to which you wish to redirect them.
5. To receive an email alert when an account is compromised, select the Send Email Alert to option and enter the email address in the text field.
6. To disable compromised accounts, check the Disable Compromised Accounts option.
7. When ready, click Enable.
Add user in VestaCP - How to do it
This article covers how to add a user in VestaCP. Vesta control panel (VestaCP) is an open source hosting control panel, which can be used to manage multiple websites, creat and manage email accounts, FTP accounts, and MySQL databases, manage DNS records and so on.
To Add / Edit User in VestaCP:
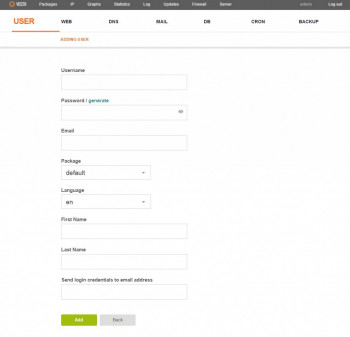
1. First, click the USER tab on top, then click the green coloured “+” to add a new user.
2. Fill in the details for the new user. Click “Add” when you’ve completed the info.
3. This message will pop up if all the info are filled in correctly.
Now, you will see 2 users to choose from. Access the newly created user by clicking on “Login as (username)”.
Each user can manage their own web, DNS, mail and database, etc.
You can also perform edit, deletion or suspension of user accounts using the buttons shown in the red box.
To uninstall Vesta Control panel:
1. Stop vesta service. service vesta stop.
Remove vesta packages and software repository. RHEL/CentOS: yum remove vesta* rm -f /etc/yum.repos.d/vesta.repo. Debian/Ubuntu: apt-get remove vesta* rm -f /etc/apt/sources.list.d/vesta.list.
2. Delete data directory and cron.


