
Remote session disconnected because there are no remote desktop license servers
This article covers how to resolve the error 'remote session disconnected because there are no remote desktop license servers'.
If the problems tend to be associated with the following user messages:
i. The remote session was disconnected because there are no Remote Desktop client access licenses available for this computer.
ii. The remote session was disconnected because there are no Remote Desktop License Servers available to provide a license.
Then, configure the RD Licensing service by following the steps below:
1. Open Server Manager and navigate to Remote Desktop Services.
2. On Deployment Overview, select Tasks, and then select Edit Deployment Properties.
3. Select RD Licensing, then select the appropriate licensing mode for your deployment (Per Device or Per User).
4. Enter the fully qualified domain name (FQDN) of your RD License server, and then select Add.
5. If you have more than one RD License server, repeat step 4 for each server.
If the RD License Diagnoser lists other problems, such as "The RDP protocol component X.224 detected an error in the protocol stream and has disconnected the client," there may be a problem that affects the license certificates. Such problems tend to be associated with user messages, such as the following:
Because of a security error, the client could not connect to the Terminal server. After making sure that you are signed in to the network, try connecting to the server again.
In this case, refresh the X509 Certificate registry keys by following the steps given below:
To resolve this problem, back up and then remove the X509 Certificate registry keys, restart the computer, and then reactivate the RD Licensing server.
1. Open the Registry Editory and navigate to HKEY_LOCAL_MACHINE\SYSTEM\CurrentControlSet\Control\Terminal Server\RCM.
2. On the Registry menu, select Export Registry File.
3. Enter exported- Certificate into the File name box, then select Save.
4. Right-click each of the following values, select Delete, and then select Yes to verify the deletion:
i. Certificate
ii. X509 Certificate
iii. X509 Certificate ID
iv. X509 Certificate2
5. Exit the Registry Editor and restart the RDSH server.
To fix Remote session was disconnected because there are no Remote Desktop client access licenses:
1. You need to delete the following registry key:HKEY_LOCAL_MACHINE\SOFTWARE\Microsoft\MSLicensing.
2. If it doesn't work and you get the following error message: "The remote computer disconnected the session because of an error in the licensing protocol";
3. Then all you need to do is Right-Click on the Remote Desktop Connection icon and select "Run as Administrator".
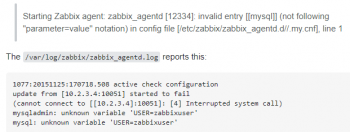
Zabbix error Invalid entry when restarting zabbix-agent - Fix it now
This article covers how to fix Zabbix error, an invalid entry when restarting the zabbix-agent which may appear when the configuration file is placed in the wrong path.
The problem is with the configurations:
You are putting the .my.cnf file at the wrong place.
Zabix agent configuration file has prescribed format and parameters defined.
If you may use Include option to load additional config files, be sure it follows the same format.
So, in your case the .my.cnf file fails to load when you put it under /etc/zabbix/zabbix_agentd.d.
You are missing the part to configure userparameter_mysql.conf file properly.
To resolve this Zabbix error:
1. Move the .my.cnf file from /etc/zabbix/zabbix_agentd.d directory to /etc/zabbix.
And also remove any Include entry to refere to the .my.cnf file (if there is any).
The content of the file may look like this:
[mysqld]
user=username
password=userpass
[mysqladmin]
user=username
password=userpass
2. Please make sure that the user listed here exists and have the necessary permissions in mysql.
3. Edit /etc/zabbix/zabbix_agentd.d/userparameter_mysql.conf file: You need to replace HOME=/var/lib/zabbix with HOME=/etc/zabbix to point to the right file (should appear three times) as mentioned in the first line of the file.
4. Finally restart the agent: $ service zabbix-agent restart

Zabbix tries to connect to the wrong database - Fix it now
This article covers how to fix Zabbix error, when Zabbix tries to connect to the wrong database.
Basically, when Zabbix tries to connect to the wrong database, we can simply resolve it by restarting the service.
Zabbix is an open-source monitoring software tool for diverse IT components, including networks, servers, virtual machines (VMs) and cloud services. Zabbix provides monitoring metrics, among others network utilization, CPU load and disk space consumption.
How do I fix Zabbix server is not running?
Zabbix server error due to problems with the firewall.
1. As a root user, we check and confirm whether the firewall is allowing connection to Zabbix Server port which is 10051.
2. If not, then we add the following rule in the configuration file /etc/sysconfig/iptables.
3. Finally, restart the service in order to fix the error.
How to turn off Zabbix server?
To Stop the Service:
1. Use PuTTY to log in as user robomanager to the server where Zabbix is installed.
2. Run the following command to switch to user root: su - root.
3. Run the following command to stop the Zabbix service: systemctl stop zabbix_server.service.
To monitor my zabbix port:
1. In order to test your configuration, access the Monitoring menu and click on the Latest data option.
2. Use the filter configuration to select the desired hostname.
3. Click on the Apply button.
4. You should be able to see the results of your TCP port monitoring using Zabbix.
Where is zabbix config located?
The Zabbix installation process created an Apache configuration file that contains these settings.
It is located in the directory /etc/zabbix and is loaded automatically by Apache.
How does Zabbix proxy work?
Zabbix proxy is a process that may collect monitoring data from one or more monitored devices and send the information to the Zabbix server, essentially working on behalf of the server.
All collected data is buffered locally and then transferred to the Zabbix server the proxy belongs to.
Zabbix Server supported DATABASE ENGINE:
Zabbix Server and Proxy support five database engines:
1. IBM DB2
2. MySQL
3. Oracle
4. PostgreSQL
5. SQLite
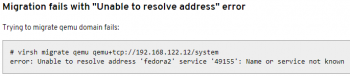
Libvirt error Unable to resolve address name or service not known
This article covers tips to fix 'Libvirt error: Unable to resolve address: name or service not known'.
QEMU guest migration fails and this error message appears:
# virsh migrate qemu qemu+tcp://192.168.122.12/system error: Unable to resolve address name_of_host service '49155': Name or service not known
Note that the address used for migration data cannot be automatically determined from the address used for connecting to destination libvirtd (for example, from qemu+tcp://192.168.122.12/system).
This is because to communicate with the destination libvirtd, the source libvirtd may need to use network infrastructure different from that which virsh (possibly running on a separate machine) requires.
To fix Libvirt error: Unable to resolve address: name or service not known:
The best solution is to configure DNS correctly so that all hosts involved in migration are able to resolve all host names.
If DNS cannot be configured to do this, a list of every host used for migration can be added manually to the /etc/hosts file on each of the hosts.
However, it is difficult to keep such lists consistent in a dynamic environment.
i. If the host names cannot be made resolvable by any means, virsh migrate supports specifying the migration host:
# virsh migrate qemu qemu+tcp://192.168.122.12/system tcp://192.168.122.12
Destination libvirtd will take the tcp://192.168.122.12 URI and append an automatically generated port number.
ii. If this is not desirable (because of firewall configuration, for example), the port number can be specified in this command:
# virsh migrate qemu qemu+tcp://192.168.122.12/system tcp://192.168.122.12:12345
iii. Another option is to use tunnelled migration. Tunnelled migration does not create a separate connection for migration data, but instead tunnels the data through the connection used for communication with destination libvirtd (for example, qemu+tcp://192.168.122.12/system):
# virsh migrate qemu qemu+tcp://192.168.122.12/system --p2p --tunnelled

Boot a guest using PXE - Do it now
This article covers how to boot a guest using PXE. PXE booting is supported for Guest Operating Systems that are listed in the VMware Guest Operating System Compatibility list and whose operating system vendor supports PXE booting of the operating system.
The virtual machine must meet the following requirements:
1. Have a virtual disk without operating system software and with enough free disk space to store the intended system software.
2. Have a network adapter connected to the network where the PXE server resides.
A virtual machine is not complete until you install the guest operating system and VMware Tools. Installing a guest operating system in your virtual machine is essentially the same as installing it in a physical computer.
To use PXE with Virtual Machines:
You can start a virtual machine from a network device and remotely install a guest operating system using a Preboot Execution Environment (PXE).
You do not need the operating system installation media. When you turn on the virtual machine, the virtual machine detects the PXE server.
To Install a Guest Operating System from Media:
You can install a guest operating system from a CD-ROM or from an ISO image. Installing from an ISO image is typically faster and more convenient than a CD-ROM installation.
To Upload ISO Image Installation Media for a Guest Operating System:
You can upload an ISO image file to a datastore from your local computer. You can do this when a virtual machine, host, or cluster does not have access to a datastore or to a shared datastore that has the guest operating system installation media that you require.
How to Use a private libvirt network ?
1. Boot a guest virtual machine using libvirt with PXE booting enabled. You can use the virt-install command to create/install a new virtual machine using PXE:
virt-install --pxe --network network=default --prompt
2. Alternatively, ensure that the guest network is configured to use your private libvirt network, and that the XML guest configuration file has a <boot dev='network'/> element inside the <os> element, as shown in the following example:
<os>
<type arch='x86_64' machine='pc-i440fx-rhel7.0.0'>hvm</type>
<boot dev='network'/>
<boot dev='hd'/>
</os>
3. Also ensure that the guest virtual machine is connected to the private network:
<interface type='network'>
<mac address='52:54:00:66:79:14'/>
<source network='default'/>
<target dev='vnet0'/>
<alias name='net0'/>
<address type='pci' domain='0x0000' bus='0x00' slot='0x03' function='0x0'/>
</interface>

Apply Configuration Fails in Nagios Server - Resolve this issue now
This article covers solutions to when Apply Configuration Fails in Nagios Server. This issue happens when the Nagios XI server is unable to resolve the "localhost".
The error message will look like this:
Apply Configuration fails with the following error:
Backend login to the Core Config Manager failed.
An error occurred while attempting to apply your configuration to Nagios Core.
Monitoring engine configuration files have been rolled back to their last known good checkpoint.
To resolve this Nagios Problem:
1. Edit your /etc/hosts file and make sure there are localhost entries. For example:
127.0.0.1 localhost.localdomain localhost.localdomain localhost4 localhost4.localdomain4 localhost xi-c6x-x64
::1 localhost.localdomain localhost.localdomain localhost6 localhost6.localdomain6 localhost xi-c6x-x64
2. After making these changes try and "Apply Configuration" from Core Configuration Manager and your problem should be resolved.


