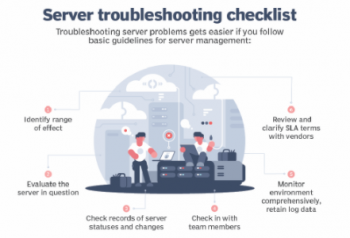
Troubleshoot server down issues - How to do it
This article covers how to troubleshoot server down issues. Basically, network issues might cause the Datacenter to go down. This can lead us into some unlucky instances. Troubleshooting server down issues is never an easy task. Whether you have a small home network, or a super connection of thousands of computers, there are meticulous steps you need to take to get your server back up running.
Steps to take when troubleshooting server down issues:
1. ANALYZE YOUR NETWORK INFRASTRUCTURE
You will have a better chance at troubleshooting network problems if you first figure out where everything is connected in the infrastructure.
2. STUDY YOUR NETWORK
If you don't have an infrastructure design to go by, you will have to learn your network’s layout when analyzing your connectivity. Several tools can help you to map out the entire network infrastructure. Tools such as IPCONFIG can aid in finding the problem.
3. CONNECTION IS DOWN
From the network troubleshooting application, find out from the OSI model if all the seven layers are working correctly. Usually, if the first layer doesn’t work the whole connection will be down. Check whether the network cable is plugged in.
4. NO IP ADDRESS
Your server could be down just because of unknown IP address settings. Anon IP address such as 0.0.0.0 or an automatic one that starts with 169.254 will typically result in server down problems. You will need to obtain a valid IP address before you can get your server back up.
5. NO DNS SERVERS
Without DNS servers configured on your network, all communication will only be possible through an IP address. A server down issue, in this case, might be a broken a line between the router and the internet.
6. NO DEFAULT GATEWAY
Your servers could be down because there is no default gateway IP address. This breaks the communication between the subnet and the local area network. You will still be able to work as usual on your local servers.
7. MISCONFIGURED IP SUBNET MASK
A misconfigured subnet mask IP can impede server communication. You can manually configure this IP subnet mask or work with the DHCP server to identify the source if there is a misconfiguration.
Create custom php ini in Litespeed Webserver - How to do it
This article covers how to Create custom php.ini in Litespeed Webserver. Basically, compared to the Apache web server, the Litespeed web server configuration may feel a bit complicated. In hosting environment with cPanel servers, it is necessary to edit the PHP variables for each domain or customer and this can be done using by creating a custom php.ini for each user's home directory. So the clients can change the PHP values according to their requirements.
There should some steps need to be done on Litespeed admin panel on cPanel/WHM to enable custom php.ini and you can follow the below steps to enable it.
To Create Custom Php.Ini In A Litespeed Webserver:
1. Login into WHM.
2. Select Litespeed Web Server
3. Litespeed Configuration > Admin Console > Configuration > Server > External App > lsphp5
4. Under Environment section >> add “PHPRC=$VH_ROOT”
5. Under “suEXEC User ” section >> add the account username for which custom php.ini has to be enabled.
6. Under “suEXEC Group ” section >> add the group name of the same account.
7. Click save and return to Main >> Litespeed Web server
8. Under Quick Configuration of PHP suEXEC settings,>> Set Enable PHP suExec to yes.
9. After that put custom php.ini in the user’s home directory and check it using a phpinfo page.
Install NDOUtils in CentOS RHEL and fix related error
This article covers how to install NDOUtils in CentOS. NDOUtils is an addon for Nagios Core that allows you to export current and historical data from one or more Nagios Core instances to a MySQL database. NDOUtils is included with Nagios XI. A source in Nagios Network Analyzer is the data collector. Outside of Nagios Network Analyzer a source is the location where data is originating from.
NDOUtils uses the kernel message queue for transferring the data from Nagios to NDOUtils. We are going to increase the default values the Kernel boots with to ensure it operates optimally.
1. Downloading NDOUtils Source
cd /tmp
wget -O ndoutils.tar.gz https://github.com/NagiosEnterprises/ndoutils/releases/download/ndoutils-2.1.3/ndoutils-2.1.3.tar.gz
tar xzf ndoutils.tar.gz
2. Compile NDOUtils
cd /tmp/ndoutils-2.1.3/
./configure
make all
3. Install Binaries
This step installs the binary files.
make install
4. Initialize Database
This prepares the database for NDOUtils.
cd db/
./installdb -u 'ndoutils' -p 'ndoutils_password' -h 'localhost' -d nagios
cd ..
SSH Servers Clients and Keys - More about it now
This article covers important information about SSH Servers, Clients and Keys. Use SSH keys for authentication when you are connecting to your server, or even between your servers.
They can greatly simplify and increase the security of your login process.
When keys are implemented correctly they provide a secure, fast, and easy way of accessing your cloud server.
Turn off password authentication Linux:
With SSH key authentication configured and tested, you can disable password authentication for SSH all together to prevent brute-forcing. When logged in to your cloud server.
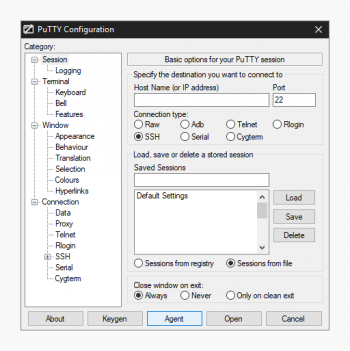
1. Open the SSH configuration file with the following command.
$ sudo nano /etc/ssh/sshd_config
2. Set the password authentication to no to disable clear text passwords.
PasswordAuthentication no
3. Check that public key authentication is enabled, just to be safe and not get locked out from your server. If you do find yourself unable to log in with SSH, you can always use the Web terminal control panel.
PubkeyAuthentication yes
Then save and exit the editor.
4. Restart the SSH service to apply the changes by using the command below.
$ sudo systemctl restart sshd
With that done your cloud server is now another step along towards security.
Malicious attempts to connect to your server will results in authentication rejection, as plain passwords are not allowed, and brute-forcing an RSA key is practically impossible.

Welcome to Emergency mode in Linux - Fix this boot error now
This article covers how to fix boot error, Welcome to Emergency mode in Linux. This issue happens after an emergency power outage on a server, a system crash, or similar situations.
The Emergency Mode sometime means that your file system may be corrupted.
In such cases, you will be left out with a prompt to go nowhere.
All you have to do is perform a file system check using,
fsck.ext4 /dev/sda3
where sda3 can be your partition and if you are using ext3 file system, change the command as follows:
fsck.ext3 /dev/sda3
About the partition number, Linux shows you the partition before arriving at the prompt.
This should solve the problem.
To fix Emergency Mode On Ubuntu:
1. use Ubuntu Live USB to boot, and open terminal:
$ sudo fsck.ext4 /dev/sda3
2. Adding sudo because it needs root permission.
(Replace ext4 with ext3 if applicable to you)
3. Cycle through the SDAs by changing the last number in the sda to see which file system has problems.
Ex: sda1, sda2, sda3, sda4, and so on
4. As I encountered, the problem might be with the 'home' directory.
5. Once you run the above command, you'll be prompted to fix the issue right inside the terminal itself.
6. Keep hitting y (for yes) until the end of the fix.
(or you can use -fy for automatically response yes to all.)
7. Navigate to the home folder of your sda using your files explorer.
(This will be mounted from the HDD since you are working with a Live USB)
8. Check inside 'home' if you can see all your files. If yes, then you're ready to reboot to your system (remove the Live USB).
Map Network Drives or Shared Folders with Group Policy - How to do it
This article covers how to map network drives or shared folders with Group Policy.
Mapping network drives using Group Policy preferences is flexible, provides easy control over who receives the drive mappings, and has easy-to-use user interfaces, all of which are in stark contrast with the complexities associated with scripts.
To Set up drive mappings with Group Policy preferences:
1. Group Policy preferences are a set of extensions that increase the functionality of Group Policy Objects (GPOs).
2. Administrators can use them to deploy and manage applications on client computers with configurations targeted to specific users.
3. The Drive Maps policy in Group Policy preferences allows an administrator to manage drive letter mappings to network shares.
To Deploy item-level targeting with Group Policy preferences:
Item-level targeting (ILT) is a feature of Group Policy preferences that allows preference settings to be applied to individual users and/or computers dynamically. ILT allows an administrator to specify a list of conditions that must be met in order for a preference setting to be applied or removed to a user or computer object.
You can configure drive mapping, only users in the Product Managers group would receive the mapping.
1. Under the Common tab of the mapped drive properties, check the Item-level targeting option, and then click Targeting….
2. In the Targeting Editor window, click New Item and select Security Group.
3. Click the … button, and type in the name of the security group.
4. Click OK to close the Targeting Editor once you're finished adding items to the list.


