IIS Manager: Could not connect to the specified computer generally happens when trying to add a remote server with the running IIS to the IIS Management Console (Connect to a Server menu) on another server. This is because by default the remote IIS management is disabled.
Here at Ibmi Media, as part of our Server Management Services, we regularly help our Customers to perform related IIS Manager queries.
In this context, we shall look into how to resolve this IIS Manager error.
Main cause of IIS Manager: "Could not connect to the specified computer" error ?
Generally, it is convenient enough to manage multiple IIS servers from a single console and it is almost the only way to manage a web server running in the Core/Nano mode.
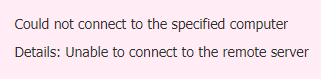
The following error message appears, when we try to add a remote server with the running IIS to the IIS Management Console (Connect to a Server menu) on another server:
Could not connect to the specified computer
Details: Unable to connect to the remote server
How to fix IIS Manager: "Could not connect to the specified computer" error ?
Here, we will look into different methods to tackle this error.
1. Install IIS Management Service
During the standard IIS installation, the service responsible for its remote management (IIS Management Service) is not being installed.
We can make sure that this service is missing in the system using the following PowerShell command:
Get-WindowsFeature *web-mgmt*
If the Web-Mgmt-Service service is not installed, Install it by executing the following PowerShell command with local admin permissions:
Add-WindowsFeature Web-Mgmt-Service
Or we can use the PowerShell cmdlet to install feature:
Install-WindowsFeature Web-Mgmt-Service
We can also install the Management Service component from the Server Manager console.
Then restart the IIS web service:
iisreset –noforce
Next, allow remote connections in the IIS web server settings:
To do it, follow the steps given below,
i. Open Management Service item in the Management section of IIS Manager.
ii. Check the "Enable remote connections" option in Management Service section.
iii. Next, by IP address we can restrict connections to the IIS Management Console.
iv. To do it, deny connections for unspecified client. Also specify the IP addresses of the connections that are allow.
v. The remote connection service uses an SSL certificate, but we can use another one if we imported it into the server's certificate store (we can create and use a self-signed SSL certificate using PoSh). Save the changes.
vi. When we save changes, port 8172 will open in Windows Firewall automatically.
vii. We can activate this option through the registry on the remote IIS server running in the Core mode by setting the parameter EnableRemoteManagement in the registry key HKLM\Software\Microsoft\WebManagement\Server to 1.
Use the command:
Reg Add HKLM\Software\Microsoft\WebManagement\Server /V EnableRemoteManagement /T REG_DWORD /D 1
viii. In this case, we have to create the firewall rule manually:
netsh advfirewall firewall add rule name=”Allow IIS Web Management” dir=in action=allow service=”WMSVC”
ix. Now we just have to start Web Management Service:
net start wmsvc
x. And configure the service to start automatically when the system starts up:
set-service wmsvc -StartupType Automatic
Or as follows:
sc config WMSVC start= auto
After that, a remote IIS web server can be added to the IIS Manager console and we can manage the IIS server, multiple sites on it the same way as the local web server.
2. Allow Non-Admin accounts to Remotely Manage the IIS Site
By default, only users with administrator privileges have the permission to remotely manage the IIS server.
In order to grant the permission to IIS remote management for standard users, it is necessary to grant the corresponding permissions at the level of each IIS website.
Then, select a site and find the IIS Manager Permissions option.
In the Actions panel, click on Allow User. Select the user account to which we want to grant access to IIS and click OK.
User permissions to manage sites on IIS server are configured in the Feature Delegation section at the IIS server level.
We can select one of three user access levels for each IIS server management functional: Read Only, Read/Write or Not Delegated.
How to Manage IIS Servers Remotely from Windows 10 ?
We need to install the IIS Management Console from: Turn Windows features on or off -> Internet Information Services -> Web Management Tools -> IIS Management Console.
Then, we can install this feature using the PowerShell command:
Enable-WindowsOptionalFeature -Online -FeatureName "IIS-ManagementService"
However, when we run the IIS Manager console in Windows 10, the Connect to a server item in the menu is missing.
To be able to connect remotely to IIS from Windows 10, we need to download and install the package IIS Manager for Remote Administration (https://www.microsoft.com/en-us/download/details.aspx?id=41177).
There is a version of IIS Manager for x64 (inetmgr_amd64_en-US.msi) and x86 OS (inetmgr_x86_en-US.msi).
After installation, we need to restart the IIS Manager and connect to the site.
If when connecting to IIS, it turns out that the console version is different on the client and the server, a notification will appear: it says that we need to update the console version (all necessary files will be automatically downloaded from the server).
Now, we must successfully connect to IIS server and remotely manage it from our desk.
IIS Remote Management and TLS 1.1/TLS 1.2 Support
If we have disabled the insecure SSLv3 and TLS 1.0 protocols on IIS and left only TLS 1.1/TLS 1.2, then when remotely connecting to IIS, an error will appear:
The underlying connection was closed: An unexpected error occurred on a send.
To fix the problem, it is necessary to make changes in the registry on the client side, for the mandatory use of the TLS 1.2 protocol during connection. Settings depend on the version of Windows.
On Windows 10 and Windows Server 2016:
<[HKEY_LOCAL_MACHINE\SOFTWARE\Microsoft\.NETFramework\v4.0.30319]”SchUseStrongCrypto”=dword:00000001[HKEY_LOCAL_MACHINE\SOFTWARE\Wow6432Node\Microsoft\.NETFramework\v4.0.30319]”SchUseStrongCrypto”=dword:00000001
On Windows 2012/R2 and Windows 8/8.1:
NET Framework 4.5.2 or higher must be installed.
[HKEY_LOCAL_MACHINE\SOFTWARE\Microsoft\.NETFramework\v4.0.30319]”SchUseStrongCrypto”=dword:00000001[HKEY_LOCAL_MACHINE\SOFTWARE\Wow6432Node\Microsoft\.NETFramework\v4.0.30319]”SchUseStrongCrypto”=dword:00000001
To check the version of NET Framework installed, execute the command from Powershell:
(Get-ItemProperty ‘HKLM:\SOFTWARE\Microsoft\NET Framework Setup\NDP\v4\Full’ -Name Release).Release
Windows Server 2008 R2/Windows 7:
Finally, we must first install the update KB3154518 to support TLS 1.2 in the .NET Framework 3.5.1.
[HKEY_LOCAL_MACHINE\SOFTWARE\Microsoft\.NETFramework\v2.0.50727]”SystemDefaultTlsVersions”=dword:00000001[HKEY_LOCAL_MACHINE\SOFTWARE\Wow6432Node\Microsoft\.NETFramework\v2.0.50727]”SystemDefaultTlsVersions”=dword:00000001[HKEY_LOCAL_MACHINE\SYSTEM\CurrentControlSet\Control\SecurityProviders\SCHANNEL\Protocols][HKEY_LOCAL_MACHINE\SYSTEM\CurrentControlSet\Control\SecurityProviders\SCHANNEL\Protocols\TLS 1.1][HKEY_LOCAL_MACHINE\SYSTEM\CurrentControlSet\Control\SecurityProviders\SCHANNEL\Protocols\TLS 1.1\Client]”DisabledByDefault”=dword:00000000[HKEY_LOCAL_MACHINE\SYSTEM\CurrentControlSet\Control\SecurityProviders\SCHANNEL\Protocols\TLS 1.1\Server]”DisabledByDefault”=dword:00000000[HKEY_LOCAL_MACHINE\SYSTEM\CurrentControlSet\Control\SecurityProviders\SCHANNEL\Protocols\TLS 1.2][HKEY_LOCAL_MACHINE\SYSTEM\CurrentControlSet\Control\SecurityProviders\SCHANNEL\Protocols\TLS 1.2\Client]”DisabledByDefault”=dword:00000000[HKEY_LOCAL_MACHINE\SYSTEM\CurrentControlSet\Control\SecurityProviders\SCHANNEL\Protocols\TLS 1.2\Server]”DisabledByDefault”=dword:00000000
[Need help to fixing windows error? We'd be happy to assist. ]
Conclusion
This article covers methods to resolve the IIS Manager error "Could not connect to the specified computer".
To install and configure Microsoft Windows Internet Information Services:
- Select: Manage / Add Roles and Features.
- Select "Next" until you get to Server Roles. Scroll down and open Web Server (IIS) / Management Tools.
- Select "Management Service".
- Select "Next" and "Install".
- Once installation completes, open services. If you already had services open, use refresh to add it to your list. Scroll down to Web Management Service. You will notice it is installed, but not started. It is also set to manual, so it will not start on reboot either. You need to change both of these so the service will run now and will run anytime the server is rebooted. Open the properties.
- Change the Startup type to "Automatic". Do not start the service yet as you will not be able to configure the service while it is running.
- Launch IIS, open Management Service.
- Configure the Web Management Service, then apply your changes and start the service.
How to configure Microsoft IIS ?
- Enable remote management.
- Use windows credentials only.
- Deny access to all except your approved IP addresses. Use IP address ranges only when you control the entire range.
- Use your server’s certificate if you have one configured. (Optional).
- Change the port from the default to something else if the server is accessible from the Internet. (Optional).
- Now you will be able to remotely manage IIS from any IP address you granted access.