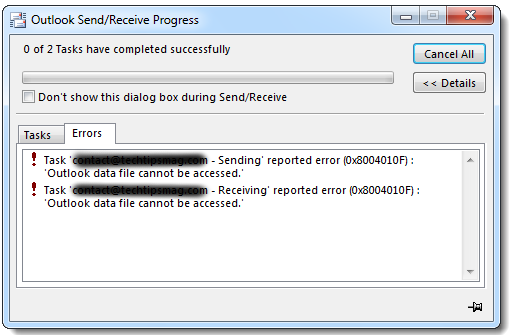
Sometimes, in the process of sending or receiving email in Outlook 2010 or Outlook 2013, you can encounter error "0x8004010F: Outlook data file cannot be accessed".
This generally occurs when some files in Outlook are damaged or currupt.
Here at Ibmi Media, as part of our Server Management Services, we regularly help our Customers to solve Outlook related errors.
In this context, we shall look into why this error occurs and how to fix it.
What triggers outlook error "0x8004010F: Outlook data file cannot be accessed" ?
As earlier stated, this Outlook error occurs while trying to send or receive emails .
Basically, a synchronized copy of all mailbox files in exchange server is stored in offline folder files (OST files) which can be accessed offline.
In some cases, such files might get currupted or damaged due to different factors such as damage due to accidental or force shutdown, corruption due to oversize, virus attack, and so on.
Some reasons why Outlook error 0x8004010F occurs are outlined below;
i. Corrupted OST file.
ii. Incorrect configuration or corrupt Outlook profile.
iii. Lack of internet or poor network connection.
iv. Sending/receiving emails via Shared Mailbox.
v. Change in the location of OST file on the System.
vi. Dealing old OST file used by previous Outlook version after upgrading.
vii. Corrupted Outlook program files.
viii. Insufficient read/write permissions.
ix. When the primary account is not set with the primary account OST file.
x. Firewall settings issue.
How to solve outlook error "0x8004010F: Outlook data file cannot be accessed" ?
As different reasons are behind the Outlook error 0x8004010F, is is necessary to perform a thorough analysis in order to get a solution to this issue.
Our Expert Support Technicians here, will guide you on the best way to fix the Outlook configuration errors as shown below.
Now let us look into the different solutions for this error.
1. Restarting Outlook and Checking Internet Connection
Sometimes a simple restart can help to resolve this issue issues with programs and systems. It is recommended that users to restart Outlook or system and then check if the issue persists.
You can also check the internet connection to ensure that you are connected.
2. Checking Account Settings
Incase restarting the system or Outlook program does not work, you can take a look at the account settings to ensure that it is correct. Additionally, ensure that the Exchange server is online.
To do this, Simply use Outlook Web App (OWA). Then try to login through OWA to ensure if there is some temporary connection problem.
If the login works successfully on OWA, it is more likely that some other factor is triggering this error.
3. Identifying the current location of the default Outlook data file.
In other cases, you might need to identify the current location of the default Outlook data file, and then create a new Outlook profile in order to resolve error 0x8004010F. To do this simply follow the following steps;
Find the default Outlook data file by;
i. Selecting Start, and then select Control Panel.
ii. In Control Panel, select Mail.
iii. In the Mail Setup – Outlook dialog box, select Show Profiles.
iv. Select the current Outlook profile, and then select Properties.
v. In the Mail Setup – Outlook dialog box, select Data Files.
vi. Select the Data Files tab in the Account Settings dialog box, and then note the name and location of the default data file for the profile (a check mark will signify the default data file).
vii. Select Close.
How to Create a new Outlook profile?
Method 1: Use auto account setup to create an IMAP or POP3 email account.
In a case where the email server supports both IMAP and POP3, auto account setup will create an IMAP account by default. We will need to follow the manual steps in order to create a POP3 account.
However, if the email server supports ONLY a POP3, auto account setup will create a POP3 account.
i. Select Start, and then select Control Panel.
ii. In the Mail Setup – Outlook dialog box, select Show Profiles.
iii. On the General tab in the Mail dialog box, select Add.
iv. In the New Profile dialog box, type a new profile name, and then select OK.
v. In the Add New Account dialog box, type the email account information, and then select Next.
vi. After the account is successfully configured, select Finish.
Method 2: Manually creating IMAP or POP3 email account
i. Select Start, and then select Control Panel.
ii. In the Mail Setup – Outlook dialog box, select Show Profiles.
iii. On the General tab in the Mail dialog box, select Add.
iv. In the New Profile dialog box, type a new profile name, and then select OK.
v. Next, in the Add New Account dialog box, select Manually configure server settings or additional server types, and then select Next.
vi. Then, in the Choose Service dialog box, select Internet E-mail, and then select Next.
vii. In the Internet E-mail Settings dialog box, type the account details.
viii. Select Test Account Settings to test your account. Contact your Internet service provider if you are unsure of the correct account details. Select Existing Outlook Data File, and then select Browse.
ix. In the Open Outlook Data File dialog box, browse to and then select the Outlook data file you previously located. Select OK.
x. Select Next.
xi. In the Test Account Settings dialog box, select Close.
xii. Select Finish.
How to configure the new Outlook profile as the default profile?
In order to set the new Outlook profile as the default profile, follow the following steps;
i. On the General tab of the Mail dialog box, select Always use this profile.
ii. Select the drop-down under Always use this profile, and then select the new profile.
iii. Select OK to close the Mail dialog box.
If we have a number of non default ".pst" files and need to include them in the Outlook profile, follow the following steps:
i. Start Outlook.
ii. On the File tab, select Open.
iii. Select Open Outlook Data File.
iv. Browse to the folder location that contains other .pst file, select it, and then select OK.
The newly added .pst file will appear in the Navigation pane.
4. Configuring Old Outlook Profile
Sometimes, modifying the message delivery location to a temporary folder and then changing it back refreshes Outlook settings. This might solve the error.
In essence, instead of creating a new Outlook profile, we could follow the steps below to fix the OST file error:
i. Go to "File > Account Settings > Account Settings" and then click Change Folder.
ii. Now, Click "New Outlook Data File" to create a temporary data file.
iii. Next, input a name for this new Outlook data file and then click OK.
iv. Now expand the subfolders and select Inbox folder
v. Next, click OK to close the dialog box
vi. Again, click on the Change Folder button
vii. Now select the Original Inbox folder data file by expanding the subfolder. Then click OK
viii. Now click on the Data Files tab and remove the temporary OST file that we created earlier
ix. Close the Account Settings dialog box and then click "Send/Receive" to check if the error 0x8004010F is resolved
5. Modifying the Firewall / Antivirus Settings
Firewall and antivirus software might affect the performance of Outlook and trigger data file cannot be accessed error.
So, ensure that network access is enabled for "Outlook.exe" file in the antivirus or firewall network settings. The default ports are 25 for outgoing access and 110 for incoming.
6. Repairing OST File
You may also attempt to repair the OST file by using the Inbox Repair tool, which is "SCANPST.EXE". The tool is located in the installation directory of Outlook. To repair the OST file by using SCANPST.EXE, follow the following steps;
i. Go to the following location to find and launch SCANPST.EXE
"C:\Program Files\Microsoft Office\root\OfficeXX\".
ii. Now, click Browse and select the OST file. The default OST file location is: "C:\Users\user\AppData\Local\Microsoft\Outlook".
iii. Next, Click "Start". If the tool finds errors, click the "Repair" button to fix the problem with the OST file.
As soon as the file is repaired, then restart Outlook and click on Send/Receive to check if Outlook is working and error is fixed.
7. Repairing Outlook
You can also try repairing the Outlook installation files to see if the issue will be fixed. Alternatively, you can try to reinstall Outlook incase the repair action does not work. To repair Outlook, simply follow the steps below;
i. Open Control Panel and click on "Programs > Programs and Features".
ii. Locate and click on "Microsoft Office".
iii. Then, click Change.
iv. Now, select "Repair" and Continue and follow the repair wizard.
v. After the repair process, you can open Outlook program to check if the error is fixed
[Need urgent support in fixing "Outlook data file cannot be accessed" error? We are available to help you today.]
Conclusion
This article will guide you on the the different methods of solving Outlook error "Outlook data file cannot be accessed" which results from different reasons such as reasons like corrupt OST file, incorrect outlook configuration, insufficient read/write permissions, and so on.
This article will guide you on the the different methods of solving Outlook error "Outlook data file cannot be accessed" which results from different reasons such as reasons like corrupt OST file, incorrect outlook configuration, insufficient read/write permissions, and so on.