With netsh, Website Owners can seemingly configure network port forwarding on Windows without using any third-party tools.
Here at Ibmi Media, as part of our Server Management Services, we regularly help our Customers with Windows related tasks.
In this context, we shall look into the steps to follow to configure port forwarding on windows using netsh.
How to Configure Port Forwarding on Windows using Netsh Portproxy?
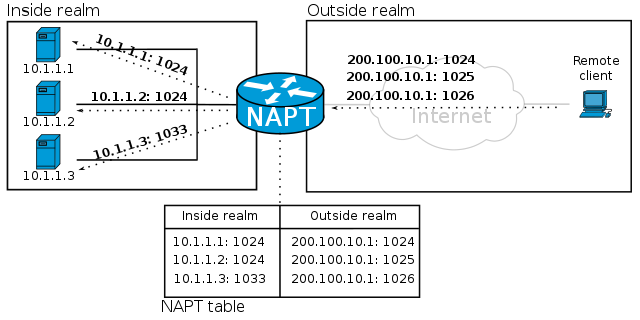
By implementing a port forwarding rule, you can redirect an incoming TCP connection (IPv4 or IPv6) from the local TCP port to any other port number, or even to a port on a remote computer.
We can configure port forwarding in Windows using the Portproxy mode of the Netsh command. The command takes the following syntax;
netsh interface portproxy add v4tov4 listenaddress=localaddress listenport=localport connectaddress=destaddress connectport=destportThe details of the parameters in the command:
"listenaddress" – This is a local IP address to listen for incoming connection (useful if we have multiple NICs or multiple IP addresses on one interface)
"listenport" – Refers to the local listening TCP port number (the connection is waiting on)
"connectaddress" – This is a local or remote IP address (or DNS name) to which we want to redirect incoming connection
"connectport" – This is a TCP port to which the connection from listenport is forwarded to.
A support request that we solved recently dealt with making RDP service to respond on a non-standard port – 3340.
We started off by redirecting incoming traffic from TCP port 3340 to another local port – 3389 which is the default RDP port number.
In the process of using any other port, make sure that no other service or process listens on the local port number that we specified in listenport:
netstat -na|find "3340"Alternatively, we can also check that the port is not listening locally using the PowerShell cmdlet Test-NetConnection:
Test-NetConnection -ComputerName localhost -Port 3340Now, to create a port forwarding rule, run a command prompt as an administrator and run the following command:
netsh interface portproxy add v4tov4 listenport=3340 listenaddress=IP_address connectport=3389 connectaddress=IP_addressReplace IP_address with the current IP address of the server.
Now, use the netstat tool to check that Windows is now listening on local port 3340:
netstat -ano | findstr :3340C:\Windows\system32>netstat -ano | findstr :3340
TCP IP_address:3340 0.0.0.0:0 LISTENING 636IP forwarding may not work in cases where the iphlpsvc (IP Helper) service is not running or if IPv6 support is not enabled on the network interface for which the port forwarding rule is created.
To make port forwarding work on Windows Server 2003/XP, we must additionally set the IPEnableRouter parameter to 1 in the registry key "HKLM\SYSTEM\ControlSet001\Services\Tcpip\Parameters".
Port forwarding with a remote system
We can find out what process is listening on the specified port using its PID (in our example, the PID is 636):
tasklist | findstr 636Now, let us try to connect to this port from a remote computer using any RDP client. Port 3340 should be specified as the RDP port number. It is specified after the colon following the RDP server address.
If we want to forward an incoming TCP connection to a remote computer, use the following command;
netsh interface portproxy add v4tov4 listenport=3389 listenaddress=IP_address1 connectport=3389 connectaddress=IP_address2This rule will redirect all incoming RDP traffic (from local TCP port 3389) from this computer to a remote host with an IP address IP_address2.
Managing Port Forwarding Rules in Windows
Ensure that the firewall (Microsoft Windows Defender Firewall or a third-party firewall that are often included into an antivirus software) allows incoming connections to the new port. We can add a new allow rule to Windows Defender Firewall with the command:
netsh advfirewall firewall add rule name="forwarded_RDPport_3340" protocol=TCP dir=in localip=IP_address localport=3340 action=allowOr using the New-NetFirewallRule PowerShell cmdlet:
New-NetFirewallRule -DisplayName "forwarder_RDP_3340" -Direction Inbound -Protocol TCP –LocalPort 3340 -Action AllowThen we can create any number of Windows port forwarding rules. All netsh interface portproxy rules are persistent and the system stores it even after a Windows restart.
To display a list of all active TCP port forwarding rules on Windows, run the command:
netsh interface portproxy show allThis will display port forwarding settings in portproxy as follows:
netsh interface portproxy dump#========================
# Port Proxy configuration
#========================
pushd interface portproxy
reset
add v4tov4 listenport=3340 connectaddress=IP_address connectport=3389
popd
# End of Port Proxy configurationTo remove a specific port forwarding rule, run the command below:
netsh interface portproxy delete v4tov4 listenport=3340 listenaddress=IP_addressTo remove all existing mapping rules and completely clear the port forwarding rules table, execute;
netsh interface portproxy resetAnother portproxy feature is an opportunity to make it look like any remote network service is running locally.
For example, let us redirect the connection from the local port 5555 to a remote HTTP server with IP address 157.166.226.25 (CNN website). To do this, execute;
netsh interface portproxy add v4tov4 listenport=5555 connectport=80 connectaddress= 157.166.226.25 protocol=tcpNow if we access http://localhost:5555/ in the browser, the CNN Start page will open. So despite the browser is accessing the local computer, it opens a page from an external web server.
[Need urgent support to configure port forwarding in Windows? We are available to help you today.]
Conclusion
This article will guide you on how to configure port forwarding on windows using netsh in order to redirect an incoming TCP connection from the local TCP port to any other port number.
This article will guide you on how to configure port forwarding on windows using netsh in order to redirect an incoming TCP connection from the local TCP port to any other port number.


