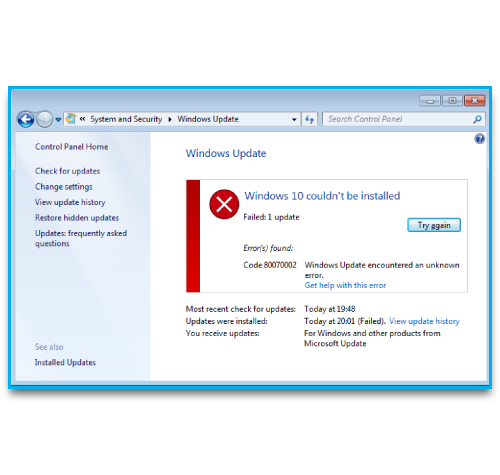
Sometimes, Security updates installations fails and triggers Windows error 0x80073712.
Here at Ibmi Media, as part of our Server Management Services, we regularly help our Customers to fix Windows related errors.
In this context, we shall look into the causes of the error and how to quickly fix it.
What triggers windows error 0x80073712?
Sometimes in a process of installing a security update due to a damaged Windows component store, you might encounter Windows error 0x80073712.
Factors that causes this Window error includes;
i. When some update files are missing or have problems.
ii. In cases where updates were not installed.
iii. Code 80073712: Windows Update ran into a problem.
With the elevated command prompt , you can reset the Windows Update agent settings and clean the SoftwareDistribution directory to solve this error.
How to solve windows error 0x80073712?
To fix this issue, you need to reset Windows Update configuration and clear the local update cache. To do this, simply follow the steps provided below;
i. Start by Stopping Windows Update, BITS, and cryptographic services, by running the following commands;
net stop bits
net stop wuauserv
net stop appidsvc
net stop cryptsvc
taskkill /im wuauclt.exe /f
ii. Next, delete service files qmgr*.dat from the folder "%ALLUSERSPROFILE%\Application Data\Microsoft\Network\Downloader\" as shown below;
Del "%ALLUSERSPROFILE%\Application Data\Microsoft\Network\Downloader\qmgr*.dat"iii. Now, change the name of the system folders that store configuration files and update cache. After the restart of WU services, it will automatically create the folders again as shown below;
Ren %systemroot%\SoftwareDistribution SoftwareDistribution.bak
Ren %systemroot%\system32\catroot2 catroot2.bak
iv. Then, delete the old windowsupdate.log file by running the following command;
del /f /s /q %windir%\windowsupdate.logv. Now you can reset the permissions for BITS and Windows Update services as shown below;
sc.exe sdset bits D:(A;;CCLCSWRPWPDTLOCRRC;;;SY)(A;;CCDCLCSWRPWPDTLOCRSDRCWDWO;;;BA)(A;;CCLCSWLOCRRC;;;AU)(A;;CCLCSWRPWPDTLOCRRC;;;PU)
sc.exe sdset wuauserv D:(A;;CCLCSWRPWPDTLOCRRC;;;SY)(A;;CCDCLCSWRPWPDTLOCRSDRCWDWO;;;BA)(A;;CCLCSWLOCRRC;;;AU)(A;;CCLCSWRPWPDTLOCRRC;;;PU)
sc.exe sdset cryptsvc D:(A;;CCLCSWLOCRRC;;;AU)(A;;CCDCLCSWRPWPDTLOCRSDRCWDWO;;;BA)(A;;CCDCLCSWRPWPDTLCRSDRCWDWO;;;SO)(A;;CCLCSWRPWPDTLOCRRC;;;SY)S:(AU;FA;CCDCLCSWRPWPDTLOCRSDRCWDWO;;WD)
sc.exe sdset trustedinstaller D:(A;;CCLCSWLOCRRC;;;AU)(A;;CCDCLCSWRPWPDTLOCRSDRCWDWO;;;BA)(A;;CCDCLCSWRPWPDTLCRSDRCWDWO;;;SO)(A;;CCLCSWRPWPDTLOCRRC;;;SY)S:(AU;FA;CCDCLCSWRPWPDTLOCRSDRCWDWO;;WD)
vi. Next, re-register the files of system dynamic libraries (dll) related to BITS and Windows Update by running the following command;
cd /d %windir%\system32
regsvr32.exe /U /s vbscript.dll
regsvr32.exe /U /s mshtml.dll
regsvr32.exe /U /s msjava.dll
regsvr32.exe /U /s msxml.dll
regsvr32.exe /U /s actxprxy.dll
regsvr32.exe /U /s shdocvw.dll
regsvr32.exe /U /s Mssip32.dll
regsvr32.exe /U /s wintrust.dll
regsvr32.exe /U /s initpki.dll
regsvr32.exe /U /s dssenh.dll
regsvr32.exe /U /s rsaenh.dll
regsvr32.exe /U /s gpkcsp.dll
regsvr32.exe /U /s sccbase.dll
regsvr32.exe /U /s slbcsp.dll
regsvr32.exe /U /s cryptdlg.dll
regsvr32.exe /U /s Urlmon.dll
regsvr32.exe /U /s Oleaut32.dll
regsvr32.exe /U /s msxml2.dll
regsvr32.exe /U /s Browseui.dll
regsvr32.exe /U /s shell32.dll
regsvr32.exe /U /s atl.dll
regsvr32.exe /U /s jscript.dll
regsvr32.exe /U /s msxml3.dll
regsvr32.exe /U /s softpub.dll
regsvr32.exe /U /s wuapi.dll
regsvr32.exe /U /s wuaueng.dll
regsvr32.exe /U /s wuaueng1.dll
regsvr32.exe /U /s wucltui.dll
regsvr32.exe /U /s wups.dll
regsvr32.exe /U /s wups2.dll
regsvr32.exe /U /s wuweb.dll
regsvr32.exe /U /s scrrun.dll
regsvr32.exe /U /s msxml6.dll
regsvr32.exe /U /s ole32.dll
regsvr32.exe /U /s qmgr.dll
regsvr32.exe /U /s qmgrprxy.dll
regsvr32.exe /U /s wucltux.dll
regsvr32.exe /U /s muweb.dll
regsvr32.exe /U /s wuwebv.dll
regsvr32.exe /s vbscript.dll
regsvr32.exe /s mshtml.dll
regsvr32.exe /s msjava.dll
regsvr32.exe /s msxml.dll
regsvr32.exe /s actxprxy.dll
regsvr32.exe /s shdocvw.dll
regsvr32.exe /s Mssip32.dll
regsvr32.exe /s wintrust.dll
regsvr32.exe /s initpki.dll
regsvr32.exe /s dssenh.dll
regsvr32.exe /s rsaenh.dll
regsvr32.exe /s gpkcsp.dll
regsvr32.exe /s sccbase.dll
regsvr32.exe /s slbcsp.dll
regsvr32.exe /s cryptdlg.dll
regsvr32.exe /s Urlmon.dll
regsvr32.exe /s Oleaut32.dll
regsvr32.exe /s msxml2.dll
regsvr32.exe /s Browseui.dll
regsvr32.exe /s shell32.dll
regsvr32.exe /s Mssip32.dll
regsvr32.exe /s atl.dll
regsvr32.exe /s jscript.dll
regsvr32.exe /s msxml3.dll
regsvr32.exe /s softpub.dll
regsvr32.exe /s wuapi.dll
regsvr32.exe /s wuaueng.dll
regsvr32.exe /s wuaueng1.dll
regsvr32.exe /s wucltui.dll
regsvr32.exe /s wups.dll
regsvr32.exe /s wups2.dll
regsvr32.exe /s wuweb.dll
regsvr32.exe /s scrrun.dll
regsvr32.exe /s msxml6.dll
regsvr32.exe /s ole32.dll
regsvr32.exe /s qmgr.dll
regsvr32.exe /s qmgrprxy.dll
regsvr32.exe /s wucltux.dll
regsvr32.exe /s muweb.dll
regsvr32.exe /s wuwebv.dll
vii. Now, reset Winsock settings by using the following command;
netsh winsock resetviii. Next, reset system proxy settings by running the following command;
netsh winhttp reset proxyix. Now, when using a local WSUS server, we can also reset the current binding of a client to the WSUS server by deleting the following parameters in the registry key "HKLM\SOFTWARE\Microsoft\Windows\CurrentVersion\WindowsUpdate" as shown below;
REG DELETE "HKLM\SOFTWARE\Microsoft\Windows\CurrentVersion\WindowsUpdate" /v AccountDomainSid /f
REG DELETE "HKLM\SOFTWARE\Microsoft\Windows\CurrentVersion\WindowsUpdate" /v PingID /f
REG DELETE "HKLM\SOFTWARE\Microsoft\Windows\CurrentVersion\WindowsUpdate" /v SusClientId /f
REG DELETE "HKLM\SOFTWARE\Policies\Microsoft\Windows\WindowsUpdate" /v TargetGroup /f
REG DELETE "HKLM\SOFTWARE\Policies\Microsoft\Windows\WindowsUpdate" /v WUServer /f
REG DELETE "HKLM\SOFTWARE\Policies\Microsoft\Windows\WindowsUpdate" /v WUStatusServer /f
x. You can start the already stopped services by running the following commands;
sc.exe config wuauserv start= auto
sc.exe config bits start= delayed-auto
sc.exe config cryptsvc start= auto
sc.exe config TrustedInstaller start= demand
sc.exe config DcomLaunch start= auto
net start bits
net start wuauserv
net start appidsvc
net start cryptsvc
xi. For optimal performance, you can install or reinstall the latest version of Windows Update Agent (WUA). Download the file for your Windows version.
To force a reinstall of the Windows Update Agent, run the following commands:
For Windows 7 x86, execute;
WindowsUpdateAgent-7.6-x86.exe /quiet /norestart /wuforce
for Windows 7 x64:
WindowsUpdateAgent-7.6-x64.exe /quiet /norestart /wuforce
Finally, you can restart the Computer system and execute synchronization with Windows Update server/WSUS. To do this, run;
wuauclt /resetauthorization /detectnowHow to check the status of the updates?
Ensure that you check the Windows Update for any errors in the process of checking, downloading, and installing the updates.
Also, you can remove backups after the updates downloads and installs correctly. To do this, run the command below;
Ren %systemroot%\SoftwareDistribution SoftwareDistribution.bak
Ren %systemroot%\system32\catroot2 catroot2.bak
[Need urgent support in fixing Windows errors? We are always available to help you today.]
Conclusion
This guide will help to solve Windows error 0x80073712 which is usually triggered due to a damaged Windows component store and makes security updates to fail.
This guide will help to solve Windows error 0x80073712 which is usually triggered due to a damaged Windows component store and makes security updates to fail.