Point In Time recovery in SQL Server allows to restore a database into a state it was at any point in time.
Here at Ibmi Media, as part of our Server Management Services, we regularly help our Customers to perform SQL Server tasks.
In this context, you will see how to perform Point in Time Recovery in SQL.
More information about Point in Time Recovery in SQL Server?
Point In Time recovery is a process to recover or restore our database until the point it was lost.
Sometimes detrimental command will probably issue against one of our databases. This will need us to recover the lost data. There are several actions that we might be able to take to recover the lost data.
One option that SQL Server offers is the ability to do point in time restores of our data in order to restore the database. It will bring the data back to the point right before that detrimental command.
Security Permissions
If the database does not exist, we must have CREATE DATABASE permissions to be able to execute RESTORE.
If the database exists, RESTORE permissions default to members of the sysadmin and dbcreator fixed server roles and the owner (dbo) of the database.
RESTORE permissions are given to roles in which membership information is always readily available to the server. Because fixed database role membership can check only when the database is accessible and undamaged. It is not always the case.
[Can't set permissions in SQL Server? We'd be happy to assist!]
Point in Time Restore
The point in time recovery is relevant only for databases that are using full or bulk-logged recovery mode.
If a log backup contains bulk-logged changes, point-in-time recovery is not possible to a point within that backup. The database must recover to the end of the transaction log backup.
We restore the last full database backup and, if any, the last differential database backup without recovering the database;
RESTORE DATABASE database_name FROM backup_device WITH NORECOVERYThen we apply each transaction log backup in the same sequence they were created, specifying the time at which we intend to stop restoring the log;
RESTORE DATABASE database_name FROM WITH STOPAT=time, RECOVERYThe basic syntax is:
RESTORE LOG database_name FROM <backup_device> WITH STOPAT =time, RECOVERY
T-SQL Code:
— Restore the full database backup.
RESTORE DATABASE AdventureWorks
FROM disk=’backup file location’
WITH NORECOVERY;
GO
— Restore the required Log backup with STOPAT keyword.
RESTORE LOG AdventureWorks
FROM disk=’backup file location’
WITH RECOVERY, STOPAT = ‘Apr 15, 2005 12:00 AM’;
GO
Point in Time Restore and SQL Server Management Studio.
To restore a database to a Point in Time Recovery in SQL Server, our Support Engineers suggest the below steps;
i. In Object Explorer, we connect to the appropriate instance of the SQL Server Database Engine and expand the server tree.
ii. Expand Databases. Depending on the database, either select a user database or expand System Databases, and then select a system database.
iii. Right-click the database, point to Tasks -> Restore -> Database.
iv. On the General page, use the Source section to specify the source and location of the backup sets to restore.
Select one of the following options:
a) Database
Select the database to restore from the drop-down list. The list contains databases backed up according to the msdb backup history.
If the backup is taken from a different server, the destination server will not have the backup history information for the specified database. In this case, select Device to manually specify the file or device to restore.
b) Device
Click the browse button to open the Select backup devices dialog box. To select one or more devices for the Backup media box, click Add.
After you add the devices you want to the Backup media list box, click OK to return to the General page.
In the Source: Device: Database list box, select the name of the database which should be restored.
This list is only available when we select the device. Only databases that have backups on the selected device will be available.
i. In the Destination section, the Database box has the name of the database to be restored. To change the name of the database, enter the new name in the Database box.
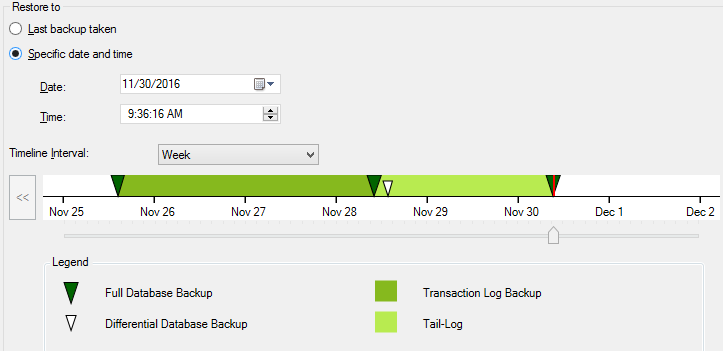
ii. Click Timeline to access the Backup Timeline dialog box.
iii. In the Restore to section, click Specific date and time.
iv. Use either the Date and Time boxes or the slider bar to specify a specific date and time to where the restore should stop. Click OK.
Use the Timeline Interval box to change the amount of time displayed on the timeline.
v. After we specify a specific point in time, the Database Recovery Advisor ensures that only backups that are required for restoring to that point in time are selected. These backups make up the restoration plan for our point-in-time restore.
vi. On the Options page, in the Restore options panel, we can select any of the following options, if appropriate for our situation:
Overwrite the existing database (WITH REPLACE)
Preserve the replication settings (WITH KEEP_REPLICATION)
Restrict access to the restored database (WITH RESTRICTED_USER)
vii. Then we need to select an option for the Recovery state box. This box determines the state of the database after the restore operation.
RESTORE WITH RECOVERY
It is the default behavior that leaves the database ready for use by rolling back the uncommitted transactions. This cannot restore additional transaction logs. We select this option if we are restoring all of the necessary backups now.
RESTORE WITH NORECOVERY
This leaves the database non-operational and does not roll back the uncommitted transactions. It can restore additional transaction logs. We cannot use the database until it is recovered.
RESTORE WITH STANDBY
This leaves the database in read-only mode. It undoes uncommitted transactions but saves the undo actions in a standby file so that recovery effects can revert.
i. Take a tail-log backup before restore if it is necessary for the point in time that you have selected. We do not need to modify this setting, but we can choose to back up the tail of the log even if it is not required.
ii. Restore operations may fail if there are active connections to the database. Check the Close existing connections option to ensure that all active connections between Management Studio and the database are closed.
iii. Select Prompt before restoring each backup if you wish to be prompted between each restore operation. This is not usually necessary unless the database is large and you wish to monitor the status of the restore operation.
[Still, stuck with Restoration in SQL Server? Contact us Now!]
Conclusion
This article will guide you on how to perform point in time #recovery in #SQL #Server which is very useful for #database administrators in case of a need to recover accidental data deletes or drops.
This article will guide you on how to perform point in time #recovery in #SQL #Server which is very useful for #database administrators in case of a need to recover accidental data deletes or drops.