Microsoft SQL Server 2017 Express is a free, feature-rich editions of SQL Server that is ideal for learning, developing, powering desktop, web & small server applications, and for redistribution by ISVs.
Here at Ibmi Media, as part of our Server Management Services, we regularly help our Customers to perform Software installation tasks.
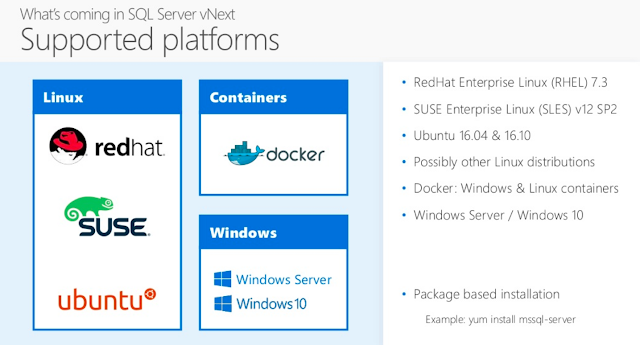
In this context, we shall look into the steps to install MS SQL Server 2017 on Ubuntu 18.04
How to install MS SQL Server 2017 on Ubuntu 18.04 ?
In 2016, Microsoft's relational database, MS SQL, was released under an open-source license.
Installing MS SQL on Ubuntu Server 18.04 is actually quite easy. Once you have it installed, the database server will function smoothly.
In order to begin the installation, you need a working Ubuntu 18.04 Server instance and a user with sudo privileges.
We can run the MS SQL Server with a trial license, but beyond that, we will need to purchase a license to put the MS SQL Server into production usage.
How to Access the Ubuntu server using SSH ?
Moving ahead let us focus on the step-by-step process of accessing the Ubuntu Server using SSH.
Step 1: Update and upgrade the OS
To update, we run the following command:
$ sudo apt-get updateOn the other hand, to upgrade, we run:
$ sudo apt-get upgrade
$ sudo apt install software-properties-common
Step 2: Import public repository GPG keys
We can import public repository GPS keys by running the following command:
$ sudo wget -qO- https://packages.microsoft.com/keys/microsoft.asc | sudo apt-key add –
Expected Output: OK
However, if we get any error we try the following commands and retry the above command again:
$ sudo apt-get remove libcurl4
$ sudo apt-get install libcurl3
Step 3: Register the Microsoft SQL Server Ubuntu repository
i. In order to register the MS SQL SQL Server Ubuntu repository, we run:
$ sudo add-apt-repository “$(wget -qO- https://packages.microsoft.com/config/ubuntu/16.04/mssql-server-2017.list)”ii. Then we run:
$ sudo apt-get updateStep 4: Install SQL server
To do this, execute:
$ sudo apt-get install -y mssql-serverWait at least five or six minutes for all packages to download and install.
After successful execution of the above command, SQL Server should finish installation on our machine.
Step 5: Set the SA password
After the package installation finishes, we run mssql-conf setup and follow the prompts to set the SA password and choose the edition.
For SQL Server 2017, Evaluation, Developer, and Express are freely licensed. We choose the version by entering a specified number in front of the version name and provide a strong password for SA (System Administrator) account.
$ sudo /opt/mssql/bin/mssql-conf setupChoose an edition of SQL Server:
Evaluation (free, no production use rights, 180-day limit)
Developer (free, no production use rights)
Express (free)
Web (PAID)
Standard (PAID)
Enterprise (PAID)
Enterprise Core (PAID)I bought a license through a retail sales channel and have a product key to enter.
Then type 2 then press Enter.
Do you accept the license terms? [Yes/No]: yes
Type SA password two times then.
Step 6: Verify if the service is running
Once the configuration is done, we need to verify that the server is running.
$ systemctl status mssql-serverIn case we need to give the service a restart, we run:
$ systemctl restart mssql-server.serviceNow the SQL Server has installed we can connect to this service remotely if we have SQL Server Management Studio on the Windows machine or install the command line tools from below.
How to Install the SQL Server command-line tools ?
Step 1: Install CURL
We need to install CURL if we do not have it already.
For the installation, we run:
$ sudo apt install curlStep 2: Import the public repository GPG keys
Execute the command below:
$ curl https://packages.microsoft.com/keys/microsoft.asc | sudo apt-key add –Step 3: Register the Microsoft Ubuntu repository.
To do this, run:
$ curl https://packages.microsoft.com/config/ubuntu/16.04/prod.list | sudo tee /etc/apt/sources.list.d/msprod.listThen, Update the sources list and run the installation command with the unixODBC developer package.
$ sudo apt-get update
$ sudo apt-get install mssql-tools unixodbc-dev
If we want to update the mssql-tools, we run:
$ sudo apt-get update
$ sudo apt-get install mssql-tools
Now it is time to connect. But before that it is better to add /opt/mssql-tools/bin/ to the PATH environment variable
$ export PATH=”$PATH:/opt/mssql-tools/bin”Connect locally:
$ sqlcmd -S localhost -U SA -P [YourPassword>]sqlcmd is executed with parameters for the SQL Server name (-S), the user name (-U), and the password (-P).
If we connect locally, the server name is localhost. The user name is SA and the password is the one we provided for the SA account during setup.
[Failed to connect remotely to SQL Server? We'd be happy to assist. ]
Conclusion
This article will guide you on how to #install MS SQL on #Ubuntu Server 18.04.
To Install #Microsoft SQL Server 2017:
1. Visit Microsoft's official SQL Server 2017 download page.
2. Select the edition you want to #download.
3. Click Download now below your selected edition.
4. The wizard will prompt you to select an installation type.
5. On the next page, select a directory for the installation folder.
To connect to the SQL Server using #SSMS:
i. From the Connect menu under the Object Explorer, choose the #Database Engine.
ii. Then, enter the information for the Server name (localhost), Authentication (SQL Server Authentication), and password for the sa user.
iii. Click the Connect button to connect to the SQL Server.