Are you trying to know more about MySQL BLOB Data Type?
This guide is for you.
The benefits of storing images in a database as opposed to storing them in a file system include portability, security, and ease of backup.
Suppose we are building an application such as an employees’ database that requires information and images to be stored together, then this technology can be of great use to us.
Here at Ibmi Media, as part of our Server Management Services, we regularly help our Customers to perform MySQL related queries.
In this context, we shall look into how to use the MySQL BLOB data type to store images with PHP on Ubuntu 18.04.
More about MySQL BLOB Data Type?
A Binary Large Object (BLOB) is a MySQL data type that can store binary data such as images, multimedia, and PDF files.
As we mentioned early, if we create applications that require a tightly-coupled database where images should be in sync with related data, it is convenient to store them in a MySQL database.
Here comes the benefit of MySQL BLOB data type. It eliminates the need for creating a separate file system for storing images. Similarly, they centralize the database, making it more portable and secure because the data isolates from the file system.
Since we can create a single MySQL dump file that contains all the data, creating backups is also more seamless.
How to set up MySQL BLOB Data Type ?
To begin, you need to have the following:
i. An Ubuntu 18.04 server configured with a non-root user with sudo privileges.
ii. Apache, MySQL, and PHP set up on Ubuntu 18.04 server.
Step 1 – Create a Database
a. Initially, let us create a sample database. To do this, access the server via SSH and run the following command to log in to the MySQL server as root:
$ sudo mysql -u root -pb. We need to enter the root password of the MySQL database.
Then, run the following command to create a database. Let’s name it test_company:
mysql> CREATE DATABASE test_company;Once done, our output will be similar to:
Query OK, 1 row affected (0.01 sec)c. Next, we create a test_user account on the MySQL server and replace PASSWORD with a strong password:
mysql> CREATE USER 'test_user'@'localhost' IDENTIFIED BY 'PASSWORD';The output will be like this:
Query OK, 0 rows affected (0.01 sec)d. To grant test_user full privileges on the test_company database, we run:
mysql> GRANT ALL PRIVILEGES ON test_company.* TO 'test_user'@'localhost';Our output will be like the following:
Query OK, 0 rows affected (0.01 sec)e. Finally, we flush the privileges table in order for MySQL to reload the permissions:
mysql> FLUSH PRIVILEGES;We will receive an output similar to:
Query OK, 0 rows affected (0.01 sec)Now that it is done, we will move on to create a products table to store sample products.
This table is to insert and retrieve records to demonstrate how MySQL BLOB works.
i. First, we need to log out from the MySQL server:
mysql> QUIT;ii. Then, log back in again with the credentials of the test_user:
$ mysql -u test_user -piii. We will receive a prompt, enter the password for the test_user there. Next, run the below command to switch to the test_company database;
mysql> USE test_company;iv. Once we select the test_company database, MySQL will display:
Database changedv. Next, we run the below command to create a products table:
mysql> CREATE TABLE `products` (product_id BIGINT PRIMARY KEY AUTO_INCREMENT, product_name VARCHAR(50), price DOUBLE, product_image BLOB) ENGINE = InnoDB;The table has four columns:
1. product_id:
This column uses a BIGINT data type in order to accommodate a large list of products up to a maximum of 2⁶³-1 items. We mark the column as PRIMARY KEY to uniquely identify products. For MySQL to handle the generation of new identifiers for inserted columns, we use the keyword AUTO_INCREMENT.
2. product_name:
This column holds the names of the products. We use the VARCHAR data type since this field will generally handle alphanumerics up to a maximum of 50 characters(hypothetical).
3. price:
The products table contains the price column to store the retail price of products. Since a few products have floating values we use the DOUBLE data type.
4. product_image:
It uses a BLOB data type to store the actual binary data of the product's images.
We use the InnoDB storage ENGINE for the table to support a wide range of features including MySQL transactions.
Once we are done creating the products table, we will receive the following output:
Query OK, 0 rows affected (0.03 sec)Then we log out from your MySQL server:
mysql> QUIT;Then, our output will be:
ByeStep 2 – Create PHP Scripts to connect and populate the Database
In this step, we will create a PHP script that will connect to the MySQL database. It will prepare three sample products and insert them into the products table.
i. To create the PHP code, we open a new file in a text editor:
$ sudo nano /var/www/html/config.phpii. Then, we enter the following information into the file and replace PASSWORD with the test_user password.
<?php
define(‘DB_NAME’, ‘test_company’);define(‘DB_USER’, ‘test_user’);define(‘DB_PASSWORD’, ‘PASSWORD’);define(‘DB_HOST’, ‘localhost’);
$pdo = new PDO(“mysql:host=” . DB_HOST . “; dbname=” . DB_NAME, DB_USER, DB_PASSWORD);$pdo->setAttribute(PDO::ATTR_ERRMODE, PDO::ERRMODE_EXCEPTION);$pdo->setAttribute(PDO::ATTR_EMULATE_PREPARES, false);iii. Save and close the file.
In this file, we have four PHP constants to connect to the MySQL database:
DB_NAME: This constant holds the name of the test_company database.
DB_USER: This variable holds the test_user username.
DB_PASSWORD: This constant stores the MySQL PASSWORD of the test_user account.
DB_HOST: This represents the server where the database resides. In this case, you are using the localhost server.
The following line in the file initiates a PHP Data Object (PDO) and connects to the MySQL database:
…$pdo = new PDO("mysql:host=" . DB_HOST . "; dbname=" . DB_NAME, DB_USER, DB_PASSWORD);…Toward the end of the file, we have set a couple of PDO attributes:
ATTR_ERRMODE, PDO::ERRMODE_EXCEPTION: This attribute instructs PDO to throw an exception that can be logged for debugging purposes.
ATTR_EMULATE_PREPARES, false: This option increases security by telling the MySQL database engine to do the preparation instead of PDO.
iv. We will include the /var/www/html/config.php file in two PHP scripts that we will create next for inserting and retrieving records respectively.
v. First, create the /var/www/html/insert_products.php PHP script for inserting records to the products table:
$ sudo nano /var/www/html/insert_products.phpvi. Then, we add the following information into the /var/www/html/insert_products.php file:
<?php
require_once 'config.php';
$products = [];
$products[] = [‘product_name’ => ‘VIRTUAL SERVERS’,‘price’ => 5,‘product_image’ => file_get_contents(“https://i.imgur.com/VEIKbp0.png”)];
$products[] = [‘product_name’ => ‘MANAGED KUBERNETES’,‘price’ => 30,‘product_image’ => file_get_contents(“https://i.imgur.com/cCc9Gw9.png”)];
$products[] = [‘product_name’ => ‘MySQL DATABASES’,‘price’ => 15,‘product_image’ => file_get_contents(“https://i.imgur.com/UYcHkKD.png” )];
$sql = “INSERT INTO products(product_name, price, product_image) VALUES (:product_name, :price, :product_image)”;
foreach ($products as $product) {$stmt = $pdo->prepare($sql);$stmt->execute($product);}echo “Records inserted successfully”;vii. Then, Save and close the file.
In the file, we have the config.php file at the top which is to define the database variables and to connect to the database. The file also initiates a PDO object and stores it in a $pdo variable.
viii. Next, we have created an array of the product's data to insert into the database. Apart from the product_name and price, the script uses PHP’s in-built file_get_contents function to read images from an external source and pass them as strings to the product_image column.
ix. Next, we have prepared an SQL statement and used the PHP foreach{…} statement to insert each product into the database.
x. To execute the /var/www/html/insert_products.php file, we run it in a browser window using the following URL:
http://your-server-IP/insert_products.phpMake sure to replace your-server-IP with the public IP address of your server.
xi. Finally, we will see a success message in the browser confirming records were inserted into the database.
Step 3 – Displaying Products’ Information From the MySQL Database
Let us now code another PHP script that queries and displays the products’ information in an HTML table on the browser.
i. To create the file, we type the following:
$ sudo nano /var/www/html/display_products.phpii. Then, enter the following information into the file:
<html><title>Using BLOB and MySQL</title><body>
<?php
require_once ‘config.php’;
$sql = “SELECT * FROM products”;$stmt = $pdo->prepare($sql);$stmt->execute();?>
<table border = ‘1’ align = ‘center’> <caption>Products Database</caption><tr><th>Product Id</th><th>Product Name</th><th>Price</th><th>Product Image</th></tr>
<?phpwhile ($row = $stmt->fetch(PDO::FETCH_ASSOC)) {echo ‘<tr>’;echo ‘<td>’ . $row[‘product_id’] . ‘</td>’;echo ‘<td>’ . $row[‘product_name’] . ‘</td>’;echo ‘<td>’ . $row[‘price’] . ‘</td>’;echo ‘<td>’ .‘<img src = “data:image/png;base64,’ . base64_encode($row[‘product_image’]) . ‘” width = “50px” height = “50px”/>’. ‘</td>’;echo ‘</tr>’;}?>
</table></body></html>iii. Save the changes to the file and close it.
iv. Here we have the config.php file in order to connect to the database. Then, we have prepared and executed an SQL statement using PDO to retrieve all items from the products table using the SELECT * FROM products command.
v. Next, we have an HTML table and populated it with the products’ data using the PHP while() {…} statement.
The line $row = $stmt->fetch(PDO::FETCH_ASSOC) queries the database and stores the result in the $row variable as a multi-dimensional array, which we display in an HTML table column using the $row[‘column_name’] syntax.
The images from the product_image column are enclosed inside the <img src = “”> tags. We use the width and height attributes to resize the images to a smaller size that can fit in the HTML table column.
vi. In order to convert the data held by the BLOB data type back to images, we use the in-built PHP base64_encode function and the following syntax for the Data URI scheme:
data:media_type;base64, base_64_encoded_dataIn this case, the image/png is the media_type and the Base64 encoded string from the product_image column is the base_64_encoded_data.
v. Next, we execute the display_products.php file in a web browser:
http://your-server-IP/display_products.phpvi. After running the display_products.php file in the browser, we will see an HTML table with a list of products and associated images.
vii. This confirms that the PHP script for retrieving images from MySQL is working as expected.
[Stuck between the process of setting up MySQL BLOB Data Type? We are here to help you. ]
Conclusion
This article will guide you on how #MySQL #BLOB data type works in storing and displaying images with #PHP on Ubuntu 18.04. A BLOB is a binary large object that can hold a variable amount of data.
A Binary Large OBject (BLOB) is a collection of #binary data stored as a single entity in a database management system. Blobs are typically images, audio or other multimedia objects, though sometimes binary executable code is stored as a blob.
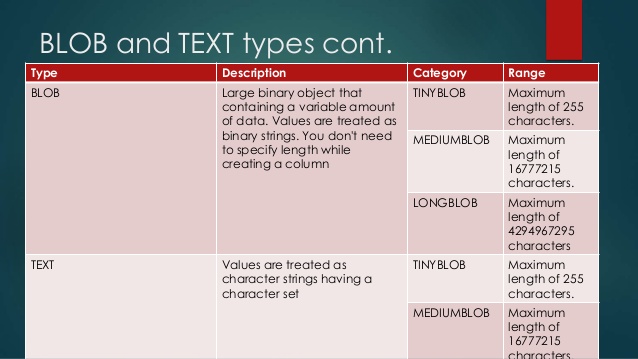
The four BLOB types are #TINYBLOB , #BLOB , #MEDIUMBLOB , and #LONGBLOB . These differ only in the maximum length of the values they can hold. The four TEXT types are TINYTEXT , TEXT , MEDIUMTEXT , and LONGTEXT .
The size of blob in MySQL:
TINYBLOB - Up to 255 bytes - 1 byte
BLOB - Up to 64 Kb - 2 bytes
MEDIUMBLOB - Up to 16 Mb - 3 bytes
LONGBLOB - Up to 4 Gb - 1 Bytes
This article will guide you on how #MySQL #BLOB data type works in storing and displaying images with #PHP on Ubuntu 18.04. A BLOB is a binary large object that can hold a variable amount of data.
A Binary Large OBject (BLOB) is a collection of #binary data stored as a single entity in a database management system. Blobs are typically images, audio or other multimedia objects, though sometimes binary executable code is stored as a blob.
The four BLOB types are #TINYBLOB , #BLOB , #MEDIUMBLOB , and #LONGBLOB . These differ only in the maximum length of the values they can hold. The four TEXT types are TINYTEXT , TEXT , MEDIUMTEXT , and LONGTEXT .
The size of blob in MySQL:
TINYBLOB - Up to 255 bytes - 1 byte
BLOB - Up to 64 Kb - 2 bytes
MEDIUMBLOB - Up to 16 Mb - 3 bytes
LONGBLOB - Up to 4 Gb - 1 Bytes


