SQL Server Management Studio (SSMS) is a free Windows application to configure, manage, and administer Microsoft SQL Server (MSSQL).
SQL Server Management Studio (SSMS) is an integrated environment for managing any SQL infrastructure. Use SSMS to access, configure, manage, administer, and develop all components of SQL Server, Azure SQL Database, and Azure Synapse Analytics.
Here at Ibmi Media, as part of our Server Management Services, we regularly help our Customers to perform SQL related queries.
In this context, we shall look into to use SQL Server Management Studio (SSMS).
How to install SQL Server Management Studio ?
SQL Server Management Studio includes an Object Explorer to view and interact with databases and other elements, a Query window to write and execute Transact-SQL queries, and script editors for developers and administrators.
The first step to install the SSMS is to download its latest general availability (GA) version. SSMS can be downloaded from this URL.
Now, double-click to open the SSMS Setup file to begin the SSMS install process.
Installing SSMS is a very simple and straightforward process. When the installer opens, we need to click Install to accept the license and start installing components.
The installation will take several minutes and may require a restart of your computer if it needs to update older components. Once setup is completed and all specified components are installed successfully, we can close the installer and remove it from the system.
How to use SSMS to Manage MSSQL ?
The settings we use when connecting to MSSQL with SSMS depend on whether we are accessing it on a remote system/network or locally.
For instance, when accessing MSSQL locally we can refer to server name as localhost. However, on remote systems, the most reliable way to reference the server is by the IP address.
Let us now look at the steps for it in detail.
1. To open SSMS, click the new icon on your desktop or, click on the Start Menu and start typing SSMS or look for the program in the Microsoft SQL Server Tools folder.
2. When we start SSMS, it asks us to connect to an MSSQL server and allows us to set connection properties.
3. Once we have entered the required information, we can click Connect to access to the SQL Server.
Connection properties
Let us now discuss the details to be given in step 2:
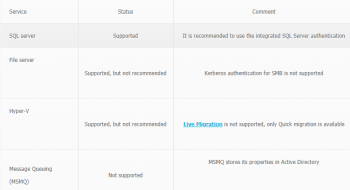
i. Server type: The most common server type is Database Engine. Other types include Analysis Services, Integration Services, Reporting Services and Azure Storage.
ii. Server name: When connecting to a MSSQL Server, if MSSQL is installed on the same server as SSMS, we can connect by referencing the server name as localhost. Likewise, use IP address if it is on remote server.
iii. MSSQL ports: The default port for MSSQL is TCP 1433. If the MSSQL server uses a different port, we can specify the port by putting a comma after the server name and then the port number of the MSSQL server.
iv. Authentication: Use Windows Authentication to log in with a Windows user account and password if SSMS is on the same server as of MSSQL. If it is on a remote server or network, we will be using SQL Server Authentication.
v. Username/password: All logins to a MSSQL server require a username and password. The MSSQL administrator can provide you with a login, or you may be logging in with a MSSQL administrator user and password.
We may need to configure MSSQL to allow TCP/IP Ports and configure a hardware firewall or the Windows Firewall to allow access from our IP address in case of difficulties to connect to MSSQL on a remote system.
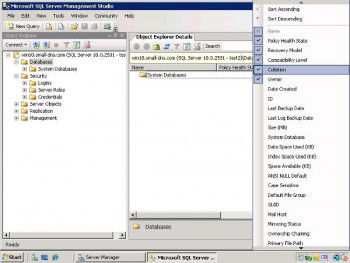
SSMS Object Explorer
The SSMS Object Explorer is the main area we will interact with to Manage MSSQL. It includes options for managing databases, security and more.
i. At the top of Object Explorer, we have a Connect drop-down that allows us to make more connections, and icons to connect/disconnect the current MSSQL server object.
ii. Right-Clicking Server Objects in Object Explorer allows you to access menus for additional tasks related to the object type.
iii. Expanding Objects in Object Explorer allows you to see the contents, and interact and manage them.
To expand an object, you can double-click it, or click on the [+] symbol to the left of the object.
How to manage Databases in SSMS Object Explorer ?
To create a database, expand Databases to see the current list of databases.
i. Right-click Databases and choose New Database.
ii. The New Database page opens. This is where we name the database, select the owner and set options including the MSSQL compatibility level.
iii. Once we are done, we click OK to create the database with the options we have selected.
The common database tasks to be performed are:
i. Attaching Databases – Select an MDF file and then set a name and path for the database.
ii. Detaching Databases – Remove the database from MSSQL.
iii. Backing up and restoring databases.
iv. Take offline – Allow us to do the maintenance without the database being online and in use (very useful for backups)..
v. Shrink – Can help free up disk space by removing unused space in database files.
vi. Import/Export data – Allow us to bring data in and get data out of our databases using files including databases, spreadsheets, and text files.
How to manage Security in SSMS Object Explorer ?
The available objects will be listed under the Security option.
i. Expand Logins to see the current list of logins.
ii. To create a new login, Right-click Logins and choose New Login.
iii. It opens the New Login page. This is where we name login, set the authentication type, set a password, select a role, and map the user to a database.
iv. In most cases, we want to create SQL logins, so we choose SQL Authentication.
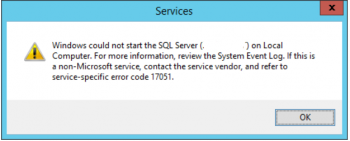
It is a good idea to uncheck the box for User must change password at next login to avoid the potential for remote logins to fail with Error 18456.
v. Set the Server Roles to allow the login to have any required server-wide privileges. User Mapping allows us to map the login to databases and select the user and default schema.
vi. Once we are done configuring the login, click OK to create the login with the options we have selected.
vii. To allow a login for a user and change permissions, in SSMS Object Explorer, expand Security, Logins. A red x on a Login indicates login is disabled.
viii. To fix this, right-click the user and choose Properties, then click the Status page. Enabling login for the user and click OK.
[Need any further assistance to setup SQL server management studio? – We're available 24*7. ]
Conclusion
This article will guide you on how to setup SQL server management studio. SQL Server Management Studio is a free #Windows #application to configure, manage, and administer Microsoft SQL Server (#MSSQL).
SSMS is available only as a 32-bit application for Windows.
To get SQL Server Management Studio:
1. Go To Start Menu>Programs>Microsoft SQL Server Tools 18> Microsoft #SSMS 18.
2. Below 'Connect to Server' screen will appear.
3. Server Name defaults to the name selected while installing MS SQL server.
4. Server type: This is an option to select one out of four available MS SQL services option.
To Enable remote connections to your SQL Server:
i. Open #SQL Server Management Studio.
ii. Right-click your server's name and select Properties.
iii. Tick the checkbox Allow remote connections to this server.
iv. Select OK.