Multipath I/O (MPIO) is a Microsoft framework designed to mitigate the effects of a host bus adapter (HBA) failure by providing an alternate data path between storage devices and a Windows operating system.
MPIO enables up to 32 alternate paths to add redundancy and load balancing for Windows storage environments.
Webmasters can enable Multi-Path Input-Output or MPIO on a Windows server either from a graphical interface using the Server Manager console
or from the PowerShell command line.
Here at Ibmi Media, as part of our Server Management Services, we regularly help our Customers to perform Windows related requests.
In this context, we shall look into the steps to enable MPIO on the windows server.
How to install MPIO Installation on Windows Server 2016/2012 R2 ?
Windows Server supports multi-path input-output (MPIO) starting from Windows Server 2008 R2.
By default, Windows Server disables MPIO module.
There are two ways to install it in Windows Server 2016:
i. From a graphical interface using the Server Manager console
ii. From the PowerShell command line
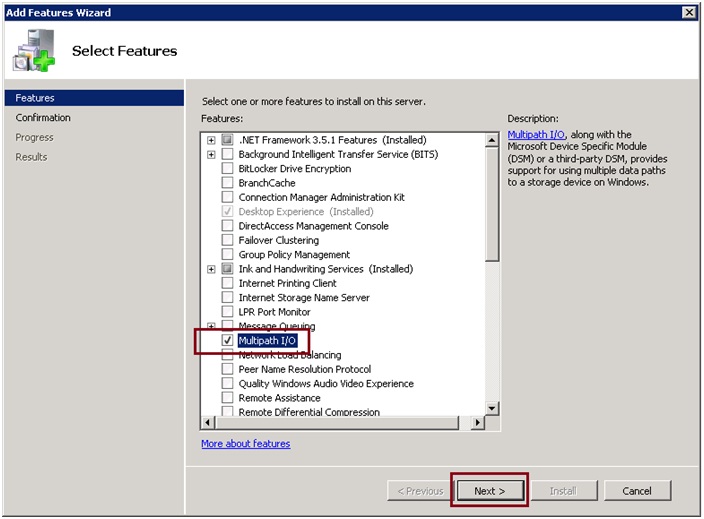
Steps to enable MPIO Using Server Manager ?
1. Open the Server Manager
2. Find and check the Multipath I/O in the Features list
3. Finish MPIO installation and restart the server
How to install Multipath-IO Using PowerShell ?
Run the PowerShell console as an administrator and use the following command to install the Windows Server feature:
Add-WindowsFeature -Name 'Multipath-IO'To make sure that MPIO has been installed on the Windows Server, run this command:
Get-WindowsFeature -Name 'Multipath-IO'To disable MPIO, enter the following command:
Remove-WindowsFeature -Name 'Multipath-IO'How to configure MPIO on Windows Server 2016 ?
After installing the MPIO module, we need to activate it for the LUNs that are available by multiple paths. By default, Windows sees each connection to a disk as different logical disks (LUNs).
Among MPIO components, there is a special module, MSDSM (Microsoft Device Service Module) that allows you to manage load balancing policies.
Typically, native DSM offers better performance and more features than Microsoft. Thus it would be a good idea to install the DSM module provided by the storage manufacturer (IBM DSM, HP DSM MPIO, etc.) though it is present with the standard Microsoft DSM by default.
Allow the DSM module by Microsoft (MSDSM) to automatically merge SAN disks based on the connection type.
MSDSM automatically detects LUNs that have multiple paths to storage and supports the most popular storage devices.
We can do it from the command prompt:
i. For SAS disks: Enable-MSDSMAutomaticClaim -BusType SAS
ii. For iSCSI disks: Enable-MSDSMAutomaticClaim -BusType iSCSI
We can do the same using the mpclaim tools.
The following command will scan all devices detected by a system, find those that have multiple paths, and enable MPIO support for them:
mpclaim.exe -r -i -a ""How to Enable DSM vi GUI ?
We can also enable DSM in the GUI. Open the Server Manager and select MPIO in the Tools menu (or run the command: mpiocpl).
Go to the Discover Multi—Paths tab, check to Add support for SASdevices (or Add supportfor iSCSI devices if you are using iSCSI storage), and click Add.
Then restart your server.
After the restart, open the Device Manager (or the Disk Manager) and make sure that the number of connected disks (LUNs) available to your server has reduced twice (if there are two paths to your storage device).
We can manage the list of devices with MPIO support enabled in the MPIO Devices tab (or using the Get-MSDSMSupportedHw command).
We can add new MPIO devices by clicking Add or from PowerShell:
New-MSDSMSupportedHw -VendorId <vend> -ProductId <product>while deploying a cluster, configure MPIO on all nodes.
To use MPIO while we connect an iSCSI target via 2 paths, select iSCSI LUN while we connect a Target, click Connect, and check the Enable multi-path option.
Then click Advanced and bind different initiator IP addresses to different target IP addresses.
You can get current MPIO settings using PowerShell:
Get-MPIOSetting
PathVerificationState : Disabled
PathVerificationPeriod : 30
PDORemovePeriod : 20
RetryCount : 3
RetryInterval : 1
UseCustomPathRecoveryTime : Disabled
CustomPathRecoveryTime : 40
DiskTimeoutValue : 60
We can change MPIO timer settings as follows:
Set-MPIOSetting -NewPathRecoveryInterval 20 -CustomPathRecovery Enabled -NewPDORemovePeriod 30 -NewDiskTimeout 60 -NewPathVerificationState EnabledThe following MPIO balancing policies are available:
i. FOO — Fail Over Only
ii. RR — Round Robin
iii. LQD — Least Queue Depth
iv. LB — Least Blocks
To change a balancing policy:
Set-MSDSMGlobalLoadBalancePolicy -Policy RRWe can also select the balancing policy in the MPIO tab of the connected LUN properties.
In this example, the Round Robin policy is selected for the array.
To view the full list of PowerShell commands available in the MPIO module, run this command:
Get-Command –Module MpioSAN (Disk) Policy on Windows Server
Windows has a special disk policy (SAN Policy) that determines whether disks must be mounted automatically when they are connected to a host.
We can get the current SAN Policy setting using diskpart.
By default, Offline Shared policy for SAN is used:
diskpart
DISKPART>>san<
Due to this SAN policy, external storage LUNs may be disabled after a restart.
To mount the drives automatically, change the SAN Policy value to OnlineAll.
DISKPART> san policy=OnlineAllPossible SAN Policy values:
1. OfflineAll : All disks are offline by default
2. OfflineInternal : All disks on internal buses are offline
3. OfflineShared : All disks connected via iSCSI, FC, or SAS are offline
4. OnlineAll : All disks get online automatically (recommended)
[Need urgent assistance to enable MPIO on windows server? – We're available 24*7. ]
Conclusion
This article covers how to enable Multi-Path Input-Output or MPIO on a Windows server either from a graphical interface using the Server Manager console or from the PowerShell command line.
Multipathing is the technique of creating more than one physical path between the server and its storage devices. It results in better fault tolerance and performance enhancement. Oracle VM Servers are installed with multipathing enabled because it is a requirement for SAN disks to be discovered by Oracle VM Manager.
To Install MPIO in Windows Server 2008 R2:
Note You must restart the server after you follow these steps.
1. Open Server Manager. To do this, click Start, click Administrative Tools, and then click Server Manager.
2. In Server Manager, click Features, and then click Add Features.
3. Select the Multipath I/O feature for installation, and then click Next.
4. Finish the installation by confirming the selections, and then restart the server.
To Configure MPIO for StorSimple volumes:
MPIO must be configured to identify StorSimple volumes.
To configure MPIO to recognize StorSimple volumes, follow these steps:
1. Open the MPIO configuration. To do this, click Start, click Administrative Tools, and then click MPIO.
2. In the MPIO window, click Add on the MPIO Devices tab.
3. Type SSIMPLE Model in the Add MPIO Support window under Device Hardware ID.
4. Restart the server when you are prompted.
To Mount a StorSimple volume in Windows Server 2008 R2:
After MPIO is configured on the server, volumes that are created on the StorSimple appliance can be mounted and can take advantage of MPIO for redundancy.
To mount a volume, follow these steps:
1. Open the iSCSI Initiator Properties dialog box on the server. To do this, click Start, click Administrative Tools, and then click iSCSI Initiator.
2. In the iSCSI Initiator Properties dialog box, click the Discovery tab, and then click Discover Portal.
3. Type the IP address of the "DATA" port on the StorSimple appliance.
Note If you use a private network for iSCSI connections, type the IP address of the DATA port that is connected to the private network.
4. Click the Targets tab in the iSCSI Initiator Properties dialog box. This displays the StorSimple appliance iSCSI qualified name (IQN) in the Discovered Targets section.
5. Click Connect to establish the iSCSI session with the StorSimple appliance. In the Connect To Target dialog box, click to select the Enable multi-path check box.
6. Open Server Manager. To do this, click Start, click Administrative Tools, and then click Server Manager.
7. In Server Manager, click Storage, and then click Disk Management. Volumes that are created on the StorSimple appliance and that are visible to this server appear under Disk Management as new disks.
8. Initialize the disk and create a new volume. During the format process, select a block size of 64 kilobytes (KB).
9. Under Disk Management, right-click the disk, and then click Properties.
10. In the SSIMPLE Model #### Multi-Path Disk Device Properties dialog box, click the MPIO tab, click Details in the DSM Name section, and then verify that the parameters are set to the default parameters.