Are you facing the error "the Windows Installer Service could not be accessed"?
This guide is for you.
The Windows Installer Service could not be accessed error happens if you are running Windows in safe mode, or the Windows Installer is not correctly installed.
It is mostly experienced by Windows users trying to install a program in Windows.
Here at Ibmi Media, as part of our Server Management Services, we regularly help our Customers to fix Windows related errors.
In this context, we shall look into how to resolve this Windows issue.
Nature of the error 'The Windows Installer Service Could Not Be Accessed' ?
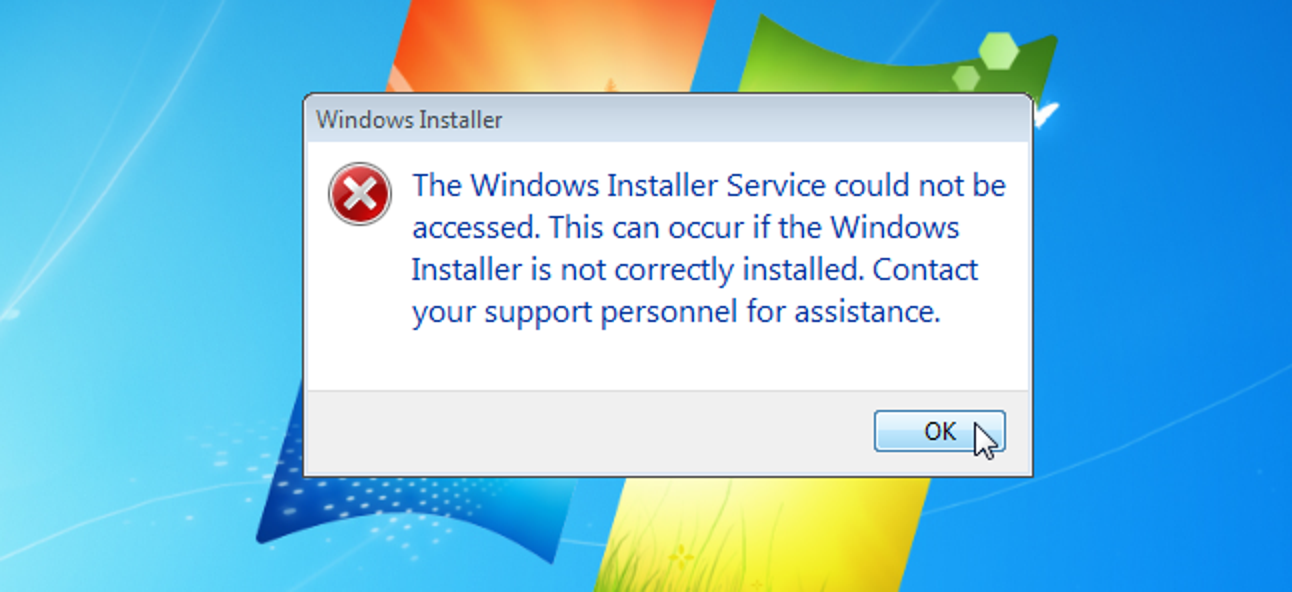
Recently, we had a customer who came across the following error message while trying to install a program in Windows:
The Windows Installer Service could not be accessed. This can occur if the Windows Installer is not correctly installed. Contact your support personnel for assistance.Though he did an upgrade of the Windows Installer version, the Service did not start. Eventually leading to the following error message:
The Windows Installer Service could not be accessed. This can occur if you are running Windows in safe mode, or the Windows Installer is not correctly installed. Contact your support personnel for assistance.The major causes of this error include:
1. We accidentally install or remove a program that uses the Microsoft Installer Service before we try to install the program on the computer.
2. The Windows Installer Service is not running.
3. A corrupt or incorrect configuration of the Windows Installer registry settings.
4. In the DCOM permissions, the default authentication level is set to None and the default Impersonation level is set to Anonymous.
5. The system account does not have Full permissions on a folder or registry key that the Windows Installer is trying to access. This is NTFS-specific.
How to fix the error 'The Windows Installer Service Could Not Be Accessed' ?
Apply the tips give below to fix the error.
Method 1: Reset the Windows Installer Service settings in the registry
To reset the Windows Installer Service settings in the registry, we follow these steps:
1. From the Start menu, we search for Notepad
2. Under Programs, click Notepad.exe.
3. Then we copy the following text into the notepad:
Windows Registry Editor Version 5.00|
[HKEY_LOCAL_MACHINE\SYSTEM\CurrentControlSet\Services\msiserver]
“DisplayName”=”@%SystemRoot%\\system32\\msimsg.dll,-27”
“ImagePath”=hex(2):25,00,73,00,79,00,73,00,74,00,65,00,6d,00,72,00,6f,00,6f,00,\
74,00,25,00,5c,00,73,00,79,00,73,00,74,00,65,00,6d,00,33,00,32,00,5c,00,6d,\
00,73,00,69,00,65,00,78,00,65,00,63,00,20,00,2f,00,56,00,00,00
“Description”=”@%SystemRoot%\\system32\\msimsg.dll,-32”
“ObjectName”=”LocalSystem”
“ErrorControl”=dword:00000001
“Start”=dword:00000003
“Type”=dword:00000010
“DependOnService”=hex(7):72,00,70,00,63,00,73,00,73,00,00,00,00,00
“ServiceSidType”=dword:00000001
“RequiredPrivileges”=hex(7):53,00,65,00,54,00,63,00,62,00,50,00,72,00,69,00,76,\
00,69,00,6c,00,65,00,67,00,65,00,00,00,53,00,65,00,43,00,72,00,65,00,61,00,\
74,00,65,00,50,00,61,00,67,00,65,00,66,00,69,00,6c,00,65,00,50,00,72,00,69,\
00,76,00,69,00,6c,00,65,00,67,00,65,00,00,00,53,00,65,00,4c,00,6f,00,63,00,\
6b,00,4d,00,65,00,6d,00,6f,00,72,00,79,00,50,00,72,00,69,00,76,00,69,00,6c,\
00,65,00,67,00,65,00,00,00,53,00,65,00,49,00,6e,00,63,00,72,00,65,00,61,00,\
73,00,65,00,42,00,61,00,73,00,65,00,50,00,72,00,69,00,6f,00,72,00,69,00,74,\
00,79,00,50,00,72,00,69,00,76,00,69,00,6c,00,65,00,67,00,65,00,00,00,53,00,\
65,00,43,00,72,00,65,00,61,00,74,00,65,00,50,00,65,00,72,00,6d,00,61,00,6e,\
00,65,00,6e,00,74,00,50,00,72,00,69,00,76,00,69,00,6c,00,65,00,67,00,65,00,\
00,00,53,00,65,00,41,00,75,00,64,00,69,00,74,00,50,00,72,00,69,00,76,00,69,\
00,6c,00,65,00,67,00,65,00,00,00,53,00,65,00,53,00,65,00,63,00,75,00,72,00,\
69,00,74,00,79,00,50,00,72,00,69,00,76,00,69,00,6c,00,65,00,67,00,65,00,00,\
00,53,00,65,00,43,00,68,00,61,00,6e,00,67,00,65,00,4e,00,6f,00,74,00,69,00,\
66,00,79,00,50,00,72,00,69,00,76,00,69,00,6c,00,65,00,67,00,65,00,00,00,53,\
00,65,00,50,00,72,00,6f,00,66,00,69,00,6c,00,65,00,53,00,69,00,6e,00,67,00,\
6c,00,65,00,50,00,72,00,6f,00,63,00,65,00,73,00,73,00,50,00,72,00,69,00,76,\
00,69,00,6c,00,65,00,67,00,65,00,00,00,53,00,65,00,49,00,6d,00,70,00,65,00,\
72,00,73,00,6f,00,6e,00,61,00,74,00,65,00,50,00,72,00,69,00,76,00,69,00,6c,\
00,65,00,67,00,65,00,00,00,53,00,65,00,43,00,72,00,65,00,61,00,74,00,65,00,\
47,00,6c,00,6f,00,62,00,61,00,6c,00,50,00,72,00,69,00,76,00,69,00,6c,00,65,\
00,67,00,65,00,00,00,53,00,65,00,41,00,73,00,73,00,69,00,67,00,6e,00,50,00,\
72,00,69,00,6d,00,61,00,72,00,79,00,54,00,6f,00,6b,00,65,00,6e,00,50,00,72,\
00,69,00,76,00,69,00,6c,00,65,00,67,00,65,00,00,00,53,00,65,00,52,00,65,00,\
73,00,74,00,6f,00,72,00,65,00,50,00,72,00,69,00,76,00,69,00,6c,00,65,00,67,\
00,65,00,00,00,53,00,65,00,49,00,6e,00,63,00,72,00,65,00,61,00,73,00,65,00,\
51,00,75,00,6f,00,74,00,61,00,50,00,72,00,69,00,76,00,69,00,6c,00,65,00,67,\
00,65,00,00,00,53,00,65,00,53,00,68,00,75,00,74,00,64,00,6f,00,77,00,6e,00,\
50,00,72,00,69,00,76,00,69,00,6c,00,65,00,67,00,65,00,00,00,53,00,65,00,54,\
00,61,00,6b,00,65,00,4f,00,77,00,6e,00,65,00,72,00,73,00,68,00,69,00,70,00,\
50,00,72,00,69,00,76,00,69,00,6c,00,65,00,67,00,65,00,00,00,53,00,65,00,4c,\
00,6f,00,61,00,64,00,44,00,72,00,69,00,76,00,65,00,72,00,50,00,72,00,69,00,\
76,00,69,00,6c,00,65,00,67,00,65,00,00,00,00,00
“FailureActions”=hex:84,03,00,00,00,00,00,00,00,00,00,00,03,00,00,00,14,00,00,\
00,01,00,00,00,c0,d4,01,00,01,00,00,00,e0,93,04,00,00,00,00,00,00,00,00,00
[HKEY_LOCAL_MACHINE\SYSTEM\CurrentControlSet\Services\msiserver\Enum]
“0”=”Root\\LEGACY_MSISERVER\\0000″
“Count”=dword:00000001
“NextInstance”=dword:00000001
4. Then we click File, click Save As and then name the file Msirepair.reg.
5. In the Save as type box, we click All Files (*.*).
6. In the Save box, we select Desktop and then click Save.
7. To close the notepad, File >> Exit
8. On the Desktop, right-click Msirepair.reg and then click Run as administrator. If we are prompted to enter an administrator password or provide confirmation, provide them or click Continue.
9. Click Yes when we are prompted to install the registry keys.
10. Finally, restart the installation process for the program we want to install.
Method 2: Start the Windows Installer Service
To start the Windows Installer Service, we follow these steps:
1. In the Start menu, search for CMD
2. Right-click cmd.exe and then click Run as Administrator.
3. Type net start MSIServer and then press ENTER.
4. Then restart the installation process for the program that we want to install.
To ensure that the Windows Installer Service is running, we follow these steps:
1. Click Start, type services.msc in the Search box, and then click Services under the Programs heading.
2. In the Services (Local) list, right-click Windows Installer and then click Properties.
3. In the Startup type drop-down list, check that the value is set to Manual.
4. The Windows Installer Service is running if the Service status entry is set to Running.
Method 3: Uninstall any earlier versions of the program that we want to install
If we have an earlier version of the program, we follow these steps:
1. Click Start >> Control Panel >> Uninstall a Program under Programs.
2. Select the program in the list that we are to install.
3. Click Uninstall (or Uninstall/Change in Windows Vista) and then follow the instructions.
4. Restart the computer.
5. Restart the installation process for the program that we want to install.
Method 4: Unregister and re-register the Windows Installer
1. Click Start, click Run, type MSIEXEC /UNREGISTER and then click OK. Even if we do this correctly, it may look like nothing occurs.
2. Click Start, click Run, type MSIEXEC /REGSERVER and then click OK. Though we do this correctly, it may look like nothing occurs or we may briefly see an hourglass. 3. After we run this command, the operation is complete.
4. Try Windows Installer-based application again.
Method 5: Verify the DCOM permissions
This method involves changing the DCOM default impersonation level to Identify and removing the Msisip.dll file:
1. Initially, click Start, click Run, type dcomcnfg and then click OK.
2. On the Default Properties tab:
a. In the Default Authentication Level list, click Connect.
b. In the Default Impersonation Level list, click Identify and then click OK.
3. Click Start, click Run, type explorer /select, %windir%\system32\msisip.dll and then click OK.
4. Rename the Msisip.dll file as Msisip.old.
Method 6: Give Full Control permission to the SYSTEM account
1. Start Windows Explorer, right-click the computer’s root hard drive and then click Properties.
2. Click the Security tab and then click Add.
3. In the Select Users, Computers, or Groups dialog box, click the SYSTEM account, click Add and then click OK.
4. Under Allow, make sure to select the Full Control check box and then OK.
5. Then click the TEMP folder and then verify that the SYSTEM account has full control.
Method 7: Verify the registry permissions
1. In the Start menu, click Run, then type Regedt32.
2. For each of the registry hives, follow these steps:
a. Select the hive.
b. For Windows XP, on the Edit menu, click Permissions.
3. For Windows NT 4, on the Security menu, click Permissions.
4. Verify that the SYSTEM account has been added and that it has Full control. If not, add the SYSTEM account with Full control.
Method 8: Fix the broken security key for the MsiServer service
1. In the Start menu, click Run, type regedit.exe, and then rename the following key to Old_Security:
HKEY_LOCAL_MACHINE\SYSTEM\CurrentControlSet\Services\MSIServer\Security2. Restart the computer.
3. Run Instmsiw.exe for installer 2.0 again; this corrects the broken security key for the MSI service.
[Failed to solve the Windows error? We'd be happy to assist. ]
Conclusion
This article covers methods to resolve the Windows #Installer Service could not be accessed #error which occurs while we try to install a program in Windows or when you are running Windows in safe mode.
Windows Installer popups may be caused by Windows configuration issues, by Windows Update prompting you to install updates or by malware.
To fix #Windows installer error:
1. Click Start. , type services.
2. Right-click Windows Installer, and then click Properties.
3. If the Startup type box is set to Disabled, change it to Manual.
4. Click OK to close the Properties window.
5. Right-click the Windows Installer service, and then click Start.
6. Try to install or to uninstall again.
To fix error 1719 windows installer service could not be accessed:
1. Start the Windows Installer Service.
2. Stop and then Restart Windows Installer Service.
3. Reset the settings of Windows Installer Service in the registry.
To to Disable Windows Installer:
1. Log into Windows. Click the "Start" button.
2. Double-Click "Group Policy" in the left pane.
3. Expand the tree in the left side of the pane, "Local Computer Policy\Computer Configuration\Administrative Templates\Windows Components\Window Installer".
4. Double click "Disable Windows Installer.
To enable Windows Installer in Safe Mode:
1. Press Windows + R, type cmd, and press Ctrl + Shift + Enter to run CMD as administrator.
2. Type the command net start msiserver in Command Prompt window, and press Enter to enable Windows Installer in Safe Mode in Windows 10.