Log Suspicious Martian Packets Un-routable Source Addresses in Linux
This article covers how to block and log suspicious martian packets on Linux servers.
Log Suspicious Martian Packets in Linux:
On the public Internet, such a packet's (Martian) source address is either spoofed, and it cannot originate as claimed, or the packet cannot be delivered.
Both IPv4 and IPv6, martian packets have a source or destination addresses within special-use ranges as per RFC 6890.
Benefits of logging of martians packets:
As I said earlier a martian packet is a packet with a source address that cannot be routed over the public Internet.
Such a packet is waste of resources on your server.
Often martian and unroutable packet used for a dangerous purpose or DoS/DDOS your server.
So you must drop bad martian packet earlier and log into your server for further inspection.
To log Martian packets on Linux?
You need to use sysctl command command to view or set Linux kernel variables that can logs packets with un-routable source addresses to the kernel log file such as /var/log/messages.
To log suspicious martian packets on Linux:
You need to set the following variables to 1 in /etc/sysctl.conf file:
net.ipv4.conf.all.log_martians
net.ipv4.conf.default.log_martians
Edit file /etc/sysctl.conf, enter:
# vi /etc/sysctl.conf
Append/edit as follows:
net.ipv4.conf.all.log_martians=1
net.ipv4.conf.default.log_martians=1
Save and close the file.
To load changes, type:
# sysctl -p

Redirect FreeBSD Console To A Serial Port for KVM Virsh - How to do it
This article covers how to redirect FreeBSD in KVM to the serial port.
FreeBSD does support a dumb terminal on a serial port as a console.
This is useful for quick login or debug guest system problem without using ssh.
1. First, login as root using ssh to your guest operating systems:
$ ssh ibmimedia@freebsd.ibmimedia.com
su -
2. Edit /boot/loader.conf, enter:
# vi /boot/loader.conf
3. Append the following entry:
console="comconsole"
4. Save and close the file. Edit /etc/ttys, enter:
# vi /etc/ttys
5. Find the line that read as follows:
ttyd0 "/usr/libexec/getty std.9600" dialup off secure
6. Update it as follows:
ttyd0 "/usr/libexec/getty std.9600" vt100 on secure
7. Save and close the file. Reboot the guest, enter:
# reboot
8. After reboot, you can connect to FreeBSD guest as follows from host (first guest the list of running guest operating systems):
# virsh list
Sample outputs:
Id Name State
----------------------------------
3 ographics running
4 freebsd running
9. Now, connect to Freebsd guest, enter:
virsh console 4
OR
virsh console freebsd
PXE Boot or DHCP Failure on Guest - Fix it now
This article covers how to fix PXE Boot (or DHCP) Failure on Guest.
Nature of this error:
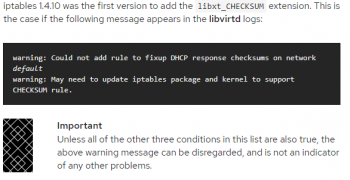
A guest virtual machine starts successfully, but is then either unable to acquire an IP address from DHCP or boot using the PXE protocol, or both. There are two common causes of this error: having a long forward delay time set for the bridge, and when the iptables package and kernel do not support checksum mangling rules.
Cause of PXE BOOT (OR DHCP) ON GUEST FAILED:
Long forward delay time on bridge.
This is the most common cause of this error. If the guest network interface is connecting to a bridge device that has STP (Spanning Tree Protocol) enabled, as well as a long forward delay set, the bridge will not forward network packets from the guest virtual machine onto the bridge until at least that number of forward delay seconds have elapsed since the guest connected to the bridge. This delay allows the bridge time to watch traffic from the interface and determine the MAC addresses behind it, and prevent forwarding loops in the network topology. If the forward delay is longer than the timeout of the guest's PXE or DHCP client, then the client's operation will fail, and the guest will either fail to boot (in the case of PXE) or fail to acquire an IP address (in the case of DHCP).
Fix to PXE BOOT (OR DHCP) ON GUEST FAILED:
If this is the case, change the forward delay on the bridge to 0, or disable STP on the bridge.
This solution applies only if the bridge is not used to connect multiple networks, but just to connect multiple endpoints to a single network (the most common use case for bridges used by libvirt).
If the guest has interfaces connecting to a libvirt-managed virtual network, edit the definition for the network, and restart it.
For example, edit the default network with the following command:
# virsh net-edit default
Add the following attributes to the <bridge> element:
<name_of_bridge='virbr0' delay='0' stp='on'/>
XML
If this problem is still not resolved, the issue may be due to a conflict between firewalld and the default libvirt network.
To fix this, stop firewalld with the service firewalld stop command, then restart libvirt with the service libvirtd restart command.
Install ClickHouse on Ubuntu 20.04 - Step by step process to perform it
This article covers how to install ClickHouse on Ubuntu. Basically, ClickHouse is an open-source analytics database developed for big data use cases.
Install of ClickHouse on Ubuntu involves a series of steps that includes adjusting the configuration file to enable listening over other IP address and remote access.
Column-oriented databases store records in blocks grouped by columns instead of rows.
By not loading data for columns absent in the query, column-oriented databases spend less time reading data while completing queries.
As a result, these databases can compute and return results much faster than traditional row-based systems for certain workloads, such as OLAP.
Online Analytics Processing (OLAP) systems allow for organizing large amounts of data and performing complex queries.
They are capable of managing petabytes of data and returning query results quickly.
In this way, OLAP is useful for work in areas like data science and business analytics.
Aggregation queries are queries that operate on a set of values and return single output values.
In analytics databases, these queries are run frequently and are well optimized by the database.
Some aggregate functions supported by ClickHouse are:
1. count: returns the count of rows matching the conditions specified.
2. sum: returns the sum of selected column values.
3. avg: returns the average of selected column values.
Some ClickHouse-specific aggregate functions include:
1. uniq: returns an approximate number of distinct rows matched.
2. topK: returns an array of the most frequent values of a specific column using an approximation algorithm.
You can set up a ClickHouse database instance on your server and create a database and table, add data, perform queries, and delete the database.
You can start, stop, and check the ClickHouse service with a few commands.
To start the clickhouse-server, use:
$ sudo systemctl start clickhouse-server
The output does not return a confirmation.
To check the ClickHouse service status, enter:
$ sudo systemctl status clickhouse-server
To stop the ClickHouse server, run this command:
$ sudo systemctl stop clickhouse-server
To enable ClickHouse on boot:
$ sudo systemctl enable clickhouse-server
To start working with ClickHouse databases, launch the ClickHouse client.
When you start a session, the procedure is similar to other SQL management systems.
To start the client, use the command:
$ clickhouse-client

How to setup AWS CloudFront and how it delivers content
This article covers how to setup AWS CloudFront. Basically, CloudFront retrieves data from the Amazon S3 bucket and distributes it to multiple datacenter locations.
Amazon CloudFront works seamlessly with Amazon Simple Storage Service (S3) to accelerate the delivery of your web content and reduce the load on your origin servers.
Amazon CloudFront is a web service that speeds up distribution of your static and dynamic web content, such as . html, . css, . js, and image files, to your users.
Benefit of CloudFront?
Great Performance. The AWS CloudFront content delivery network optimizes for low latency and high information transfer speeds.
CloudFront's intelligent routing predicate on real-world latency measurements incessantly gathered from standard websites, as well as Amazon.com.
Step by step process on getting started in the AWS Console, configuring your origin, and beginning testing your CloudFront distribution:
1. Go to the AWS Console
2. Create an Amazon S3 bucket
3. Create an Amazon CloudFront distribution
4. Specify your distribution settings
5. Configure your origin
6. Configure Origin Access Identity
7. Configure default cache behavior
8. Configure your TTLs
9. Configure additional features
10. Test your CloudFront distribution
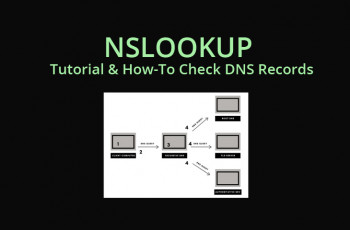
Troubleshoot DNS issues - Step by Step tips to resolve it
This article covers how to troubleshoot DNS issues. One of the handiest tools for troubleshooting DNS failures is the NSLOOKUP command, which you can access from a Windows Command Prompt window. Simply type NSLOOKUP followed by the name of the host for which you want to test the name resolution.
Basically, DNS errors are caused by problems on the user end, whether that's with a network or internet connection, misconfigured DNS settings, or an outdated browser. They can also be attributed to a temporary server outage that renders the DNS unavailable.
DNS: online name resolution:
The domain name system (DNS) is a directory service used for transforming alphanumeric domain names into numeric IP addresses.
A decentralized process, name resolution generally takes place on DNS servers’ networks distributed throughout the world.
Every internet address you enter into your web browser’s search bar is then forwarded by your router to a DNS server. This server then dissolves the domain name into a numeric sequence and returns a corresponding IP address.
Should the DNS server fail to produce an answer, then it won’t be possible to access the desired website; the result is the error message ‘DNS server not responding’.
To clear your DNS cache:
1. On your keyboard, press Win+X to open the WinX Menu.
2. Right-click Command Prompt and select Run as Administrator.
3. Run the following command: ipconfig /flushdns.
To Troubleshoot DNS issues:
The root of such irritating messages can often be traced back to the server outage. In such cases, the DNS server is temporarily unavailable. Most of the time, these problems can be corrected by changing browsers, switching a few of your firewall settings, or restarting your router.
1. In order to rule out that the connection problem isn’t being caused by your web browser, carry out a test by attempting to logon on to the desired web page with alternative applications.
2. In case you aren’t able to achieve your desired results simply by changing browsers, then the next step is to rule out Windows Firewall as the possible culprit.
3. Connection problems can often be solved by restarting the server. Most devices include a power button specifically for this purpose. Should this fail to yield any results, then it looks like a hard reboot may be in store; this is done simply by pulling out the power plug.
4. If you have ruled out common causes of error such as the router software crashes or conflicts with Windows Firewall, then changing your DNS server could be the solution.
How to Check DNS server?
You can find out whether changing DNS server has solved the problem by carrying out a simple test.
Enter the URL of a well-known site in your browser (e.g. www.google.com).
If the site can be accessed it means the DNS server is functioning properly.
If the site can't be accessed, you can enter the following IP address into your browser: 172.217.16.195.
This is one of Google’s IP addresses. If Google doesn't appear after entering the address, it probably means there's a general internet problem rather than a problem with the DNS server.


