Unable to add MySQL database in Plesk Customer Panel - Fix it now
This article covers how to fix issues that make it unable to add MySQL database in Plesk customer panel.
To resolve Cannot add MySQL database in Plesk Customer Panel:
1. Log in to Plesk and apply one of the following:
2. Enable Database server selection directive in Service Plans > Default > Permissions > Show more available permissions and press Update & Sync.
3. Switch MySQL default database server from None to localhost:3306 in Service Plans > Default > Hosting Parameters > Default Database Server and press Update & Sync.
Note: it is also applicable to cases when Amazon RDS extension is installed.
If it is needed to provide customer with the ability to select Amazon server, enable "database server selection" option.
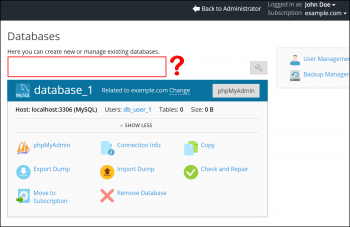
How do I add a database to my Plesk Panel?
How to Create a New Database or Database User in the Plesk Control Panel
1. Log into your Control Panel.
2. Click on Databases.
3. Click on the Add New Database icon.
4. Next to Database Name enter the name you want to use.
For Type, choose either Microsoft SQL Server or MySQL (DNN uses the Microsoft SQL Server.).
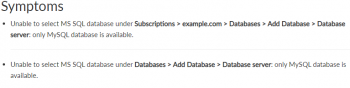
Unable to add MS SQL database in Plesk - Fix it now
This article covers how to fix the error, Unable to add MS SQL database in Plesk.
Basically, the number of MS SQL databases is limited for the webspace, subscriptions, or reseller's plan.
In Web Admin Edition:
1. Log in to Plesk.
2. Go to Tools & Settings > License Management and check if Microsoft SQL Server support enabled or not:
a. If no, then it is required to purchase the MSSQL support first for the subscription.
MSSQL support is included in the Power Pack and Developer Pack.
b. If yes, then proceed to step 3.
3. Run the command below to get the current limit of MSSQL databases for the required webspace:
C:\> plesk bin subscription_settings --info example.com | findstr max_mssql_db
max_mssql_db 30 MS SQL databases
4. Increase the number of MSSQL databases for the required webspace (use the "-1" to set to the Unlimited value):
C:\> plesk bin subscription_settings -u example.com -max_mssql_db 100
plesk bin subscription_settings -u example.com -max_mssql_db -1
In Web Pro and Web Host Editions:
1. Log in to Plesk.
2. Go to Subscriptions > example.com > Account > Resources.
3. Find the MS SQL databases number.
a. If it reached its limit, increase it of the following ways:
Go to Subscriptions > example.com > Customize > Resources page and increase the MS SQL databases limit (changes will affect only this subscription).
Go to Subscriptions > example.com > Service Plan: Default > Resources page and increase the MS SQL databases limit (changes will affect all subscriptions assigned to this service plan).
b. If it is not reached the limit, then this limit is set on the reseller's level as also. Follow to the next step.
4. Go to Subscriptions > example.com > Subscriber: John Doe > Provider: Jane Doe.
5. Click the Change Plan button to increase the MS SQL databases number for all resellers assigned to this service plan.
Click the Customize button to increase the MS SQL databases number only for this reseller.
6. Find the MS SQL databases number and increase it to the required value.
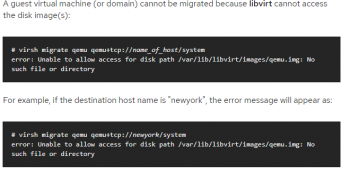
Unable to allow access for disk path in libvirtd - Fix it Now
This article covers tips to fix the error Unable to allow access for disk path in libvirtd. By default, migration only transfers the in-memory state of a running guest (such as memory or CPU state). Although disk images are not transferred during migration, they need to remain accessible at the same path by both hosts.
To fix Unable to allow access for disk path in libvirtd error:
Set up and mount shared storage at the same location on both hosts. The simplest way to do this is to use NFS:
1. Set up an NFS server on a host serving as shared storage. The NFS server can be one of the hosts involved in the migration, as long as all hosts involved are accessing the shared storage through NFS.
# mkdir -p /exports/images
# cat >>/etc/exports <<EOF
/exports/images    192.168.122.0/24(rw,no_root_squash)
EOF
2. Mount the exported directory at a common location on all hosts running libvirt. For example, if the IP address of the NFS server is 192.168.122.1, mount the directory with the following commands:
# cat >>/etc/fstab <<EOF
192.168.122.1:/exports/images  /var/lib/libvirt/images  nfs  auto  0 0
EOF
# mount /var/lib/libvirt/images
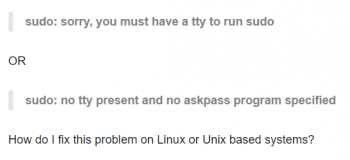
sudo sorry you must have a tty to run sudo - Fix it now
This article covers how to resolve the error sudo: sorry you must have a tty to run sudo which happens because the sudo command tries to execute a command that requires a tty.
To fix "sudo: sorry, you must have a tty to run sudo" error:
You have to run your ssh command as follows to avoid error that read as sudo: Sorry, you must have a tty to run sudo Error:
ssh -t hostname sudo command
ssh -t user@hostname sudo command
ssh -t user@box.example.com sudo command1 /path/to/file
The -t option force pseudo-tty allocation. This can be used to execute arbitrary screen-based programs on a remote machine, which can be very useful, e.g., when implementing menu services.
Multiple -t options force tty allocation, even if ssh has no local tty.
The requiretty option in sudoers file
The requiretty if set in sudo config file sudoers, sudo will only run when the user is logged in to a real tty.
When this flag is set, sudo can only be run from a login session and not via other means such as cron, shell/perl/python or cgi-bin scripts.
This flag is set on many distores by default. Edit /etc/sudoers, file, enter:
# visudo
Find line that read as follows:
Defaults requiretty
Either comment it out the line or delete the line:
#Defaults requiretty
Save and close the file.
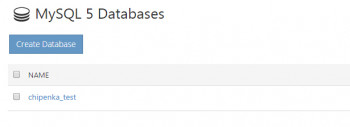
Add MySQL database in Websitepanel and fix common errors
This article covers add MySQL database in Websitepanel and fix a common errors related to this task.
A database interface allows you to create and manage the existing MySQL databases. If you are creating a PHP based application or any application that uses a database, then you will need to create a database and a database user to access this database.
To create a MySQL database in WebsitePanel:
1. Click on the plan you want to add a MySQL database to.
2. Then click Databases.
3. Click MySQL.
4. Click Create Database.
5. Enter a name for your database.
6. Click Save.
7. You can click on the database you just added to edit it.
8. You can view existing users or delete or backup the database.
9. Click Save when you are finished
Success! You can view your added databases and see how many allowed databases you've used.
Encrypt email messages in Outlook - Follow this guide now
This article covers the different methods to encrypt email messages in Outlook: using certificates (S/Mime), Office 365 Message Encryption (OME), and using encryption add-ins.
To Encrypt a single message:
1. In message that you are composing, click File > Properties.
2. Click Security Settings, and then select the Encrypt message contents and attachments check box.
3. Compose your message, and then click Send.
In Outlook, All attachments are encrypted.
Recipients who access the encrypted email via the Office Message Encryption portal can view attachments in the browser.
Note that if the recipient of the file is using an Outlook.com account, they can open encrypted Office attachments on the Office apps for Windows.
To view an encrypted email in Outlook:
1. Select Read the message.
2. You'll be redirected to a page where you can sign in and receive a single-use code.
3. Check your email for the single-use code. Enter the code in the browser window, then select Continue to read your message.
To encrypt a message in Office 365:
1. Sign in with Global Admin credentials.
2. Click on Admin.
3. Click on Settings.
4. Click on Services & add-ins.
5. Click on Microsoft Azure Information Protection.


