
Install Drupal with Docker Compose
This article covers how to install Drupal with Docker Compose. Basically, installation process of Drupal can be simplified with the use of tools like Docker and Docker Compose. Docker Compose can be used to create a Drupal installation with an Nginx web server.
Drupal and Docker needs the following to work:
1. HTTP Server with PHP: We can either use Apache with PHP or Nginx with PHP. I'm going to demonstrate building the Docker using Apache with PHP. A Drupal docker can also have services like SSH (for drush alias to work) and some important utilities like vim
2. SQL Server: Choose your favourite SQL Service (MySQL or PostGRESQL or SQLite). I'm going to be using a MySQL docker. The idea behind using a separate docker for SQL is so that you have a freedom to choose an internal SQL service or an external SQL Services like Amazon RDS without affecting your Drupal environment.
The need to Use Docker to Run Drupal:
Using the Drupal and PostgreSQL images from Docker Hub offers the following benefits:
1. The configuration of the software has been done for you, which means that you don’t need to follow a step-by-step process for each application to get them running on your system.
2. Updating your software is as simple as downloading the latest images from Docker Hub.
3. Images and containers are self-contained, which means that they are easy to clean up if you decide to remove them.
How to Set Up Drupal ?
1. Create a new directory in your home folder called my_drupal and cd into it:
mkdir ~/my_drupal/
cd ~/my_drupal/
2. Create a file named docker-compose.yml in this folder and add the following contents. Set your own password for the POSTGRES_PASSWORD option.
3. From the my_drupal directory, start your Docker containers:
docker-compose up -d
4. The Docker containers will take a minute or two to start up Drupal and PostgreSQL. Afterwards, you can visit your Linode’s IP address in your web browser .
5. On the Set up database page, select PostgreSQL as the Database type and enter the following values:
Database name: postgres
Database username: postgres
Database password: The password you set in the docker-compose.yml file
Host (under Advanced Options): postgres
6. When creating your Drupal user, be sure to enter a password that is different from your PostgreSQL password.

ModSecurity File Upload Error With SecRequestBodyNoFilesLimit
This article covers ModSecurity File Upload Error With SecRequestBodyNoFilesLimit error which happens when the ModSecurity parameter SecRequestBodyNoFilesLimit has reached the limit.
When this issue occurs, you will be Unable to upload file to the website: Request body no files data length is larger than the configured limit.
This error can occur when WAF_SECREQUESTBODYNOFILESLIMIT parameter value reached its limit.
Symptoms of ModSecurity File Upload Error:
1. Unable to upload a file to the website hosted in Plesk with the error:
413 Request entity too large
Request Entity Too Large
The requested resource
/upload-a-file/
does not allow request data with POST requests, or the amount of data provided in the request exceeds the capacity limit.
2. ModSecurity component is installed on the server.
3. The following error can be found in /var/www/vhosts/example.com/logs/error_log file:
[:error] [pid 21701] [client 203.0.112.2] ModSecurity: Request body no files data length is larger than the configured limit (1048576)..
Deny with code (413) [hostname "www.example.com"] [uri "/wp-admin/admin-ajax.php"] [unique_id "Wakfj-fvNMmcLKLp-n8PjQAAAAE"]
Steps to resolve ModSecurity File Upload Error:
1. Log into the server via SSH.
2. Open /etc/asl/config file using the vi text editor.
3. Increase the value for the WAF_SECREQUESTBODYNOFILESLIMIT directive, for example to the value as below:
WAF_SECREQUESTBODYNOFILESLIMIT "10000000"
Note: it is specified in Bytes.
4. Execute the command below to update the rulesets:
for i in daily weekly monthly; do /usr/local/psa/bin/sw-engine-pleskrun /usr/local/psa/admin/plib/DailyMaintainance/script.php -f UpdateModSecurityRuleSet --period "${i}"; done
This way the change will remain persistent after any updates/rulesets changes.
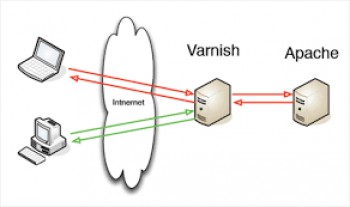
Configure Varnish with Apache - How to do it
This article covers how to configure Varnish #cache on the #Apache server. Varnish is an HTTP accelerator and a useful tool for speeding up a server, especially during a times when there is high traffic to a site.
It works by redirecting visitors to static pages whenever possible and only drawing on the virtual private server itself if there is a need for an active process.
#Varnish is a caching HTTP reverse proxy. It receives requests from clients and tries to answer them from the cache.
Where is varnish configuration file?
The Varnish configuration file will be located in the /etc/varnish directory in CentOS 7.
To make Varnish work in front of Apache, you will need to set up some basic configurations.
By default Varnish listens on port 6081 .
You will need to change port 6081 to 80 so that website requests access the Varnish cache first.
What is varnish WordPress?
Varnish is a full-page cache and HTTP preprocessor which can be used to speed up requests for a WordPress site.
Setting up Varnish is a technical task, as it requires installing and configuring a system package on a web server, rather than just installing a plugin.
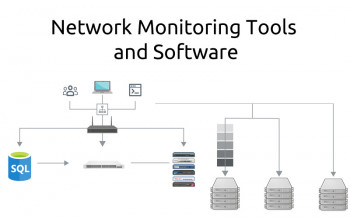
Best Server Monitoring Software Products - Advantages and Disadvantages
This article covers the Best Server Monitoring Software. Basically, Server management software takes the burden of managing servers and other critical applications.
Reporting and monitoring is critical in business, especially when it comes to IT infrastructure such as network connectivity and server monitoring.
Being able to look back at historical trends and faults is especially useful when troubleshooting an issue on a critical server or service, so if you don’t already have a solution in place, then it might be time to seriously consider it.
Server Monitoring Software is able to check everything about your system, such as:
1. CPU usage
2. RAM utilization
3. Hard Disk Space
4. System Temperatures
5. Server Alerts (Hardware status warnings)
6. RAID Array health checks
7. Virtual Machine Alerts
8. You can also monitor user logins, suspicious activity on your server, and the status of your services and daemons
Best server monitoring software and tools includes:
1. SolarWinds Server & Application Monitor - Tracks the statuses of key server components and also watches the performance of applications running on each server. The tool runs on Windows Server but can also monitor Linux servers across a network.
2. Atera - A remote monitoring and management system that includes server monitoring features. Ideal for managed service providers.
3. Site24x7 Server Monitoring - A cloud-based monitoring system that can track the statuses of Windows and Linux servers as part of a company’s infrastructure.
4. ManageEngine Applications Manager - A server and applications monitoring system that includes extra capabilities such as VM monitoring. Runs on Windows Server and Linux.
5. Paessler PRTG - A package of monitors that includes a range of server status trackers. Installs on Windows Server.
6. Nagios XI - A comprehensive infrastructure monitoring system that includes live server monitoring services. Installs on Linux.
7. Opsview - A system monitoring tool that includes sever monitoring and is billed as an alternative to Nagios XI. Runs on Linux.
8. Zenoss - A system monitoring tool that includes a server monitoring module and is also available in a free version. Installs on Linux.
9. OP5 - Monitor Server monitoring as part of a system-wide monitor tool that accepts Nagios plug-ins. Install on Linux.
10. AppOptics - A cloud-based server and applications monitoring system that will track the performance of Windows and Linux servers.
11. Monitis - A cloud-based monitoring system that specializes in tracking the performance of Web servers and Web applications.
12. ManageEngine Free Windows Admin Tools - A collection of 15 free tools that cover different aspects of server monitoring including disk space, software inventory, and user lists.
What is server maintenance?
Server maintenance is process of keeping a server software updated and running so that a computer network can operate smoothly and avoid downtime or loss of data. Regular maintenance will keep the server running as expected and will help avoid a total or partial network failure.
SELinux on CentOS 7 - Set it up now
This article covers how to set up SELinux on #CentOS 7. #SELinux is a security mechanism built into the Linux kernel. Linux distributions such as CentOS, RHEL, and Fedora are equipped with SELinux by default.
SELinux improves server security by restricting and defining how a server processes requests and users interact with sockets, network ports, and essential directories.
To check SELinux mode:
The easiest way on how to check SELinux ( Security Enhanced Linux ) operation mode is to use getenforce command.
This command without any options or arguments will simply print a current status SELinux operational mode.
Furthermore, the current status of SELinux operational mode can be set permanently or temporarily.
To check whether SELinux is enabled or not:
1. Use the getenforce command. [vagrant@vagrantdev ~]$ getenforce Permissive.
2. Use the sestatus command.
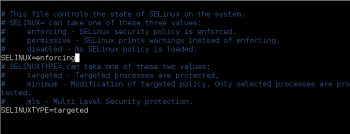
3. Use the SELinux Configuration File i.e. cat /etc/selinux/config to view the status.
To configure SELinux to enforcing mode:
1. Open the /etc/selinux/config file in a text editor of your choice, for example: # vi /etc/selinux/config.
2. Configure the SELINUX=enforcing option: # This file controls the state of SELinux on the system.
3. Save the change, and restart the system: # reboot.
To enable SELinux without rebooting:
1. Changing the SELinux mode at run time. If SELinux is disabled it cannot be enabled without rebooting.
2. To detemine the current Mode of SELinux.
3. Changing the SELinux mode Permanently. In the /boot/grub/grub.conf file add a line: selinux=0.
4. Or in /etc/sysconfig/selinux change.
To permanently change mode to permissive:
1. Edit the /etc/selinux/config file as follows: # This file controls the state of SELinux on the system. # SELINUX= can take one of these three values: # enforcing - SELinux security policy is enforced.
2. Restart the system: $ reboot.

Install and Configure Mahara on Ubuntu
This article covers how to install Mahara. Basically, Mahara is a popular ePortfolio and social networking system that helps educators to develop a digital classroom in a remote learning environment and track student's progress.
Mahara also has many non-student applications. You can use it to build a blog, a resume-builder, a file-repository, or a competency framework.
Mahara is a fully featured web application to build your electronic portfolio.
You can upload files, create journals, embed social media resources from the web and collaborate with other users in groups.
To install Mahara on Ubuntu:
1. 1. Login to your VPS via SSH
ssh user@vps
2. Update the system
[user]$ sudo apt-get update && sudo apt-get -y upgrade3. Install MariaDB
To install MariaDB, run the following command:
[user]$ sudo apt-get install -y mariadb-server4. Create MariaDB database for Mahara
Next, we need to create a database for our Mahara installation.
[user]$ mysql -u root -p
MariaDB [(none)]> CREATE DATABASE mahara character set UTF8;
MariaDB [(none)]> GRANT ALL PRIVILEGES ON mahara.* TO 'maharauser'@'localhost' IDENTIFIED BY 'your-password';
MariaDB [(none)]> FLUSH PRIVILEGES;
MariaDB [(none)]> \q
Do not forget to replace 'your-password' with a strong password.
5. Install Apache2 Web Server
Install Apache2 web server
[user]$ sudo apt-get install apache26. Install PHP
Install PHP and required PHP modules
To install the latest stable version of PHP version 5 and all necessary modules, run:
[user]$ sudo apt-get install php5 libapache2-mod-php5 php5-mcrypt php5-mysql php5-gd7. Download and extract Mahara
Download and extract the latest version of Mahara on your server:
[user]$ sudo cd /opt && wget https://launchpad.net/mahara/16.04/16.04.1/+download/mahara-16.04.1.zip
[user]$ sudo unzip mahara-16.04.1.zip
[user]$ sudo mv mahara-16.04.1 /var/www/html/mahara
Create Mahara’s upload directory
[user]$ sudo mkdir /var/www/html/mahara/upload/
8. Configure Mahara
Create Mahara’s config.php
In the Mahara ‘htdocs’ directory there is config-dist.php file. Make a copy of this called config.php.
[user]$ cd /var/www/html/mahara/htdocs/
[user]$ sudo cp config-dist.php config.php
Open the config.php and make the necessary changes where appropriate.
[user]$ sudo nano config.php
$cfg->dbtype   = 'mysql';
$cfg->dbhost   = 'localhost';
$cfg->dbport   = null;
$cfg->dbname   = 'mahara';
$cfg->dbuser   = 'maharauser';
$cfg->dbpass   = 'your-password';
$cfg->dataroot = '/var/www/html/mahara/upload/';
All files have to be readable by the web server, so we need to set a proper ownership
[user]$ sudo chown www-data:www-data -R /var/www/html/mahara/9. Configure Apache Web Server
Create a new virtual host directive in Apache. For example, create a new Apache configuration file named ‘mahara.conf’ on your virtual server:
[user]$ sudo touch /etc/apache2/sites-available/mahara.conf
[user]$ sudo ln -s /etc/apache2/sites-available/mahara.conf /etc/apache2/sites-enabled/mahara.conf
[user]$ sudo nano /etc/apache2/sites-available/mahara.conf
Then, add the following lines:
<VirtualHost *:80>
ServerAdmin admin@yourdomain.com
DocumentRoot /var/www/html/mahara/htdocs/
ServerName your-domain.com
ServerAlias www.your-domain.com
<Directory /var/www/html/mahara/htdocs/>
Options FollowSymLinks
AllowOverride All
Order allow,deny
allow from all
</Directory>
ErrorLog /var/log/apache2/your-domain.com-error_log
CustomLog /var/log/apache2/your-domain.com-access_log common
</VirtualHost>
10. Restart and Verify
Restart the Apache web server for the changes to take effect:
[user]$ sudo service apache2 restartOpen your favorite web browser, navigate to http://your-domain.com/ and if you configured everything correctly the Mahara installer should be starting.


