
Show dropped packets per interface on Linux - Methods to check it
This article covers how to Show dropped packets per interface on Linux.
There can be various reasons for packet loss. It can be that the network transport is unreliable and packet loss is natural, the network link could be congested, applications cannot handle the offered load.
Sometimes there are too many packets, they are saved to a buffer, but they are saved faster than processed, so eventually the buffer runs out of space, so the kernel drops all further packets until there is some free space in the buffer.
You will learn the different Linux commands to see packet loss on Linux per-interface, including excellent tools such as dropwatch.
We can also use Linux profiling with performance counters utility called perf.
To display show dropped packets per interface on Linux using the netstat:
The netstat command is mostly obsolete. Replacement for netstat is ss and ip command.
However, netstat still available on older Linux distros, which are in productions.
Hence, I will start with netstat but if possible, use the ip/ss tools.
The command in Linux is:
$ netstat -i
$ netstat --interfaces
To display summary statistics for each protocol, run:
$ netstat -s
$ netstat --statistics
To show dropped packets statistics per network interface on Linux using the ip:
Let us see how to see link device stats using the ip command.
The syntax is:
$ ip -s link
$ ip -s link show {interface}
$ ip -s link show eth0

SELinux users on CentOS 7 – Actions and Deciphering error messages
This article covers more information about SELinux users on CentOS 7.
Deciphering SELinux Error Messages
We looked at one SELinux error message. We were then using the grep command to sift through /var/log/messages file. Fortunately SELinux comes with a few tools to make life a bit easier than that. These tools are not installed by default and require installing a few packages, which you should have installed in the first part of this tutorial.
The first command is ausearch. We can make use of this command if the auditd daemon is running. In the following code snippet we are trying to look at all the error messages related to the httpd daemon. Make sure you are in your root account:
ausearch -m avc -c httpdIn our system a number of entries were listed, but we will concentrate on the last one:
----
time->Thu Aug 21 16:42:17 2014
...
type=AVC msg=audit(1408603337.115:914): avc:  denied  { getattr } for  pid=10204 comm="httpd" path="/www/html/index.html" dev="dm-0" ino=8445484 scontext=system_u:system_r:httpd_t:s0 tcontext=unconfined_u:object_r:default_t:s0 tclass=file
Even experienced system administrators can get confused by messages like this unless they know what they are looking for. To understand it, let’s take apart each of the fields:
type=AVC and avc: AVC stands for Access Vector Cache. SELinux caches access control decisions for resource and processes. This cache is known as the Access Vector Cache (AVC). That's why SELinux access denial messages are also known as “AVC denials”. These two fields of information are saying the entry is coming from an AVC log and it’s an AVC event.
denied { getattr }: The permission that was attempted and the result it got. In this case the get attribute operation was denied.
pid=10204. This is the process id of the process that attempted the access.
comm: The process id by itself doesn’t mean much. The comm attribute shows the process command. In this case it’s httpd. Immediately we know the error is coming from the web server.
path: The location of the resource that was accessed. In this case it’s a file under /www/html/index.html.
dev and ino: The device where the target resource resides and its inode address.
scontext: The security context of the process. We can see the source is running under the httpd_t domain.
tcontext: The security context of the target resource. In this case the file type is default_t.
tclass: The class of the target resource. In this case it’s a file.

Disable database UTF8 connectivity on Nagios - How to do it
This article covers how to configure disable UTF8 connectivity to the MySQL/MariaDB databases. By default Nagios XI uses UTF8 however sometimes this needs to be disabled to allow MySQL / MariaDB to define the connectivity method.
This configuration ensures that characters from different languages can be correctly stored and retrieved in the databases.
The Nagios XI Configuration Directive
The following configuration directive was added in Nagios XI 5.4.13:
$cfg['db_conn_utf8'] = 0;To determine if you currently have that directive enabled, establish a terminal session to your Nagios XI server as the root user and execute the following command:
$ grep db_conn_utf8 /usr/local/nagiosxi/html/config.inc.phpIf the grep command produces NO output then the directive does not exist in your configuration and it needs to be added. This can be added with the following command:
$ printf "\n\$cfg['db_conn_utf8'] = 0;\n" >> /usr/local/nagiosxi/html/config.inc.php
If the grep command produced output then it can be changed with the following command (sets it to 0):
$sed -i "s/db_conn_utf8'\] =.*/db_conn_utf8'\] = 0;/g" /usr/local/nagiosxi/html/config.inc.phpDefining the directive to 0 will resolve the issue you for garbled or ??? characters.
If you wanted to change it to 1 then use the following command:
$sed -i "s/db_conn_utf8'\] =.*/db_conn_utf8'\] = 1;/g" /usr/local/nagiosxi/html/config.inc.php
The change takes effect immediately.
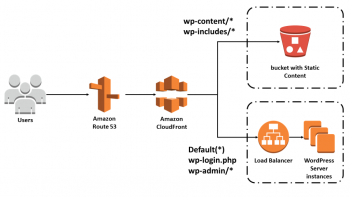
Set up Amazon CloudFront with WordPress site - Do it now
This article covers how to set up Amazon CloudFront with WordPress site. WordPress performs reasonably well out of the box, but there is room for improvement—the number of WordPress plugins that address performance is evidence of this. However, the easiest way to improve the user experience is to accelerate one's entire WordPress website by using CloudFront.
Doing this will not only improve your site's responsiveness, but it may also reduce the overall cost of operating your WordPress infrastructure, as reducing the load on your web servers may help you scale down the required infrastructure.
In fact, CloudFront can significantly help your site cope with an unexpected load when your site gets popular.
How does CloudFront help?
Many AWS customers have users spread across the globe that they want to reach. However, what once required an immense engineering effort can now be easily built using AWS Regions and Edge locations, which allow you to serve content from the locations closest to those users.
Data transfers on the internet depend largely on global networks of fiber optic cables, allowing very high bandwidth data transfers.
As the speed of light is proving a difficult challenge to overcome, Amazon CloudFront improves the experience for users accessing your websites in several other ways, including:
1. Anycast DNS ensures your customers are routed to the nearest edge location.
2. Cached content, when available, is delivered to your users from the edge location.
3. When data needs to be fetched from your site CloudFront optimizes network throughput by managing the transfers between Edge Locations and your website. This traffic runs over the Amazon Global Backbone, where optimized TCP configuration ensures more bytes are in-flight on the network, improving throughput, while TCP connection re-use eliminates much of the latency associated with establishing connections. In this way, whether content is cached or not, it will be accelerated by delivery over optimized network paths.
4. Finally, negotiating and offloading Transport Layer Security (TLS) at the CloudFront Edge further improves performance, reducing connection setup latency, and further supporting back-end connection re-use.

Force DHCP Client to Renew IP Address - Perform it now
This article covers how to force DHCP client to renew IP address. You need to use Dynamic Host Configuration Protocol Client i.e., dhclient command.
The client normally doesn't release the current lease as it is not required by the DHCP protocol. Some cable ISPs require their clients to notify the server if they wish to release an assigned IP address.
The dhclient command, provides a means for configuring one or more network interfaces using the Dynamic Host Configuration Protocol, BOOTP protocol, or if these protocols fail, by statically assigning an address.
Linux renew ip command using dhcp:
The -r flag explicitly releases the current lease, and once the lease has been released, the client exits.
For example, open terminal application and type the command:
$ sudo dhclient -r
Now obtain fresh IP address using DHCP on Linux:
$ sudo dhclient
To start DHCP client in Linux:
1. To start the DHCP service, type the following command: # /etc/init.d/dhcp start.
2. To stop the DHCP service, type the following command: # /etc/init.d/dhcp stop.
The DHCP daemon stops until it is manually started again, or the system reboots.
How can I renew or release an IP in Linux for eth0?
To renew or release an IP address for the eth0 interface, enter:
$ sudo dhclient -r eth0
$ sudo dhclient eth0
In this example, I am renewing an IP address for my wireless interface:
sudo dhclient -v -r eth0
sudo dhclient -v eth0
Command to release/renew a DHCP IP address in Linux:
1. ip a - Get ip address and interface information on Linux
2. ip a s eth0 - Find the current ip address for the eth0 interface in Linux
3. dhclient -v -r eth0 - Force Linux to renew IP address using a DHCP for eth0 interface
4. systemctl restart network.service - Restart networking service and obtain a new IP address via DHCP on Ubuntu/Debian Linux
5. systemctl restart networking.service - Restart networking service and obtain a new IP address via DHCP on a CentOS/RHEL/Fedora Linux
6. nmcli con - Use NetworkManager to obtain info about Linux IP address and interfaces
7. nmcli con down id 'enp6s0' - Take down Linux interface enp6s0 and release IP address in Linux
8. nmcli con up id 'enp6s0' - Obtian a new IP address for Linux interface enp6s0 and release IP address using DHCP
MongoDB service is not starting up - Fix it now
This article covers how to resolve the the problem of starting MongoDB server when running the command mongod which may arise due to file permission or ownership issues.
The reason was the dbpath variable in /etc/mongodb.conf.
To fix, you only had to change the owner of the /data/db directory recursively.
Also For ubunto , what made it happen and was real simple is to install mongodb package:
$sudo apt-get install mongodb
Also, You can use the below-mentioned command for mongodb service is not starting up:-
$sudo rm /var/lib/mongodb/mongod.lock
$mongod --repair
$sudo service mongodb start
Mongodb service is not starting up:
This can also happen if your file permissions get changed somehow.
Removing the lock file didn't help, and we were getting errors in the log file like:
2016-01-20T09:14:58.210-0800 [initandlisten] warning couldn't write to / rename file /var/lib/mongodb/journal/prealloc.0: couldn't open file /var/lib/mongodb/journal/prealloc.0 for writing errno:13 Permission denied
2016-01-20T09:14:58.288-0800 [initandlisten] couldn't open /var/lib/mongodb/local.ns errno:13 Permission denied
2016-01-20T09:14:58.288-0800 [initandlisten] error couldn't open file /var/lib/mongodb/local.ns terminating
So, went to check permissions:
ls -l /var/lib/mongodb
total 245780
drwxr-xr-x 2 mongodb mongodb 4096 Jan 20 09:14 journal
drwxr-xr-x 2 root root 4096 Jan 20 09:11 local
-rw------- 1 root root 67108864 Jan 20 09:11 local.0
-rw------- 1 root root 16777216 Jan 20 09:11 local.ns
-rwxr-xr-x 1 mongodb nogroup 0 Jan 20 09:14 mongod.lock


