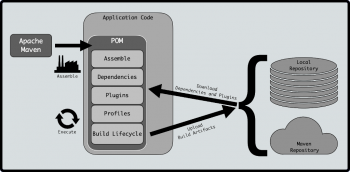
Apache Maven on Ubuntu Steps to install it
This article will guide you on how to #install #Apache #Maven on Ubuntu. Basically, Apache Maven is a popular build management tool for #Java projects.
To test The Maven Installation in #Ubuntu:
Run the command mvn -version to check if the maven is installed properly.
You will see the below description on the command prompt. Maven is installed successfully.
Some Maven #Commands:
1. mvn clean. This command cleans the maven project by deleting the target directory.
2. mvn compiler:compile. This command compiles the java source classes of the maven project.
3. mvn compiler:testCompile.
4. mvn package.
5. mvn install.
6. mvn deploy.
7. mvn validate.
8. mvn dependency:tree.
Install Cockpit Web Console on Ubuntu
This article will guide you on the steps to #install the #Cockpit web console on #Ubuntu. Basically, Cockpit web console provides a #graphical overview of the core components and overall status of a #Linux #machine.
To access cockpit in Linux:
1. Open the Interface by Opening a web #browser and enter the server's IP address with port 9090 in the address bar. If the web browser is on the Cockpit server, open localhost:9090 or hostname:9090.
2. Log into the Cockpit interface with the same user name and password that you would normally use to log into the #system.
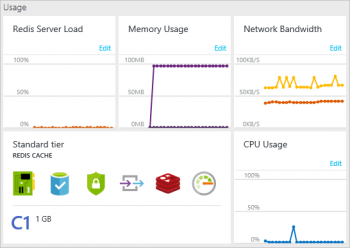
Data Loss through Partial loss of keys in Azure Cache for Redis
This article will guide you on the different methods to fix data loss in #Azure #Cache for #Redis which can happen due to a number of reasons like Redis instance failure, incorrect #database selection, and so on.
Redis server saves all its data to HDD from time to time, thus providing some level of persistence. It saves data in one of the following cases: automatically from time to time. when you manually call BGSAVE command.
Redis does not use #tables, and stores data in #memory, and is not limited by the hard #disk I / O speed when reading and writing #data, so the speed is extremely fast.

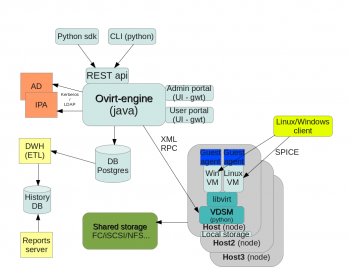
Virtual Machines (VMs) in oVirt 4 0 Environment
This article will guide you on the steps to create a Virtual Machines (#VMs) in oVirt 4.0 Environment.
The #oVirt engine acts as the control center for oVirt environments. The engine enables admins to define #hosts and #networks, as well as to add storage, create VMs and manage user permissions. Included in the oVirt engine is a graphical user interface (GUI), which manages oVirt #infrastructure resources.
To Create a Virtual Server:
i. Access the Virtual Server class tab in the Class #Manager.
ii. Click the Add Virtual Server link.
iii. Specify the name of the virtual server, its connections, and the URL Hosts. ...
iv. Click OK and then Apply to save and apply your changes.
To to Create Virtual Machines (VMs) in oVirt 4.0 Environment:
1. Create new Data Center.
2. Configure Cluster for Data Center.
3. Add Host or oVirt Node to above created data center & cluster.
4. Creating Storage #Domains.
5. Upload #ISO files to ISO Storage Domain.
6. Create Virtual Machine.
oVirt Guest Agent on CentOS 8 and RHEL 8 Steps to install
This article will guide you on how to install oVirt Guest Agent on CentOS and RHEL. oVirt / #RedHat V#irtualization guest agent provides information, notifications, and actions between the #oVirt web interface and the guest.
To install oVirt guest agent:
1. Log in to the Red Hat Enterprise Linux virtual machine.
2. Enable the Red Hat Virtualization Agent #repository.
3. Install the guest #agent and #dependencies: # yum install ovirt-guest-agent-common.
4. Start and enable the ovirt-guest-agent service.
5. Start and enable the qemu-guest-agent service.

NFS Server on RHEL CentOS 8 Steps to install and configure
This article will guide you on the steps to Install and Configure #NFS Server on #RHEL or #CentOS.
The terms client and server are used to describe the roles that a computer plays when sharing file systems. The NFS service enables any given computer to access any other computer's file systems and, at the same time, to provide access to its own file systems.
To install NFS server:
1. Install NFS #Kernel Server.
2. Create the #Export #Directory.
3. Assign server access to client(s) through NFS export file.
4. Export the shared directory.
5. Open #firewall for the client (s).


