Blog
- Home
- Blog
This article covers how to install the Zabbix Agent on a Ubuntu 20.04 system very conveniently.
You can ensure the successful installation of the Zabbix Agent by checking its Active status on your system. However, you can also uninstall it anytime you want.
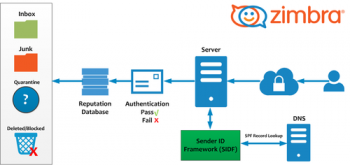
Zabbix agent is installed on the remote host (target) to monitor the hard drive, memory processor, etc. The agent collects data and sends back to Zabbix Server.
Zabbix agents can use passive or active checks to pass information.
In passive check, Zabbix server (poller) requests an agent for certain information, and the agent sends back a value.
In the active check, the agent process all data and pushes it to the Zabbix server.
However, agent periodically connects the server to collect metric which needs to be monitored.
To Configure Zabbix agent:
Make necessary changes on the Zabbix Agent configuration file "/etc/zabbix/zabbix_agentd.conf".
After making changes, Save the changes and exit the file.
Then restart Zabbix agent service to the changes to be effected.
$ sudo systemctl restart zabbix-agent
To Configure the firewall on Zabbix agent:
1. If you have UFW firewall enables, execute the commands:
$ sudo ufw allow 10050/tcp2. Then reload the firewall
$ sudo ufw reload3. And verify that the port has been opened or allowed on the firewall.
$ sudo ufw status
This article covers how to install Tig on your Ubuntu 20.04 system and hence interacting with Git all the more efficiently.
However, you can get rid of this utility any time you want by following the uninstallation procedure that we have shared with you in this guide.
Tig is a text-mode interface for git. It mainly serves as a Git repository browser. It can also assist in staging changes for commit at the chunk level.
Features of Tig:
1. Browses the commits in the current branch
2. Displays the commits for one or more specific branches
3. Compares two branches
4. Helps to see the changes for a single file
5. Displays the list of stashes
6. Shows references for branches, tags and remotes
To install tig on Ubuntu:
1. First update the system, run:
# sudo apt update2. To install tig on ubuntu, run:
# sudo apt install tig
To uninstall tig on Ubuntu:
To completely remove tig from your Ubuntu machine, type;
# sudo apt remove tig -y
This article covers how to install the AWS CLI very conveniently on your Linux Mint 20 system and use it for managing the Amazon Web Services very efficiently.
The AWS or Amazon Web Service command line interface is a command line tool for manage our Amazon web services.
AWS CLI provides direct access to the Amazon Web Services public API.
As it is a command line tool, it can also be used to create scripts to automate your Amazon web services.
To the AWS CLI on Ubuntu With APT:
1. First we update the package listing cache with the following command in the terminal (Ctrl + Alt + T):
# sudo apt-get update2. Now we are going to install the AWS CLI using the command:
# sudo apt-get install awscli3. We will can check if AWS CLI is working correctly with the following command:
# aws --version
This article covers Google Chrome extensions that ought to improve productivity, time consumption and efficiency of work.
Some of the listed extensions can yield opposite results from expectation, e.g., Pocket, in its attempt to suggest popular articles can result in distracting a user from their main task.
However, all the listed extensions are most popular amongst its users and therefore improve overall Chrome users experience. Other than the listed few, many other Chrome extensions have also greatly contributed to productivity, e.g., Grammarly extension is great for users as it helps identify and save users from unwanted typos or spelling mistakes.
Nonetheless, the provided list in the article covers the top ten most efficient and productive Google Chrome extensions that have been most downloaded and loved by its users.
This article covers the different methods to perform the installation of NodeJS on the CentOS 8 system.
Now that NodeJS is installed on your CentOS 8 system, you can use it to deploy a NodeJS application on the system.
Node.js is a cross-platform, runtime environment that was built on Chrome's JavaScript. This environment is designed to execute JavaScript code on the server-side.
To check Node version number, run the command:
# node --version
This article covers how to setup an SSH key-based authentication as well how to connect to your Linux server without entering a password.
To set up a passwordless SSH login in Linux all you need to do is to generate a public authentication key and append it to the remote hosts ~/.ssh/authorized_keys file.
To Disable SSH Password Authentication
To add an extra layer of security to your server you can disable the password authentication for SSH.
Before disabling the SSH password authentication make sure you can log in to your server without a password and the user you are logging in with has sudo privileges.
The following steps describe how to configure sudo access:
1. Log into your remote server with SSH keys, either as a user with sudo privileges or root:
# ssh sudo_user@server_ip_address2. Open the SSH configuration file /etc/ssh/sshd_config, search for the following directives and modify as it follows:
/etc/ssh/sshd_configPasswordAuthentication noChallengeResponseAuthentication noUsePAM no3. Once you are done save the file and restart the SSH service.
On Ubuntu or Debian servers, run the following command:
# sudo systemctl restart sshOn CentOS or Fedora servers, run the following command:
# sudo systemctl restart sshd


