Are you trying to set up Amazon CloudFront with WordPress site?
This guide is for you.
One of the easiest ways to improve the user experience is to accelerate one’s entire WordPress website by using CloudFront.
This will improve the site's responsiveness by reducing the load on web servers. CloudFront can be configured to accelerate a website regardless of the website being hosted on AWS.
Amazon CloudFront is a fast content delivery network (CDN) service that securely delivers data, videos, applications, and APIs to customers globally with low latency, high transfer speeds, all within a developer-friendly environment.
Here at Ibmi Media, as part of our Server Management Services, we regularly help our Customers to to set up Amazon CloudFront with WordPress site.
In this context, we shall look into how to perform this setup with WordPress.
Steps to Set up Amazon CloudFront with WordPress site ?
Before going into the steps we will see what is the importance of CloudFront on a WordPress site.
How does CloudFront help?
Amazon CloudFront improves the experience for users accessing websites in the following ways:
1.Firstly, Anycast DNS ensures that customers are routed to the nearest edge location.
2. Cached content, when available, is delivered to users from the edge location.
3. When data needs to be fetched from our site, CloudFront optimizes network throughput by managing the transfers between Edge Locations and our website.
4. Finally, negotiating and offloading Transport Layer Security (TLS) at the CloudFront Edge and improving performance, reducing connection setup latency, and supporting back-end connection re-use.
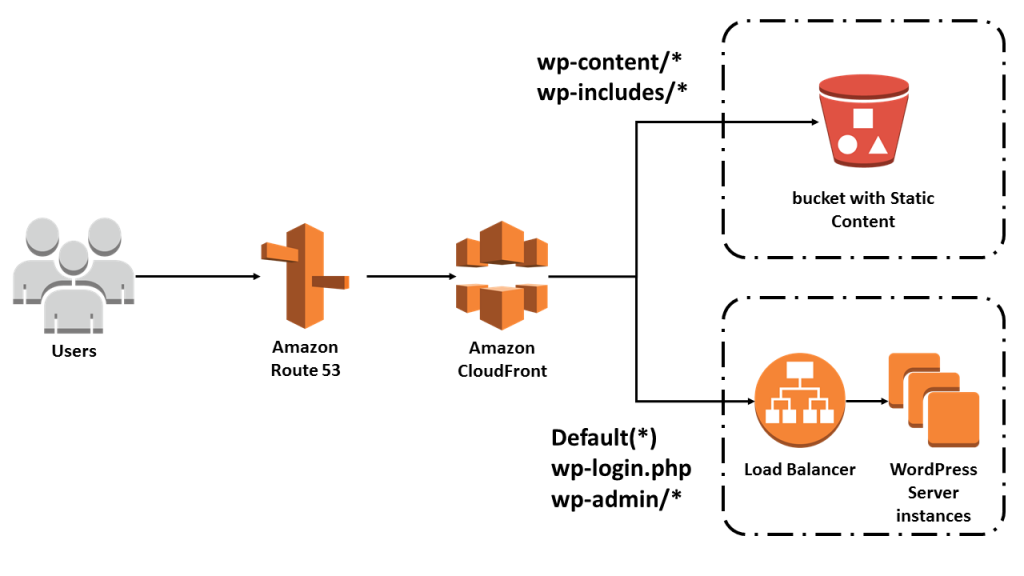
The simplified architecture above describes a common architecture for WordPress, with static content stored in AWS S3, and WordPress running on EC2, Lightsail, or another hosting facility.
Generally, WordPress stores everything locally on the webserver.
However, there are several plugins that make it easy to move static content to S3 and one example is W3 Total Cache.
The main steps to configure CloudFront are:
1. Creating a distribution
2. Defining origin(s)
3. Configuring cache behaviors
Before creating a CloudFront distribution, we have to ensure that the site with www and non-www are resolving properly.
We can create a CloudFront Web distribution from the CloudFront console.
For this, we have to fill in the required details for the distribution.
The CloudFront console offers a drop-down listing the S3 buckets along with any Load Balancers configured in the AWS account to help avoid errors.
We can simply type the DNS name or IP address if it not listed.
TLS/SSL
TLS/SSL certificates are made free by Amazon Certificate Manager. We can use this for use with CloudFront and AWS Elastic or Application Load Balancers.
Choose the SSL protocols that CloudFront may use when communicating with our WordPress site.
This is relevant if we have configured the site to accept HTTPS traffic.
The Origin Protocol Policy determines how CloudFront communicates with Origin (WordPress server).
We can choose to always have CloudFront use HTTP.
Timeouts & Ports
CloudFront allows users to configure the Origin response and Keep-alive timeouts.
If the site receives light traffic, it is good to increase the keep-alive timeout, possibly up to the maximum of 60 seconds.
This helps CloudFront to hold open TCP connections to Origin between requests for longer than the default behavior of closing connections if found idle for 5 seconds.
As a result, it reduces the latency associated with re-establishing connections for subsequent users or page fetches.
Custom Headers
CloudFront has the ability to add user-specified headers to each request sent to the Origin, potentially overriding headers set by the viewer.
Default Cache Behavior Settings
The default settings are the "catch-all" behavior and must be appropriate for any request not handled by more specific rules.
We can configure CloudFront to redirect any HTTP requests to HTTPS.
If we choose HTTPS Only, users may have to type the full https://url when they visit our site, unless they will always be following a link from another page to navigate there.
Headers
When the webserver is configured to host multiple sites the Host header determines the content that will be served.
It is better to set caching based on Whitelisted headers with both Host and Origin headers configured at a minimum.
Object Caching
WordPress, by default, does not set cache control headers such as Expires or max-age. We can install a plugin or configure '.htaccess' files to set these headers. If we choose not to configure WordPress in this way, we can still have CloudFront cache content by choosing to customize under Object Caching.
When we configure Cache Control headers in WordPress we have to choose "User Origin Cache Headers".
The "Default TTL" setting tells CloudFront to cache objects for 300 seconds when the WordPress server does not configure caching headers.
We need to choose a lower default TTL if we want users to see comments soon after posting.
Cookies
WordPress makes extensive use of cookies. We can forward cookies based on a whitelist.
Generally, the following cookies will be enough for most cases:
comment_author_*
comment_author_email_*
comment_author_url_*
wordpress_logged_in_*
wordpress_test_cookie
wp-settings-*
Query Strings
WordPress uses Query Strings to determine the content to return. With the "Compress Objects Automatically" option, CloudFront will compress certain files when the requesting viewer or browser includes the header: "Accept-Encoding: gzip".
Distribution Settings
CloudFront configuration options that are relevant to a WordPress site is given below:
TLS/SSL
Certificate can be used with CloudFront in order to secure communications between users and the CloudFront edge location, in addition to securing the back-end traffic between CloudFront and the website.
Custom TLS/SSL Client Support
CloudFront offers two options for hosting TLS/SSL certificates. The default option is to serve only clients that support Server Name Indication (SNI).
SNI is an extension to the TLS protocol, supported by most modern browsers, that includes the domain name in the request header.
The alternative is to provide CloudFront dedicated IP addresses in each Edge location that hosts our distribution.
In this case, a browser that does not support SNI will be able to negotiate a secure connection to the website.
Security Policy
CloudFront supports a variety of security policies that allow improving the security of web applications by enforcing, for example, TLS v1.2 and eliminate weak ciphers like RC4.
Default Root Object
This can be ignored for WordPress as the site will automatically be configured to serve index.php.
Logging
Depending on our requirements, we can choose to log HTTP requests handled by CloudFront, by an Elastic or Application Load Balancer, by WordPress server, or all of the above. The default is not to log all viewer requests.
Finally, we can add a comment, select “enabled” as the distribution state, and click create distribution.
Status: In Progress
Once we create the distribution, we will be redirected back to the CloudFront web console, where we can see our distribution listed with a status of “In Progress”.
Next we can continue to specify Origins and Behaviors for the WordPress content.
Adding Origins & Behaviors
We need to select our Distribution and click the Distributions Settings button to edit the settings.
On the Origins tab, we should see one Origin, created during the initial setup.
Select Create Origin to add a source that CloudFront will request content from.
As WordPress is configured to store static content like images, CSS and JavaScript files in S3, add the S3 bucket as an Origin and configure appropriate Cache Behavior.
Next, from the Behaviors tab, we will create the configurations required.
Currently, we can see the Default(*) behavior only.
As the content is static, it should be very cacheable.
DNS Settings
In order to make the CloudFront configuration active for our domain, we have to update the DNS record, creating a CNAME or ALIAS pointing to CloudFront distribution’s DNS name.
However, before we make this change for all users, we can test the settings, overriding DNS for our own computer by editing the host's file:
1. From a command line perform a DNS lookup on CloudFront distribution:
dig xyz.cloudfront.net
xyz.cloudfront.net. 54 IN A 54.192.31.130
xyz.cloudfront.net. 54 IN A 54.192.31.131
2. Pick any of the IP addresses returned and add to hosts file C:\Windows\System32\drivers\etc\hosts on Windows or /etc/hosts on a Mac or Linux system.
Append a line to the bottom of the file, it should look like this;
www.example.com 54.192.31.1303. Now when we visit our site with our browser, the hosts file will overwrite DNS and we will be directed to CloudFront distribution for testing.
4. Finally, once the test seems to be successful, we can remove the entry from hosts file and in DNS create a CNAME pointing www.example.com at our CloudFront Distribution DNS endpoint.
[Need Assistance with Amazon CloudFront on WordPress setup? We are available 24*7. ]
Conclusion
This article covers how to set up Amazon CloudFront with WordPress site. WordPress performs reasonably well out of the box, but there is room for improvement—the number of WordPress plugins that address performance is evidence of this. However, the easiest way to improve the user experience is to accelerate one's entire WordPress website by using CloudFront.
Doing this will not only improve your site's responsiveness, but it may also reduce the overall cost of operating your WordPress infrastructure, as reducing the load on your web servers may help you scale down the required infrastructure.
In fact, CloudFront can significantly help your site cope with an unexpected load when your site gets popular.
How does CloudFront help?
Many AWS customers have users spread across the globe that they want to reach. However, what once required an immense engineering effort can now be easily built using AWS Regions and Edge locations, which allow you to serve content from the locations closest to those users.
Data transfers on the internet depend largely on global networks of fiber optic cables, allowing very high bandwidth data transfers.
As the speed of light is proving a difficult challenge to overcome, Amazon CloudFront improves the experience for users accessing your websites in several other ways, including:
1. Anycast DNS ensures your customers are routed to the nearest edge location.
2. Cached content, when available, is delivered to your users from the edge location.
3. When data needs to be fetched from your site CloudFront optimizes network throughput by managing the transfers between Edge Locations and your website. This traffic runs over the Amazon Global Backbone, where optimized TCP configuration ensures more bytes are in-flight on the network, improving throughput, while TCP connection re-use eliminates much of the latency associated with establishing connections. In this way, whether content is cached or not, it will be accelerated by delivery over optimized network paths.
4. Finally, negotiating and offloading Transport Layer Security (TLS) at the CloudFront Edge further improves performance, reducing connection setup latency, and further supporting back-end connection re-use.


