Windows Deployment Services (WDS) is a Microsoft tool which allows an administrator to remotely deploy Windows operating systems to machines booting from a network adapter.
It is not common that software testers to get a requirement to test WDS deployment in Virtual machines.
However, recently, we tested this using some simple test cases. We can use them to check if the deployment is complete.
Here at Ibmi Media, as part of our Server Management Services, we regularly help our Customers to perform related Windows queries.
In this context, we shall look into a few test cases of WDS deployment in Virtual machines.
WDS deployment in Virtual machines
Test case 1
WDS- Windows installation: To ensure proper Windows installation:
i. Log in to the virtual machine.
ii. Then in the command prompt type 'winver'.
This is the first and simple way to check the deployment.
A prompt will show us the Windows version details.
Test case-2
WDS- Windows version: To test if the version is correct:
i. Log in to the virtual machine.
ii. Then click the start button -> control panel -> system and security -> system and check the versions and bits.
Test case-3
WDS- Anti-piracy: To test the auto-activation anti-piracy technology
For Windows 2008/Windows 7/Windows Vista:
i. Initially, login to the virtual machine.
ii. Press windows+ R keys on the keyboard.
iii. Then type slui and press Enter.
For Windows 2003/Windows XP:
i. Log in to the virtual machine.
ii. Then, Start -> Run and type command oobe/msoobe /a.
iii. Eventually, hit Enter.
This will display the action status.
Test case-4
WDS- Configure IP address
Once we have the operating system, we need to make sure it has the right IP address assigned and that it can ping.
IP correctness:
i. Log in to the virtual machine
ii. Click Start -> Run and take command prompt window.
iii. Then enter ipconfig/all and check that the proper IP is assigned to the machine.
Ability to ping
If we are unable to ping, then:
i. Click the start button and take Administrative tools -> Firewall with Advanced security on local computer.
ii. Click Windows firewall properties and make Public profile -> off and again ping the IP address.
Test case-5
WDS- Configure Hostname: To test that hostname is set to the Virtual machine:
i. Log in to the virtual machine.
ii. Then click Start -> Run, take command prompt window, and type hostname.
Assign the correct hostname.
Test case-6
WDS- Configures Support information
In Windows 2008, if a customer has a managed service, this information will be provided:
i. Log in to the virtual machine.
ii. Right-click on Computer and choose Properties to bring up the System properties screen.
iii. In the support information, check the information and compare it to the requirement.
Test case-7
WDS- GPO settings
To ensure proper update of the Group Policy:
i. Log in to the virtual machine.
ii. Press Start -> Run and type gpedit.msc.
iii. Check if the Group Policy settings are right and points to the Internal Windows update Server.
Test case-8
WDS- Windows updates installation:
i. Log in to the virtual machine.
ii. Press Start -> Control Panel -> Programs -> Programs and Features.
iii. Then view installed updates.
Check that windows updates are proper.
Test case-9
WDS- Machine access
Once the deployment is complete, the machine should be accessible through other machines. We can check this as follows.
Access windows from Linux machine (Remote Desktop):
i. Login to control panel using rdesktop -u username -p ‘password’ IP -g resolution in the terminal.
ii. Check if the user is able to access the windows system.
For security, Remote access should allow through the firewall.
We can check this from:
i. Start -> Control Panel -> System and Security -> Windows Firewall -> Allowed Programs.
ii. Check if rdesktop firewall is enabled.
Access Linux from Windows machine:
i. Initially, log in to the virtual machine.
ii. Then download putty.exe.
iii. Eventually, save and open putty.exe file.
iv. Specify the connection name by typing hostname or IP address in the open window.
v. Then click on the Open button to connect to remote Linux server via SSH.
vi. Click on the Yes button to accept the server’s host key and cache the same key.
vii. Finally, check if the user is able to access the Linux system.
[Need urgent help to perform any WDS deployment test? We'd be happy to assist. ]
Conclusion
This article covers some methods to test Windows deployment in virtual machines. Windows Deployment Services (WDS) enables you to deploy Windows operating systems over the network, which means that you do not have to install each operating system directly from a CD or DVD.
To install Windows Deployment Services:
Windows Deployment Services ships as an innate role of Windows Server. I will be demonstrating on WS2016. All currently-supported versions provide it and you follow nearly the same process on each of them.
1. Start in Server Manager. Use the Add roles and features link on the main page (Dashboard) or on the Manage drop-down.
2. Click Next on the introductory page.
3. Choose Role-based or feature-based installation.
4. On the assumption that you're running locally, you'll only have a single server to choose from. If you've added others, choose accordingly.
5. Check Windows Deployment Services.
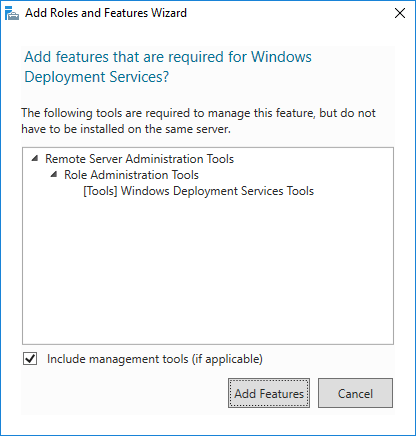
6. Immediately upon selecting Windows Deployment Services, you’ll be asked if you’d like to include the management tools. Unless you will always manage from another server, leave the box checked and click Add Features.
7. Click Next on the Select server roles page and then click Next on the Select server features page (unless you wish to pick other things; no others are needed for this walkthrough).
8. You'll receive another informational screen explaining that WDS requires further configuration for successful operation. Read through for your own edification. You can use the mentioned command line tools if you like, but that won't be necessary.
9. You will be asked to select the components to install. Leave both Deployment Server and Transport Server checked.
10. Click Install on the final screen and wait for the installation to finish.
To create WDS Boot Images:
When a system starts up and PXE directs it to the WDS server, it first receives a boot image. The boot image should match the operating system it will deploy.
You can obtain one easily.
1. Find the DVD or ISO for the operating system that you want to install. Look in its Sources folder for a file named boot.wim.
2. On your WDS server, right-click the Boot Images node and click Add Boot Image.
3. On the first page of the wizard, browse to the image file. You can load it right off the DVD as it will be copied to the local storage that you picked when you configured WDS.
4. You’re given an opportunity to change the boot image’s name and description. I would take that opportunity, because the default Microsoft Windows Setup (x##) won’t tell you much when you have multiples.
5. You will then be presented with a confirmation screen. Clicking Next starts the file copy to the local source directory. After that completes, just click Finish.
This article covers some methods to test Windows deployment in virtual machines. Windows Deployment Services (WDS) enables you to deploy Windows operating systems over the network, which means that you do not have to install each operating system directly from a CD or DVD.
To install Windows Deployment Services:
Windows Deployment Services ships as an innate role of Windows Server. I will be demonstrating on WS2016. All currently-supported versions provide it and you follow nearly the same process on each of them.
1. Start in Server Manager. Use the Add roles and features link on the main page (Dashboard) or on the Manage drop-down.
2. Click Next on the introductory page.
3. Choose Role-based or feature-based installation.
4. On the assumption that you're running locally, you'll only have a single server to choose from. If you've added others, choose accordingly.
5. Check Windows Deployment Services.
6. Immediately upon selecting Windows Deployment Services, you’ll be asked if you’d like to include the management tools. Unless you will always manage from another server, leave the box checked and click Add Features.
7. Click Next on the Select server roles page and then click Next on the Select server features page (unless you wish to pick other things; no others are needed for this walkthrough).
8. You'll receive another informational screen explaining that WDS requires further configuration for successful operation. Read through for your own edification. You can use the mentioned command line tools if you like, but that won't be necessary.
9. You will be asked to select the components to install. Leave both Deployment Server and Transport Server checked.
10. Click Install on the final screen and wait for the installation to finish.
To create WDS Boot Images:
When a system starts up and PXE directs it to the WDS server, it first receives a boot image. The boot image should match the operating system it will deploy.
You can obtain one easily.
1. Find the DVD or ISO for the operating system that you want to install. Look in its Sources folder for a file named boot.wim.
2. On your WDS server, right-click the Boot Images node and click Add Boot Image.
3. On the first page of the wizard, browse to the image file. You can load it right off the DVD as it will be copied to the local storage that you picked when you configured WDS.
4. You’re given an opportunity to change the boot image’s name and description. I would take that opportunity, because the default Microsoft Windows Setup (x##) won’t tell you much when you have multiples.
5. You will then be presented with a confirmation screen. Clicking Next starts the file copy to the local source directory. After that completes, just click Finish.


