Are you trying to configure Amazon WorkSpaces?
We can help you.
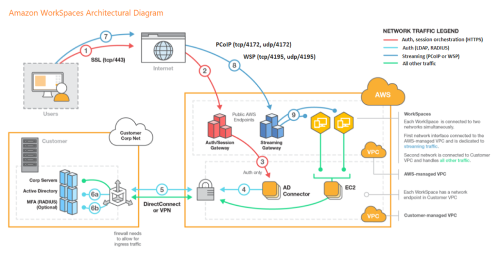
Amazon WorkSpaces uses your Simple AD, AD Connector, or AWS Managed Microsoft AD directory to authenticate users. Users access their WorkSpaces by using a client application from a supported device or, for Windows WorkSpaces, a web browser, and they log in by using their directory credentials.
Amazon WorkSpaces is a fully managed desktop computing service in the cloud. With Amazon WorkSpaces we can provide cloud-based desktops to end-users. This service was launched to meet its customer’s rising demand for Cloud-based 'Desktop as a Service' (DaaS).
Here at Ibmi Media, as part of our Server Management Services, we regularly help our Customers to set up Amazon WorkSpaces.
More about Amazon WorkSpaces ?
Amazon WorkSpaces enables you to provision virtual, cloud-based Microsoft Windows or Amazon Linux desktops for your users, known as WorkSpaces. Amazon WorkSpaces eliminates the need to procure and deploy hardware or install complex software. You can quickly add or remove users as your needs change. Users can access their virtual desktops from multiple devices or web browsers.
Features of Amazon WorkSpaces:
1. Choose your operating system (Windows or Amazon Linux) and select from a range of hardware configurations, software configurations, and AWS Regions. For more information, see Amazon WorkSpaces Bundles and Create a Custom WorkSpaces Image and Bundle.
2. Choose your protocol: PCoIP or WorkSpaces Streaming Protocol (WSP). For more information, see Protocols for Amazon WorkSpaces.
3. Connect to your WorkSpace and pick up from right where you left off. Amazon WorkSpaces provides a persistent desktop experience.
4. Amazon WorkSpaces provides the flexibility of either monthly or hourly billing for WorkSpaces. For more information, see Amazon WorkSpaces Pricing.
5. Deploy and manage applications for your Windows WorkSpaces by using Amazon WorkSpaces Application Manager (Amazon WAM).
6. For Windows desktops, you can bring your own licenses and applications, or purchase them from the AWS Marketplace for Desktop Apps.
7. Create a standalone managed directory for your users, or connect your WorkSpaces to your on-premises directory so that your users can use their existing credentials to obtain seamless access to corporate resources. For more information, see Manage Directories for Amazon WorkSpaces.
8. Use the same tools to manage WorkSpaces that you use to manage on-premises desktops.
9. Use multi-factor authentication (MFA) for additional security.
10. Use AWS Key Management Service (AWS KMS) to encrypt data at rest, disk I/O, and volume snapshots.
11. Control the IP addresses from which users are allowed to access their WorkSpaces.
How to Set Up Amazon Workspaces ?
Steps to set up Amazon WorkSpaces
Now we will see the steps that our Support Techs follow to set up Amazon WorkSpaces.
1. Creating and configuring the VPC
i. First, open the Amazon VPC console by using the following link:
https://console.aws.amazon.com/vpc/
ii. Then select creating the VPC option on the right side of the navigation bar.
iii. After that click the start VPC wizard option, then click VPC with a single public subnet option on the left side.
iv. Now fill in the details like VPC name, subnet name and leave the other fields as default.
v. After that click the Create VPC button.
vi. Finally select the OK button.
2. Creating an AD Directory
i. Firstly, by using the following link we need to open Amazon WorkSpace Console:
https://console.aws.amazon.com/workspaces/
ii. Then select Directories and Setup Directory in the navigation panel.
iii. After that select Create Simple AD button and fill in the required details.
iv. Then fill in the VPC details and select the Next step.
v. Finally, then click the Create Simple AD button.
3. Creating a WorkSpace
i. First open Amazon WorkSpace Console using the following:
https://console.aws.amazon.com/workspaces/
ii. Then select Workspaces and then launch the WorkSpaces option in the navigation panel.
iii. After that select the cloud directory.
iv. And enable/disable WorkDocs for all users in this directory, then click the Yes, Next button.
v. Then fill in the details for the new user and select the Create Users button.
vi. Once the user is added to the WorkSpace list, select Next.
vii. And enter the number of bundles that we need in the value field of the WorkSpaces Bundles page, then select Next.
viii. Finally, check the details and make changes if required and select Launch WorkSpaces.
There will be a message to confirm the account, after which we can use WorkSpaces.
4. Testing WorkSpaces
i. First, run the application. For the first time, we need to enter the registration code received in the email and click Register.
ii. Connect to WorkSpace by entering the user name and password for the user. Select Sign In.
iii. After that, open the following link on the web browser.
http://aws.amazon.com/workspaces/
Navigate and verify that the page can be viewed.
A message saying "Congratulations! Your Amazon WorkSpaces cloud directory has been created, and your first WorkSpace is working correctly and has Internet access" will be received.
Some Benefits of Amazon WorkSpaces ?
1. Easy to set up
2. Choice of devices and applications
3. Cost-effective
[Need assistance in setting up Amazon WorkSpaces ? We can help you. ]
Conclusion
This article covers how to set up Amazon WorkSpaces for our customers. Amazon WorkSpaces is a managed, secure Desktop-as-a-Service (DaaS) solution. With Amazon WorkSpaces, your users get a fast, responsive desktop of their choice that they can access anywhere, anytime, from any supported device.
With Amazon WorkSpaces, you can provision virtual, cloud-based Microsoft Windows or Amazon Linux desktops for your users, known as WorkSpaces.
Generally, Workspaces are meant to reduce clutter and make the desktop easier to navigate. Workspaces can be used to organize your work. For example, you could have all your communication windows, such as e-mail and your chat program, on one workspace, and the work you are doing on a different workspace.
The Amazon WorkSpaces Free Tier provides two Standard bundle WorkSpaces with 80 GB Root and 50 GB User volumes, running in AutoStop mode, for up to 40 hours of combined use per month, for two calendar months, from the time you create your first WorkSpace.
Key Features of Amazon WorkSpaces:
1. The end-users can access the documents, applications, and resources using devices of their choice such as laptops, iPad, Kindle.
2. Network Health Check-Up verifies if the network and Internet connections are working. Also, checks if WorkSpaces and their associated registration services are accessible, and checks if port 4172 is open for UDP and TCP access or not.
3. Client Reconnect feature allows the users to access their WorkSpace without entering their credentials every time when they disconnect.
4. Auto Resume Session feature allows the client to resume a session that gets disconnected due to any reason in network connectivity within 20 minutes by default. This can be extended for 4 hours. However, the users can disable this feature any time in the group policy section.
5. Console Search feature allows Administrators to search for WorkSpaces by their user name, bundle type, or directory.
Some AWS Limitations:
1. AWS service limits. AWS service limits are set by the platform.
2. Technology limitations. An exceptional characteristic of this limiting factor is that it can be applied to all Cloud services, not just on AWS.
3. Lack of relevant knowledge by your team.
4. Technical support fee.
5. General Cloud Computing issues.


