The process of extending a VMDK file is a fairly easy task that can be performed right in Disk Manager, shrinking a virtual disk is a bit tricky.
And, you need to be really careful because unless done properly, reducing virtual disk size may cause data loss!
Unlike expanding a disk of a VMWare virtual machine, it is more complicated to shrink VMDK Virtual Disk Size on the VMWare ESXi hypervisor.
It is impossible to do it via the vSphere Web Client graphical interface. It does not allow to specify a smaller virtual disk size.
Here at Ibmi Media, as part of our Server Management Services, we regularly help our Customers to perform related VMWare queries.
In this context, we shall look into how to reduce the size of a virtual disk (vmdk) file of the virtual machine running on VMWare ESXi.
How to Shrink VMDK Virtual Disk Size on VMWare ESXi ?
Before we reduce the size, we need to do the following on the VMWare ESXi host:
1. Delete all snapshots of the virtual machine not to damage the virtual disk
2. Create a full backup of the virtual machine or a copy of the vmdk and flat files we want to shrink:
cp vmname.vmdk backup_vmname.vmdk
cp vmname-flat.vmdk backup_vmname-flat.vmdk
The process to reduce a virtual disk size consists of two steps:
i. Shrink the partition inside the guest OS
ii. Reduce the size of the VMDK file of the VMWare virtual machine on the VMFS (NFS) datastore.
How to Shrink the Partition Size in the Guest OS?
Initially, we need to reduce the size of the disk partition in the guest operating system.
If the virtual machine runs Windows OS, we use the Disk Manager diskmgmt.msc or third-party tools. Failure of which may lead to a file system crash.
For instance, if we want to reduce the disk size by 40 GB, the volume size must reduce by 40960 MB (40 GB x 1024).
We enter this value in the corresponding field of the Shrink Volume wizard.
Once done, there will be some unallocated space to the right of our partition.
How to Reduce the VMDK File Size of the VMWare Virtual Machine ?
In order to reduce the size of the VMDK file on the VMWare VMFS file system, we suggests the following steps:
1. Initially, we shut down the virtual machine we want to reduce disk size.
2. Via SSH, we connect to the console of the ESXi host the VM is registered on
3. Then we go to the directory the VMDK file of our VM is located in:
cd /vmfs/volumes/datastore/test-VM
4. We display the contents of the virtual disk configuration file (*.vmdk) using the cat command:
# cat test_vm_3.vmdk
5. The size of the vmdk disk is shown in the #Extent description section.
6. To reduce the VMDK disk from 80 to 40 GB, we have to specify 83886080 in the Extent description section. Set the new size of the virtual disk using a text editor.
For example,
# vi test_vm_3.vmdk
7. From the down arrow key, go to the line containing the disk size. Specify the new size, save the changes and close the file.
8. Then we clone or migrate the virtual machine to another datastore. Once we move the virtual machine files, the new size of its virtual disk will display in its properties.
9. Ensure the new size displays in the VM properties.
10. Then start the VM, log in to the guest OS, and make sure that the unallocated area has disappeared and the disk size has been reduced.
How to Shrink a VMDK Using VMware vCenter Converter Standalone ?
GUI tool VMware vCenter Converter Standalone is another way to reduce a virtual disk size of a VMWare virtual machine.
Pros:
i. V2V conversion is slow
ii. Need enough space on the datastore to save the new VM
iii. The new virtual machine will have a new MAC address.
Cons:
i. We do not need to open the vCenter or ESXi host console
ii. Creates an exact copy of a VM
iii. The source disk cannot be damaged in case of any errors in conversion task settings.
Instead of Suspend, we have to Shut down the virtual machine we want to change the disk size.
1. Initially, we specify the ESXi host address and select the source VM.
2. Then we set the parameters of the new VM.
3. Go to the disk edit mode (Data to copy -> Edit).
4. Select the copy mode: Select volumes to copy.
5. We specify the new disk size for the new VM.
6. Once we run the VM conversion process, we can power off the source VM and power on the new one.
7. Ensure the disk size has been reduced. After that, we can remove the original VM.
[Need urgent help to shrink the VMDK Virtual Disk Size? We'd be happy to assist. ]
Conclusion
This article covers how to shrink VMDK Virtual Disk Size on VMWare ESXi.
By default, VMware creates "growable" disks that grow larger in size as you add data.
Unfortunately, they don't automatically shrink when you remove data.
You'll need to clean up or compact your disks to actually free up space on your hard drive.
VMware Workstation also allows you to create snapshots, which contain a complete "snapshot" of a virtual machine's state at the point in time you created them.
These can take a lot of space if the virtual machine has changed significantly since then.
You can free up additional space by deleting snapshots you no longer need.
1. To view the snapshots for a virtual machine, select the virtual machine in VMware Workstation and click VM > Snapshot > Snapshot Manager.
2. To delete a snapshot you no longer need, right-click it in the Snapshot Manager window and select "Delete". It will be removed from your computer.
3. You won't be able to restore your virtual machine to that previous point in time after deleting the snapshot, of course.
Before we try to shrink the virtual disk files, we should try to remove any unneeded files from the virtual machine to free space.
For example, on Debian-based VMs, you can run:
$ apt-get clean
To clear out the local repository of retrieved package files.
Next, run the command below to fill the unused space with zeros:
cat /dev/zero > zero.fill;sync;sleep 1;sync;rm -f zero.fill
Free Disk Space In VMware Workstation
In VMware Workstation, first power off the virtual machine you want to compact. You can't complete this process if it's powered on or suspended.
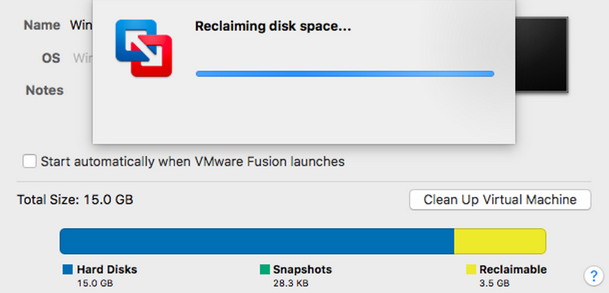
1. Select the virtual machine you want to compact in the main window and click VM > Manage > Clean Up Disks.
2. The tool will analyze the selected virtual machine's disk and show you how much space you can reclaim.
To reclaim the space, click "Clean up now".
If no space can be freed, you'll see a "Cleanup is not necessary" message here instead.
This article covers how to shrink VMDK Virtual Disk Size on VMWare ESXi.
By default, VMware creates "growable" disks that grow larger in size as you add data.
Unfortunately, they don't automatically shrink when you remove data.
You'll need to clean up or compact your disks to actually free up space on your hard drive.
VMware Workstation also allows you to create snapshots, which contain a complete "snapshot" of a virtual machine's state at the point in time you created them.
These can take a lot of space if the virtual machine has changed significantly since then.
You can free up additional space by deleting snapshots you no longer need.
1. To view the snapshots for a virtual machine, select the virtual machine in VMware Workstation and click VM > Snapshot > Snapshot Manager.
2. To delete a snapshot you no longer need, right-click it in the Snapshot Manager window and select "Delete". It will be removed from your computer.
3. You won't be able to restore your virtual machine to that previous point in time after deleting the snapshot, of course.
Before we try to shrink the virtual disk files, we should try to remove any unneeded files from the virtual machine to free space.
For example, on Debian-based VMs, you can run:
$ apt-get clean
To clear out the local repository of retrieved package files.
Next, run the command below to fill the unused space with zeros:
cat /dev/zero > zero.fill;sync;sleep 1;sync;rm -f zero.fill
Free Disk Space In VMware Workstation
In VMware Workstation, first power off the virtual machine you want to compact. You can't complete this process if it's powered on or suspended.
1. Select the virtual machine you want to compact in the main window and click VM > Manage > Clean Up Disks.
2. The tool will analyze the selected virtual machine's disk and show you how much space you can reclaim.
To reclaim the space, click "Clean up now".
If no space can be freed, you'll see a "Cleanup is not necessary" message here instead.


