Do you need to set up Site to Site VPN with pfSense?
Setting up pfSense Site to Site VPN is made easy by tweaking and implementing some configurations.
As part of our Server Support Services here at Ibmi Media, We have previously helped customers set up VPN and pfSense.
In this context, We shall look into more about pfSense VPN.
Getting started with Site to Site VPN with pfSense
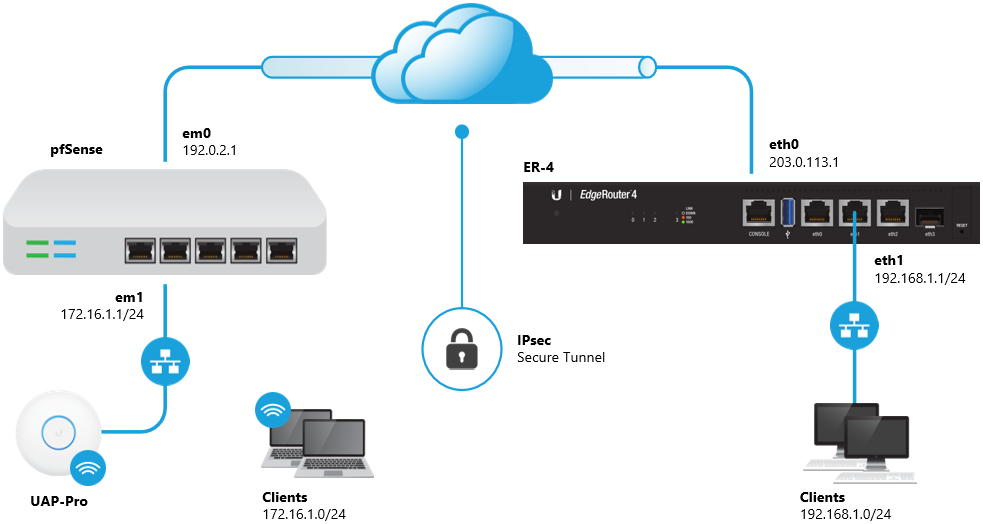
To set up Site to Site VPN with pfSense, access to both network interfaces is very essential for it to work. We will discuss it briefly below;
Local network Setup
1.Phase 1 of pfSense setup on local network.
To setup VPN on pfSense local network, follow the steps below;
i. To begin, Log into the pfSense local interface where you will see the VPN settings.
ii. Now click on VPN followed by IPSEC. Next click on + Add P1 to add a Remote Gateway as well its Description.
iii. Then create a Pre-Shared Key by entering the key in the Pre-Shared Key field which is available in the Phase 1 Proposal (Authentication). After which you should click on save to effect the changes.
2. Phase 2 of pfSense setup on local network.
This next phase will show you the second phase of pfSense setup on local network. Follow the steps below;
i. To begin, click on the + Show Phase 2 Entries followed by clicking on + Add P2.
ii. Now you should choose Network in Local Network and enter the local network's subnet.
iii. Next, Choose Network at Remote Network and enter the remote network's subnet.
iv. Select AES Encryption in Encryption Algorithms which is available in Phase 2 Proposal (SA/Key Exchange).
v. Select SHA1 followed by the PFS key group bit in the Hash Algorithm.
vi. The Remote Location’s IP Address of the pfSense should be entered which you should save to effect changes.
To finalize this stage, apply assign a rule to the firewall. To achieve this, do the following;
i. Click on the Firewall followed by Rules and IPsec where you will click on Add.
ii. Modify the protocol to Any and select the source as Network.
iii. Now enter the pfSense Remote Location's Subnet where you will enter the Description. To effect changes, click on Save and Apply changes.
Remote network Setup
1.Phase 1 of pfSense setup on remote network.
To setup VPN on pfSense remote network, follow the steps below;
i. To begin, Log into the pfSence remote interface and click on VPN.
ii. In the VPN section, navigate to IPSec and click on +1 Ass P1 where you should add the Remote Gateway as well as its description.
iii. Now enter the key in the Pre-Shared Key field in Phase 1 Proposal (Authentication) leaving the other attributes as default. After this effect changes by clicking save.
2. Phase 2 of pfSense setup on remote network.
This next phase will show you the second phase of pfSense setup on remote network. Follow the steps below;
i. To begin, click on + Show Phase 2 Entries followed by + Add P2.
ii. Now choose Network in Local Network where you should enter the subnet of the local network for the remote scenario.
iii. Here choose Network at Remote Network where you should enter the remote network's subnet for a local scenario.
iv. Next Select AES Encryption in Encryption Algorithms located at the Phase 2 Proposal (SA/Key Exchange).
v. Select SHA1 followed by PFS key group bit in the Hash Algorithm.
vi. You can now enter the pfSense local Location’s IP Address which you should Save to effect changes.
To implement changes in the settings , do the following;
i. Start by clicking the Firewall followed by Rule and IPsec respectively which you should add by clicking Add.
ii. Now modify the protocol to Any and select the Source as Network.
iii. Finally, enter the pfSense Remote Location's subnet where you should specify its Description. Effect changes by clicking on Save.
Need support in setting up pfSence and VPN? We are available.
Conclusion
The process of Setting up pfsense VPN Using IPsec to configure a site to site VPN working between two firewalls.
The process of Setting up pfsense VPN Using IPsec to configure a site to site VPN working between two firewalls.