A Backup destination is the storage location for your backup files (backup destinations can be remote or local).
Here at Ibmi Media, as part of our Server Management Services, we regularly help our Customers to perform related Jetbackup queries.
In this context, we shall look into how to create New Destinations for JetBackup.
How to Create New Destinations for JetBackup ?
A backup destination is the storage location for our backup files. Backup destinations can be remote or local.
Here, you will learn how to set up destinations for backups with JetBackup.
How to Secure Local Backup Storage ?
Prior to adding a destination to JetBackup, it is advised to secure the backup directory, so that only the allowed users can access that folder.
In order to do that, please connect to the destination via console/GUI and make the directory in which we want to store our backups.
For example:
mkdir [-p] /mnt/backup_vol/jetbackup
Then secure that destination so only one user can access its content (except root):
useradd <jetbackup>
chown jetbackup:jetbackup /mnt/backup_vol/jetbackup
chmod 700 /mnt/backup_vol/jetbackup
Right now only two users that can access this directory are root and jetbackup.
Now, when adding that destination in JetBackup GUI, the path field supplied should be the directory we have just created and secured: ie /mnt/backup_vol/jetbackup.
How to Create New Destinations for JetBackup ?
We can create a backup destination to use as a storage location for backups.
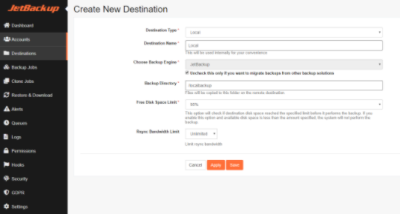
To configure it, go to JetBackup » Destination » Create New Destination.
Here we will begin configuring the backup destination.
Select the proper destination type.
There are different destination types as given below:
1. Local:
Firstly, local folder destination will be the fastest destination if there is no remote/local network involved.
2. SSH:
Remote SSH (using rsync) supports all features, we can make the most of it when backing up.
3. FTP:
The File Transfer Protocol (FTP) is a standard network protocol used to transfer computer files from one host to another host over a TCP-based network, such as the Internet. JetBackup preferred FTP server is pureFTPd. JetBackup does not support FTP servers hosted on Windows as a backup destination.
4. SFTP:
The SSH File Transfer Protocol (SFTP), also known as the Secure File Transfer Protocol, enables secure file transfer capabilities between networked hosts. SFTP additionally provides remote file system management functionality, allowing applications to resume interrupted file transfers, list the contents of remote directories and delete remote files.
5. Rsync.net:
- The first step is to create an account at http://rsync.net using one of the pricing plans from http://rsync.net/pricing.html.
- After filling up the details at https://www.rsync.net/signup/order.html, wait for the account to created and for rsync welcome email titled "Your rsync.net filesystem is ready".
- Next, create SSH keys so that the login is without using password.
The next step is to create backup destination:
- Specify "Type" as "Rsync.net".
- Write a name for the destination and remote hostname and account username as mailed to us from rsync.net.
- Then, write the private key: ~/.ssh/rsyncnet_rsa.
- Finally, click the "Save" button.
6. Amazon S3:
Amazon S3 (Simple Storage Service) is a scalable, web-based cloud object storage service that is used for remote backups and archiving of data and applications on AWS (Amazon Web Services).
7. Google Drive:
Next, google Drive is a file storage and synchronization service developed by Google. It allows users to store files on their servers, synchronize files across devices, and share files. JetBackup uses the Google Drive API to transfer backups to your Google Drive cloud storage.
8. Dropbox:
Then, using this backup destination for accounts with a large number of files is not recommended. Due to DropBox API limitations, there is too much overhead for each file, which makes file transfers very slow. We recommend using this for full compressed backups only.
9. Backblaze B2:
- The first step is to sign in with our account at https://www.backblaze.com/ or create an account.
- In the Backblaze B2 Cloud Storage interface, locate the "App Keys" and "Buckets" sections in the sidebar.
- Click on "App Keys" on the "B2 Cloud Storage" sidebar, scroll to "Your Application Keys", then click the "Add New Application Key" button.
- Enter the name for the key and ensure "Read and Write" access is granted to the new application key.
- Keep our Account ID (Key ID) and application key for later usage.
- Note that if we generate a new Master application key, the old one will no longer work.
- If we create an Application Key and are not using the BackBlaze Master Application Key, the application key must have all privileges (Read and Write) for the targeted bucket. Click on "Create a Bucket". Give our bucket a unique name and choose "private".
The next step is to create a backup destination:
- Firstly, specify "Destination Type" as "Backblaze".
- Then, add a name for our destination.
- Then, fill in the Account ID (keyID), Application Key and Bucket name that we have just created.
- Finally, click the "Save" button.
10. SSH cPanel Clone:
This destination is for clone jobs only. We must have root access to this destination (cPanel server).
Destination Settings
i. In order to change destination settings, click on Destination at the JetBackup sidebar and choose our destination to view settings.
ii. Disable/Enable Destination: Click on Disable/Enable Destination to Disable/Enable our destination.
iii. Validate Destination: Click on Validate Destination to check whether our destination is valid.
iv. Manage Destination: Click on Manage Destination to modify destination settings.
v. Export JB Config: This option enables "JetBackup configuration" backup(s) which is necessary to perform critical JetBackup operations such as “Disaster Recovery” and recovering from database corruption. "JetBackup configuration" backup(s) are lightweight and can execut daily to retain up to 7 snapshots. This backup is encrypted using the Master Private Key and is highly recommended to keep the key on a secure remote location (such as a password management software). On top of Export JB config enabled destination(s), JetBackup also has an "Automated Daily DR Export" executed during the daily cron and is stored locally at: `/usr/local/jetapps/usr/jetbackup/dailybackup`. JetBackup will continue to raise an alert until “Export JB config” is enable on at least one destination and the alerts are acknowledged.
vi. Hide/UnHide Snapshots: This option allows to set the visibility of backups/snapshots stored on the destination. When we enable, the backups from the destination will not be visible on the end-user’s cPanel Plugin Interface.
vii. Browse Destination Files: Browse files and folders stored in our destination. We may also select items for download.
viii. The following destinations does not support Download option via the file browser:
Google Drive.
- DropBox.
- BackBlaze.
ix. Delete Destination: Click on Delete Destination to Delete our destination permanently.
[Need urgent assistance in backup related queries? – We can help you. ]
Conclusion
This article covers how to create New Destinations for JetBackup. Basically, clients choose to store at least one copy of backups locally and additional copies in at least one or more remote destinations. Remote destinations are usually slower than local destinations to backup and restore from due to bandwidth requirements. With this in consideration, many clients choose to store at least one copy of backups locally and additional copies in at least one or more remote destinations.
Whatever backup destination option(s) you choose, please make sure that your destination path is secure and has the appropriate privileges.
How To Secure Local Backup Storage ?
Prior to adding a destination to JetBackup, we advise securing the backup directory, so that only the allowed users can access that folder.
In order to do that, please connect to the destination via console/GUI, and make the directory in which you want to store your backups.
For example:
$ mkdir [-p] /mnt/backup_vol/jetbackup
Then we advise securing that destination so only one user can access it's content (except root):
$ useradd <jetbackup>
$ chown jetbackup:jetbackup /mnt/backup_vol/jetbackup
$ chmod 700 /mnt/backup_vol/jetbackup
Right now only two users that can access this directory are root and jetbackup.
Please search online, how to secure a backup folder for your particular file system (EXT, NTFS, FAT, etc..) on your system (Windows, Linux, macOS, BSD, etc..)


