Are you facing "DHCP error 0x79"? This guide will help you.
DHCP stands for Dynamic Host Configuration Protocol. It is a network management protocol mainly used to automate the process of configuring devices on IP networks, thereby enabling them to use network services such as DNS, NTP, and any communication protocol based on UDP or TCP.
Here at Ibmi Media, we regularly help our Customers to fix DHCP related errors as part of our Server Support Services.
In this context, we shall look into the main causes of this error and how to fix it.
What triggers DHCP error 0x79?
This error can occurs due the following reasons;
i. When you have a predefined IP address on the computer and it has assigned the IP address to a different device.
ii. When the IP address is beyond the scope of the DHCP range.
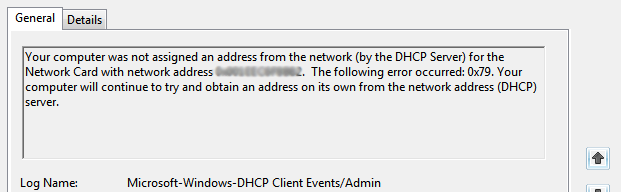
When the error occurs, you will see an error message such as;
Your computer was not assigned an address from the network (by the DHCP server) for the Network Card with network address xxxxxxxx. The following error occurred: 0x79. Your computer will continue to try and obtain an address on its own from the network address (DHCP) server.How to get rid of DHCP error 0x79?
To solve this issue, follow the steps below;
1. Start by checking the DHCP range on the router. Also verify that the computer is ready to obtain an address automatically.
2. Then try to disable the Internet Protocol Version 6 (IPv6) on the network adapter. To do this follow the steps below;
i. Begin by right-clicking on the Network icon in the system Tray. Then click on "Network and Sharing Center".
ii. Now click on Change Adapter Settings.
iii. Next, right-click on Network Adapter and choose "Properties" where you should uncheck "Internet Protocol Version 6".
iv. Finally, Click "OK" to effect changes made.
3. Now try to unplug the LAN cable as well as the wireless connection.
To do this, follow the steps below;
i. Start by going to the properties of "Ethernet Adapter local area connection 2".
ii. Next, select the option "Internet Protocol Version 4 (TCP/IPv4)".
iii. Here click on the Properties button.
iv. Now, select the option "Use the following IP address:" and set the the following;
IP=192.1xx.1.10
subnet mask=255.255.255.0
default gateway = your router IP address such as 192.1xx.1.1
v. From the second option section, select "Use the following DNS server addresses:" where you should set "Prefer Alternate DNS server:" as your router's default IP address, for instance 192.168.1.2.
vi. To end, click on "OK" and try to connect via the LAN and then the Wireless connection.
4. You can also attempt to disable Wireless Connect #2 (Microsoft Virtual WiFi Miniport Adaptor) network adapter. To get this, compare the MAC address listed in the error message with the output of the command "CMD>ipconfig /all".
5. Also, you can check the DHCP "lease" time of the router and ensure that it is set the value as high as you prefer it to be.
6. Make sure the DHCP Client service "services.mscLocate" is started and set the Startup Type to Automatic. If this service is already started, first try to stop it and then restart it.
7. Now navigate via "Start >> Programs >> Accessories" and then right-click on the command prompt. Then select "Run as Administrator" to open a command prompt.
Now in the command prompt, run the commands as stated below;
To restart WINSOCK entries to installation defaults with the command below;
netsh winsock reset catalog
Now, restart IPv4 TCP/IP stack to installation defaults with the command below;
netsh int ipv4 reset reset.log
Now reset "IPv6 TCP/IP" stack to installation defaults with the command below;
netsh int ipv6 reset reset.log
Now, reboot the computer.
Need support in solving DHCP errors? We are available to help you today.
Conclusion
This guide will help you to fix DHCP error 0x79 which shows that a predefined IP address on the computer and your device has assigned this IP address to some other device.
This guide will help you to fix DHCP error 0x79 which shows that a predefined IP address on the computer and your device has assigned this IP address to some other device.