Are you trying to install vCenter on ESXi Host? This guide will help you.
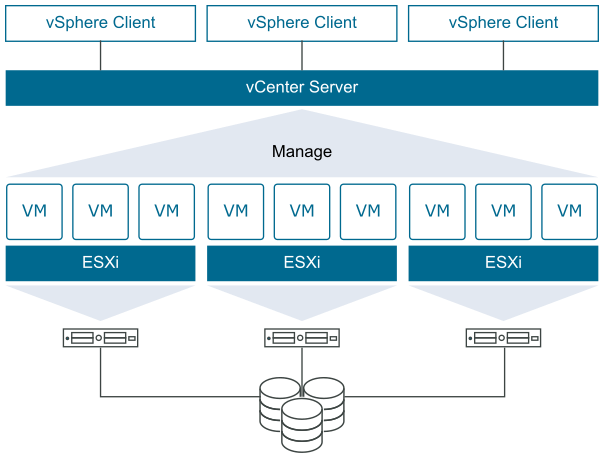
VMware vCenter Server is advanced server management software that provides a centralized platform for controlling your VMware vSphere environments.
It helps in the automation and delivery of virtual infrastructure across the hybrid cloud with confidence.
Here at Ibmi Media, as part of our Server Management Services, we regularly help our Customers to perform VMware ESXi related installation tasks.
In this context, we shall look into how to install Vcenter on ESXi host.
More information about vCenter Server?
As stated previously, VMware vCenter Server is the centralized monitoring and resource management software for VMware vSphere virtual infrastructure.
vCenter Server for Windows basically runs exclusively on a Microsoft Windows server operating system.
How to install Vcenter on ESXi host?
Setting up a DNS Server for the domain you want to use for Vcenter on ESXi host is very important. So ensure that the A record and PTR record of your vCenter hostname is properly configured.
Creation of the vCenter Instance Datastore
i. To begin, we need a datastore on the ESXi host where we can store the vCenter instance. However, if you do not have it then create one.
ii. In our case, we are choosing the VMFS datastore type.
iii. Next, give a name to the datastore and choose a disk to be used for datastore creation.
iv. Now, select partitioning format for the datastore.
v. Then, confirm settings and click on Finish.
vi. Agree to data erasing and create datastore.
vii. Finally, confirm if the datastore created is available in the list of datastores.
Installing vCenter 7 Server Appliance on ESXi Host
To install vCenter 7 Server, follow the process provided below;
1. Start by downloading the vCenter ISO image from the URL provided below;
https://my.vmware.com/web/vmware/downloads/#all_products
2. As soon as the file is downloaded, then click on it to mount.
3. Next, navigate to the vcsa-ui-installer directory and then win32 directory.
4. Click on the installer file to initiate the installation of vCenter 7.0 Server Appliance.
5. In the next window, choose the "Install" option. In case, if you are upgrading from an older version of vCenter then choose “Upgrade“.
6. Now you will get to Stage 1 where the deployment of vCenter Instance to VMware Infrastructure is done. Click Next to get started with stage 1.
7. To continue, accept the License Agreement terms
8. Now input the IP address of the ESXi host or vCenter Server name where you will deploy the instance.
9. Also, accept the certificate warning if you are using self-signed SSL certificates.
10. Then give the vCenter Instance a name and also set a root password.
11. Select a deployment size depending on your managed Infrastructure needs.
12. Select datastore for vCenter Server.
13. Now choose the network, set the IP address, gateway, and DNS servers for the vCenter Server. The FQDN provided should be as set in the DNS server and should match the IP address that was configured in the DNS Server.
14. Click the Next button when done and Stage 1 actual deployment should start.
15. Make sure that you get a Successful installation message for Stage 1 before going to the next step.
16. If satisfied with the deployment results click "Continue" to initiate Stage 2.
17. Start the setup of vCenter Server. Then validate settings and modify where possible then click "Next".
18. Create a new or join existing SSO domain if you have another vCenter Server already deployed.
19. You can choose to join the VMware Customer Experience Improvement Program(CEIP).
Stage 2 Configuration Processes
You have to wait for the stage 2 configuration process to complete and make a note of the vCenter Server Administration URL.
After the process is complete, the instance and all services are started automatically. You should be able to login to vCenter Server Appliance Console and check services status. The default port 5480.
The vCenter Console for vSphere administration is on https port 443.
Finally, login with the SSO username and password you provided earlier in stage 2 configurations.
[Need additional support with VMware ESXi? – We are available to help you today.]
Conclusion
This article will guide you on how to install vCenter Server on a physical server or a virtual machine running Windows.
This article will guide you on how to install vCenter Server on a physical server or a virtual machine running Windows.


