Are you having issues such as CPUs are not running at its full capacity in Windows?
This article is for you.
CPU (is also known as Central Processing Unit or Processor) is the most important component of a computer.
Here at Ibmi Media, as part of our Server Management Services, we regularly help our Customers to troubleshoot Windows related errors.
In this context, we shall look into the steps to perform troubleshooting this CPU issue.
What can you do when CPUs are not running at its full capacity in Windows?
CPUs are mainly designed to power the computer. It runs at its full capacity when there is a heavy load and it runs at a very low speed when there is no load or little load on the computer. If it is not running at its full speed then our Support Experts follow provide these general troubleshooting methods to our customers.
1. Restart the system and after rebooting.
2. Check if there is any Windows Update pending on the system.
3. Run a full scan on the system for malware, viruses. After scanning, reboot the computer.
4. If the problem is on a laptop, disable the battery saver mode. After disabling, CPUs on the laptop should be running at its full capacity.
If the problem still persists, then we suggest following the below solutions.
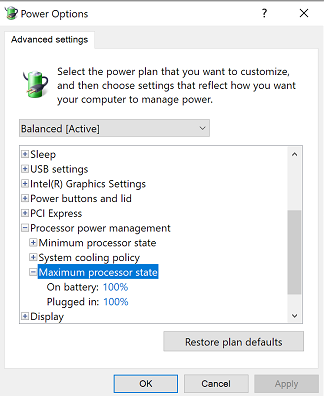
Method 1: Set Maximum processor state to 100%
Sometimes, the Maximum processor state of the CPUs on the system might be set at less than 100%. We follow the below steps to set the maximum processor state to 100%.
i. First, we press Windows Key+R to launch the Run command. Here we enter the below command in the Run command.
control.exe powercfg.cpl,,3ii. Next, in the Power Options window, we scroll down and expand “Processor power management” and then expand "Maximum processor state".
iii. Then we click on the box beside “Settings” and set the value to “100“.
iv. After that, we expand the “System cooling policy” just above the ‘Maximum processor state’.
v. Then we click on “Settings” to expand it and set it as “Active“.
vi. Finally, we click on “Apply” and “OK” to save the changes.
vii. We reboot the computer and run any heavy task on the computer if necessary.
Now we check if the CPUs are working at their full capacity or not. If the problem persists, then go for the next fix.
Method 2: Disable Intelppm registry in Registry Editor
We can change the value of the ‘start’ key of the ‘Intelppm’ registry to set the CPU work at its full capacity. Here are the steps for changing it.
i. First, we press the Windows key from the keyboard and then we type “Registry“.
ii. Next, we click on the “Registry Editor” in the search result.
iii. On the left pane of Registry Editor, we navigate to the below location.
HKEY_LOCAL_MACHINE\SYSTEM\CurrentControlSet\Services\intelppmiv. Now, on the right pane, we double click on “Start“ and set the Value data to “4“. Then we click on “OK” to change the value of the registry.
Finally, we reboot the computer and check if the CPU is working at its full capacity or not. If the same problem persists, then we go for the next fix.
Method 3: Disable/Update Intel Power Management Driver
When there is a low load on the CPU, it runs at a low rpm. But when there is a heavy load it speeds up-to its capacity. This system is controlled by Intel Power Management Driver. We disable the Intel Power Management Driver by following these steps.
i. First, we click on Windows Icon and click on the “Power” icon. Next, we press Shift and then click on "Restart". The system will boot into Troubleshooting mode.
ii. Now, we click on “Troubleshoot” and then go to “Advanced Option“.
iii. Finally, we open the “Command Prompt“ and run the below commands to go to the directory C:\Windows\System32\driver.
cd driversren intelppm.sys intelppm.sys.bakiv. At last, we reboot the system.
[Need any further assistance in fixing Windows errors? – We are available to help you today.]
Conclusion
This guide will help you with the troubleshooting steps you need to follow to fix this CPU capacity issue in Windows.
This guide will help you with the troubleshooting steps you need to follow to fix this CPU capacity issue in Windows.


