Are you trying to install GNS3 on Ubuntu?
This guide will help you through the process.
Here at Ibmi Media, as part of our Server Management Services, we regularly help our Customers to perform Software Installation tasks on Ubuntu Servers.
Here, you shall learn how to install GNS3 on Ubuntu.
More information about GNS3?
GNS3 network emulator is an open-source tool used to simulate, configure, test, and troubleshoot virtual and real networks.
It can be installed on Windows, macOS, and on Linux. The Virtualization for instances used in inter-connection includes VirtualBox, VMware, and Docker. With all available tools, you will be able to simulate complex network scenarios and sent packets through as if you are working on actual appliances.
Steps to install GNS3 on Ubuntu 20.04?
To install GNS3, simply follow the following steps;
Step 1: Add GNS3 PPA repository
Start by executing the following commands to add the GNS3 repository:
$ sudo add-apt-repository ppa:gns3/ppaThen, input the user password and Press [ENTER] to continue:
[sudo] password for ibmimedia:
PPA for GNS3 and Supporting Packages. Please see http://www.gns3.com for more details
More info: https://launchpad.net/~gns3/+archive/ubuntu/ppa
Press [ENTER] to continue or Ctrl-c to cancel adding it.
Hit:1 http://ke.archive.ubuntu.com/ubuntu focal InRelease
Hit:2 http://ke.archive.ubuntu.com/ubuntu focal-updates InRelease
Hit:3 http://security.ubuntu.com/ubuntu focal-security InRelease
Hit:4 http://ke.archive.ubuntu.com/ubuntu focal-backports InRelease
Hit:5 http://ppa.launchpad.net/gns3/ppa/ubuntu focal InRelease
Reading package lists… Done
Step 2: Install GNS3 GUI & GNS3 Server on Ubuntu 20.04
After adding the repository, then you can install GNS3 by running the following command;
$ sudo apt update$ sudo apt install gns3-server gns3-guiThis will get a number of packages installed. Then we press ‘Y’ key yo accept the installation.
The following packages will be upgraded:
libnss-systemd libpam-systemd libsystemd0 systemd systemd-sysv
systemd-timesyncd
6 upgraded, 124 newly installed, 0 to remove and 112 not upgraded.
Need to get 101 MB of archives.
After this operation, 465 MB of additional disk space will be used.
Do you want to continue? [Y/n] y
We allow non-root users to use wireshark. Also, we allow them to capture packets as well.
Step 3: Install IOU Support (Optional)
IOU (IOS over Unix) is an internal Cisco tool for simulating the ASICs in Cisco Switches. This enables to play with Layer 2 switching in the LABS.
To install GNS3 IOU package to unlock this feature, execute:
$ sudo dpkg –add-architecture i386$ sudo apt update$ sudo apt install gns3-iouThen, you will be prompted to accept the installation prompt.
The following packages will be upgraded:
libssl1.1
1 upgraded, 10 newly installed, 0 to remove and 111 not upgraded.
Need to get 8,575 kB of archives.
After this operation, 34.2 MB of additional disk space will be used.
Do you want to continue? [Y/n] y
Step 4: Launch GNS3 on Ubuntu 20.04
Since, GNS3 has been installed on your Ubuntu 20.04, you can launch it from the terminal or from the Desktop launcher by executing;
$ gns3Then;
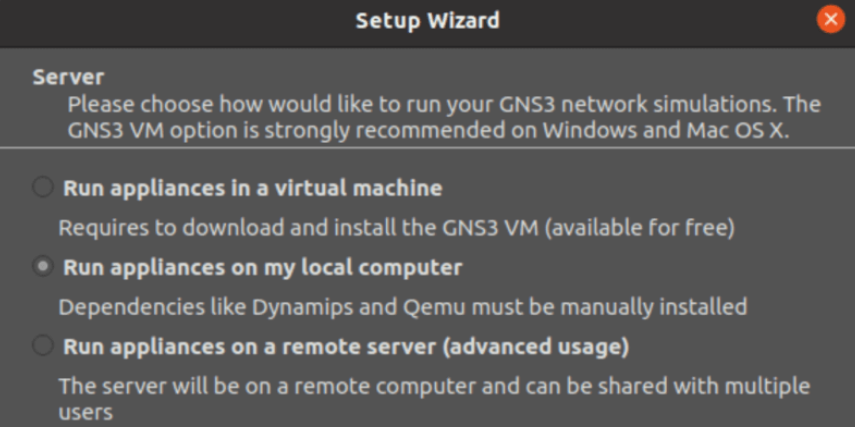
i. On the first page, we select "Run the appliances on my computer"
ii. Then on the second page, confirm the local server configuration location.
iii. After that, we confirm that the connection is successful.
iv. Then we complete the GNS3 setup on Ubuntu 20.04 Linux.
v. To be able to capture GNS3 packets for analysis, we need Wireshark.
To install Wireshark, simply follow the steps given below and run the commands:
$ sudo add-apt-repository ppa:wireshark-dev/stable$ sudo apt update$ sudo apt -y install wireshark[Need additional support with Ubuntu queries? – We are here to help you.]
Conclusion
This article will guide you on the steps to install GNS3 on Ubuntu.
This article will guide you on the steps to install GNS3 on Ubuntu.


