In order to install Hyper-V Role in Windows 10 VM under VMWare ESXi, you need to provide Nested Virtualization which allows running a hypervisor inside a virtual machine running on another hypervisor.
Here at Ibmi Media, as part of our Server Management Services, we regularly help our Customers to perform Hyper-V Role installation on Windows 10 VM under VMWare ESXi.
In this context, we shall be looking into the importance of Hyper-V Role and how to install it.
Some Advantages of Hyper-V inside of VMware?
Utilizing Microsoft's hypervisor-based server virtualization product can prove to be advantageous for your business.
Flexibility, redundancy, scalability, and reduced cost of operations are just a few of the advantages offered from Microsoft's Hyper-V virtualization.
Therefore , using Hyper-V inside of VMware provides some great advantages for Lab environments, and we do not need any additional hardware or network gear for this.
How to install Hyper-V Task in Windows 10 VM under VMWare ESXi?
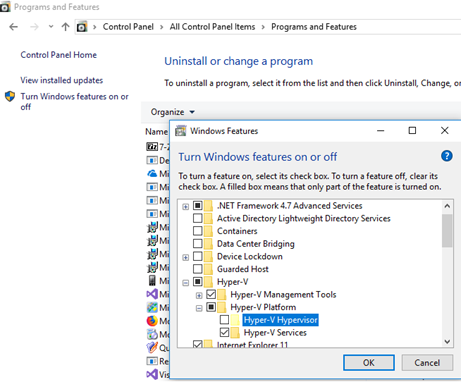
In a Windows 10 1709 virtual machine running VMWare ESXi 6.0 virtualization host, if you try to install Hyper-V, via the "Control Panel -> Programs & Features -> Turn Windows features on or off", you will see that the option turns out to be inactive.
This is generally because;
Hyper-V cannot be installed: The processor does not have the required virtualization capabilitiesTo enable nested virtualization for the VM with Windows 10 guest OS, we need to open the virtual machine settings using vSphere web client (The VM must be off).
In the CPU section, check the option "Expose hardware-assisted virtualization to the guest OS" (This option is not available in the vCenter C# thin client).
The previous ESXi versions which do not have this option and in the desktop VMWare Workstation we can enable nested virtualization by adding the following options into the configuration file of the virtual machine(*.vmx);
hypervisor.cpuid.v0 = “FALSE”
mce.enable = “TRUE”
vhv.enable= "TRUE"
In the VMware vSphere client, these options can be added to the VM settings.
To do this, simply follow the steps below:
i. Go to Options.
ii. Then take General.
iii. And take the Configuration Parameters.
Here, add two new rows with the same parameters (Add Row).
Then we should start the Windows 10 virtual machine and try to install the Hyper-V role again.
Now Windows will not detect that it is running inside another hypervisor, but a new error will appear;
Hyper-V cannot be installed: the processor does not support second level address translation (SLAT).This signifies that besides supporting the virtualization, the VM processor must support SLAT technology,
SALT technology means virtualization of memory pages and their direct control by the guest OS.
In Intel terms, this feature is called Extended Page Tables (EPT), and AMD calls it Rapid Virtualization Indexing (RVI).
Make sure that the processor (vCPU) supports SLAT using the following command:
systeminfoThe command in Hyper-V Requirements section should return that there is no SLAT support:
Second Level Address Translation: NoNow we need to change the parameters of the virtual machine processor. In CPU/MMU Virtualization section of the vSphere web client, select Hardware CPU and MMU.
In vSphere Client, the same option is located in the CPU/MMU Virtualization section of the Options tab and called 'Use Intel VT-x/AMD-V for instruction set virtualization and Intel EPT/AMD RVI for MMU virtualization'.
Start Windows 10 virtual machine and make sure that its processor supports SLAT. Now we can all components of the Hyper-V role and run other virtual machines inside the Windows 10 VM.
[Need additional help in installing Hyper-V VMware? We are available to help you today!]
Conclusion
This article will guide you on the steps to follow to install Hyper-V Role in Windows 10 VM under VMWare ESXi.
This article will guide you on the steps to follow to install Hyper-V Role in Windows 10 VM under VMWare ESXi.


