RDP file transfer can be done by opening and configuring the program and then accessing the files.
Here at Ibmi Media, as part of our Server Management Services, we regularly help our Customers to fix Windows related issues.
In this context, we shall look into the process to transfer files to Windows Server.
RDP File transfer process in Windows Server
It might be a difficult process to transfer files to your new Windows Server when you are new to files transfer.
Most Windows experts transfer files through Remote Desktop Connection by follow the steps below;
1. Open the Program
First, we click on the ‘Start’ button and search for “Remote Desktop Connection” and a computer with green arrows should come up. This is the program that we will be using.
2. Configuring the Program
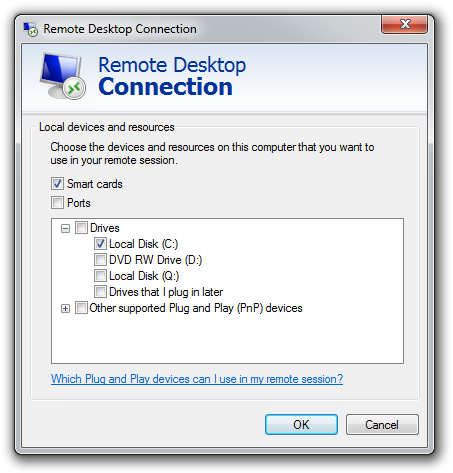
Below are the steps that we follow to configure the program to redirect the local workstation’s C drive.
i. First, we input the server’s IP address in the “Computer” field.
ii. Next, we select the “Local Resources” tab.
iii. After that, we select the “More” button.
iv. Then we expand the “Drives” section.
v. Here, we select the “Local Disk C:” (and any other drives).
vi. Finally, we click “Connect”.
3. Accessing the Files
Once we are connected to the server, we follow the steps below to access the files.
i. First, we log into the server using the new settings.
ii. Next, we open “File Explorer”.
iii. After that, we select “This PC” or “Computer”.
iv. Then we double-click “C on [Your Local Workstation]”.
How to Transfer Large Files Using a Remote Desktop Connection?
1. Click the "Start" button. Click "Run." In the Open box type "mstsc.exe." This will start the Remote Desktop.
2. Enter the IP address of the computer to which you want to connect. If you do not know the IP address of the computer, then go to the Resources section of this article, and click on the 'What is My IP Address" link.
3. Select "Options." Click on the "Local Resources" tab.
4. Check the "Disk Drives" checkbox and log on.
5. Click the "Start" button. Select "All Programs," "Accessories," and then "Windows Explorer." This opens "Windows Explorer." You will notice that new drives have appeared. These are the drives of the computer you have connected to.
6. Drag and drop files from your local computer to the drives on the connected computer. This will accommodate any size files.
Now, all the files will be on the local workstation. However, there is a file size limitation of 2 GB when transferring files through this method. Additionally, transfer speeds may be a little slower.
Moreover, we can make use of Plesk Control panel to set up FTP which can then be used to transfer large files.
[Need any further assistance RDP queries? – We are here to help you]
Conclusion
This article will guide you on steps to transfer files Using Remote Desktop in Windows.
This article will guide you on steps to transfer files Using Remote Desktop in Windows.


