Are you facing Outlook error 0x8004060C?
This guide is for you.
Outlook error 0x8004060C affects all the capabilities of the Outlook application.
Here at Ibmi Media, as part of our Server Management Services, we regularly help our Customers to fix Outlook related errors.
In this context, we shall look into the steps to fix this error.
Nature of Outlook error 0x8004060C?
Basically, with MS Outlook, management of different tasks can be done in a single platform.
This tool is very essential and plays an important role in the day by day activities of any organization.
Sometimes, Outlook users experience error 0x8004060C which disrupts the communication of an organization. This is why it is important to resolve such error quickly as possible.
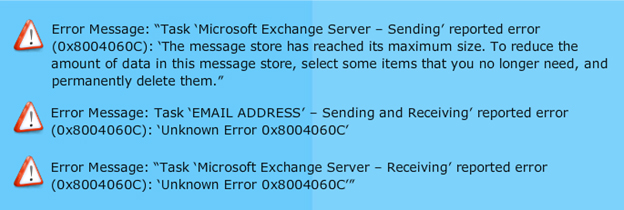
This error can even result in turning all the emails inaccessible to the user. 0x8004060C can occur in different scenarios. Based on it, the error message may differ, although the error code remains the same – 0x8004060C.
What triggers Outlook error 0x8004060C?
As error 0x8004060C differs in certain scenarios, the causes that led to this error will vary too. There can be many possible logical or physical corruptions that could cause this error.
Some of the most common causes are:
i. Exchange server outage
ii. Synchronization problem between MS Outlook and exchange server
iii. A corrupt PST or OST file
iv. Virus infection or malware attack
v. Outlook has reached its maximum defined storage capacity
Of all the above-listed causes, the most common cause is an oversized PST or OST file leading to reaching the maximum defined storage capacity for Outlook.
How to fix Outlook error 0x8004060C?
Apply the following tips to resolve this Outlook error.
1. Manually Empty Deleted Items Folder
Outlook does not directly delete the items that we choose to delete. It, however, moves those items from the active folders to a Deleted Items folder.
But the size of this folder can grow immensely because this folder is not cleaned up by the users manually. Hence, we need to empty it to retrieve some space quickly.
i. You need to click on the File button on the top left of Outlook and select Info. Then click on Tools.
ii. It will open a small list. Choose 'Empty Deleted Items Folder' from the list.
iii. A new window will pop up, click on ‘Empty Folder’ and then press OK or hit Enter.
2. Empty Deleted Items Folder – Automated
Now, to make sure that the size of the Deleted items folder is always in check, we need to turn on the settings to empty this folder whenever we exit the Outlook application. This option will automate the cleaning of the Deleted Items folder.
i. Click on the File button on the menu bar of the Outlook application. Click on Info.
ii. Choose the Options menu button on the left.
iii. Click on Advanced.
iv. On the right, under Outlook start and exit, select ‘Empty Deleted Items folders when exiting Outlook’ and click OK.
3. Mailbox Cleanup
If the above methods don’t fix, there is a high probability that most of the space is consumed by active folders and needs to clean up.
Manual sorting and cleaning can take hours to free up space like this mainly because there is a limit to the size of email messages, which is mostly 25MB.
Deleting a few emails can only temporarily fix the issue. The issue will occur again in a few days. So, we need to clean up some considerable space and further ensure that the free space is maintained.
Let us first discuss the cleanup part.
i. From the Outlook menu bar, go to File > Info.
ii. On the right-hand side, we would see a Tools button with a drop-down sign. Click on it and select ‘Mailbox Cleanup’ from the list.
iii. It will open a new window. Select the ‘Find items larger than’ option and select the size we find appropriate. The default is usually 250 KB. Then click on the Find button.
iv. It will scan Outlook items and list down all the mails and other objects which are greater than 250 KB. We can then delete those items and free up considerable space without manually scrolling through your emails.
4. Auto Archiving
To ensure that the issue does not recur in a few months, we need to auto-archive our emails.
This option is very useful as it clears space from the drive without deleting emails. It will move old emails from the current storage location to a different one. These old emails will still be accessible to us.
i. Go to the Advanced options menu, as shown in the above methods. Go to File -> Option -> Advanced.
ii. Now under the Autoarchive heading, click on the AutoArchive Settings button.
iii. It will pop open a new window, select the ‘Run auto-archive’ option. Then select the number of days next to it. It is optional to check the Prompt user option.
iv. Then click on the Browse option to select the location where old items will be moved. Then click on OK.
5. Remove duplicate e-mails
By default, a copy of every email that we forward reside in the Inbox and Sent Items folder. Hence, it occupies unnecessary Outlook space. To eliminate these files, we can follow effective measures:
Manual Method:
i. Initially, go to the Sent Items folder and sort it by the recipient.
ii. Then click on the header to accomplish the task.
Automatic Settings:
i. Go to the File Tab.
ii. Then select Options and click the Save Message section.
iii. Now go to the Send Section and uncheck the option ‘Save a copy of forwarded message’.
iv. Click OK to save the changes we have made.
6. Restore individual e-mails
We can restore individual emails in various formats at different locations. Similarly, we can save the attachment to the same location for future usage.
For this purpose, we right-click on the email and click Save As option then select the required format to save the file. Subsequently, save the attachment in the same folder.
[Need to fix Outlook Errors quickly? We are here for you!]
Conclusion
This article will guide you on the steps to fix Outlook error 0x8004060C by keeping a proactive mailbox cleaning practice and auto-archiving.
This article will guide you on the steps to fix Outlook error 0x8004060C by keeping a proactive mailbox cleaning practice and auto-archiving.


