Are you trying to set up Google's SMTP server for your project?
This guide is for you.
Google's Gmail SMTP server is a free SMTP service which anyone who has a Gmail account can use to send emails.
Here at Ibmi Media, as part of our Server Management Services, we regularly help our Customers to configure SMTP Servers for their email list.
In this context, we shall look into the steps to set up SMTP Server with your Gmail account for free.
What is SMTP?
Simple Mail Transfer Protocol (SMTP) is a set of commands that directs the transfer of emails. When you send an email, it will be forwarded from your email client (such as Microsoft Outlook , Gmail , or Mozilla Thunderbird ) to the SMTP server. The server will then relay the mail to the recipient’s email server.
The recipient will receive the mail once it’s downloaded from the email server via POP3 or IMAP. There are two types of SMTP servers — internal and external.
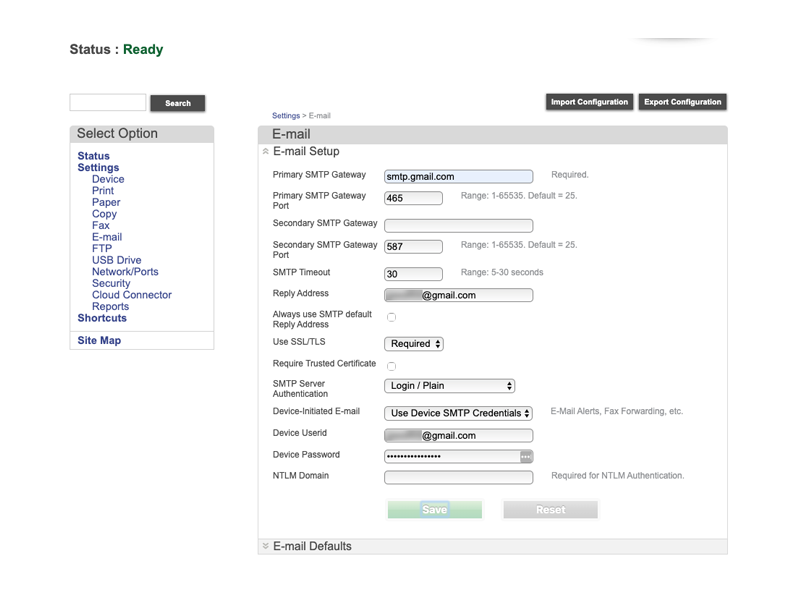
What are Gmail SMTP settings?
Gmail SMTP setup settings are provided below:
1. SMTP username: Your Gmail address.
ii. SMTP password: Your Gmail password.
iii. SMTP server address: smtp.gmail.com.
iv. Gmail SMTP port (TLS): 587.
v. SMTP port (SSL): 465.
vi. SMTP TLS/SSL required: yes.
What are the Benefits of SMTP server provided by Google?
Google SMTP server is a free SMTP service available for anyone who has a Gmail account. Generally, it can use to send emails. Instead of managing our own outgoing mail server, we can configure Google’s SMTP server settings to send an email. For that either we need a free Gmail account or a paid G Suite account.
More benefits of Google SMTP Server includes;
i. Google store and index the emails – Sent emails will be searchable and backed-up on Google’s servers.
ii. Convenient – Have the choice to use the Gmail or G Suite account for the incoming email.
iii. Less chance of being marked as spam by ISP – Since Google’s SMTP server does not use Port 25.
How to Use Google SMTP Server?
Here, you will learn how to send emails using Google's SMTP server through a custom domain in Gmail or with a plugin in WordPress.
Using a Custom Domain
If you have a custom email address, the process to connect to Google’s SMTP server is simple. But first, make sure that you have an email address with a custom domain and a Gmail address.
Before proceeding, you need to prepare an app password – which will give your custom email address permission to access a Google account. Make sure that you’ve activated the two-factor authentication on the Gmail address beforehand.
Once you’ve obtained the app password, log in to your Gmail account and follow these steps:
1. Navigate to the Settings by clicking the "gear icon" in the top right in your Gmail account Interface.
2. Then, click on the Accounts tab and click on Add another email address.
3. A pop-up window will appear. Fill the required information and press the Next Step button.
4. Enter Google's SMTP server, your Gmail address, and the app password you’ve created earlier in the respected fields.
5. A verification email will be sent to your custom email address. Open it and click the confirmation link.
That's it!
Now your custom email address has been linked with Google's SMTP server and also start sending emails from the custom address through Gmail.
In addition, for Google to automatically copy the sent emails to the sent folder, it must also verify that IMAP access is enabled for the account.
To do so, go to the Gmail settings and click on the Forwarding and POP/IMAP tab > Scroll down to the IMAP Access section and make sure that IMAP access is enabled for the account.
Further, Google limits the number of mail a user can send through its portable SMTP server. The maximum sent limit set to 100 emails per day. However, the restriction is automatically removed 24 hours after hit the limit.
How to configure Google SMTP Server with a WordPress Plugin?
Similarly, you can send emails using Google's SMTP server through a WordPress plugin. There are plenty of SMTP plugins , but in this guide, you will learn how to use WP Mail SMTP :
1. Access your WordPress admin dashboard and go to Plugins -> Add New. Search for the "WP Mail SMTP by WPForms" plugin, then Install Now -> Activate.
2. Navigate to WP Mail SMTP from your WordPress dashboard. Click on Settings. Fill in the From Name field and choose Gmail in the Mailer section.
3. Don't forget to check the "Set the return-path to match the From Email" checkbox to get notifications each time there’s a delivery issue.
4. Scroll down, and you will see the Client ID and Client Secret fields. To fill them, you have to create a web application in your Google account.
5. Open a new tab, go to Google API Console , and log in with your Google account.
6. Click Create Project, create a Project Name, and hit Create.
7. Then, select the API Library on the left side of the dashboard. Search for "Gmail API".
8. Enable the API and click on Create Credentials.
9. Answer the questions with the following: Gmail API -> Web browser (Javascript) -> User data. Proceed by clicking What credentials do I need?
10. A "Set up OAuth consent screen" window will appear. Click "Set up consent screen".
11. Pick your User Type. Fill the Application name with your website’s title.
12. Then, fill the Authorized domains, Application Homepage link, Application Privacy Policy link, and Application Terms of Service link with your site’s address. 13. Tweak any other settings if you prefer and then click Save.
14. In the Credentials page, type in the Name and Authorized JavaScript origins. Fill this one with your site’s address as well. You will then need to enter the Authorized redirect URIs, which you can find in your WP Mail SMTP settings.
15. Go back to the WP Mail SMTP -> Settings on your WordPress dashboard and copy the Authorized redirect URI.
16. Go back to APIs & Services page, paste the URL to the Authorized redirect URIs field in the Credentials section. Click Create.
17. You will see a pop-up window containing the Client ID and Client Secret. Copy both and paste them to the WP Mail SMTP Settings page under the Gmail section. Don’t forget to press the Save Settings button.
18. Press the "Allow plugin to send emails using your Google account" button next to the Authorization section.
19. Connect your Gmail account and allow your website to manage it.
20. Send a test email to make sure that everything works properly. This can be done in the WP Mail SMTP -> Email Test tab.
If everything is fine, you will get a email sent notification (email is successfully delivered).
[Need urgent assistance to configure the SMTP server? We are available to help you.]
Conclusion
This article will guide you on the steps on how to use Google SMTP and how to send emails using the server.
This article will guide you on the steps on how to use Google SMTP and how to send emails using the server.


