Website Administrators need to configure Jenkins with SSL to protect passwords and sensitive data transmitted through the web interface.
Here at Ibmi Media, as part of our Server Management Services, we regularly help our Customers to set up Jenkins with SSL.
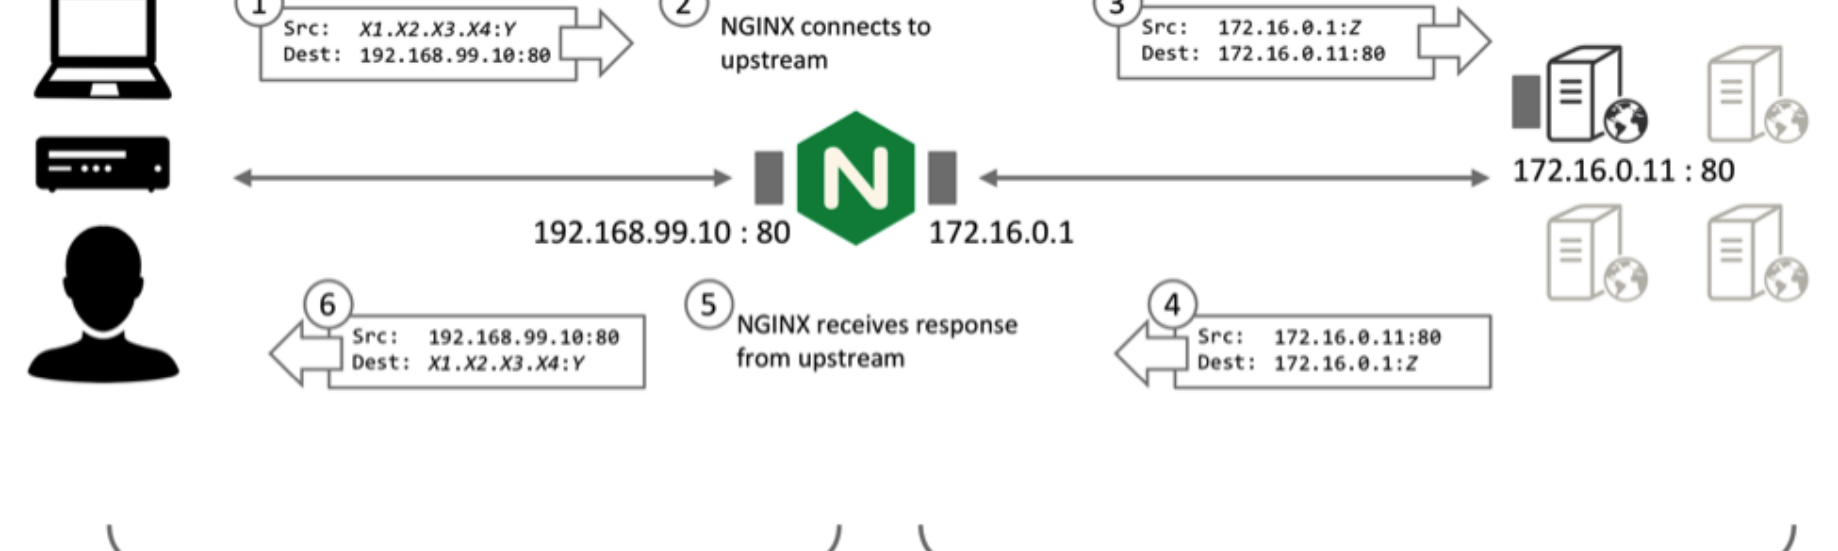
In this context, we shall look into the right steps to perform this task using an Nginx reverse proxy.
How to configure Jenkins with SSL using an Nginx reverse proxy?
The steps involved to configure Nginx as a reverse proxy to direct client requests to Jenkins include:
i. Configuring Nginx
ii. Configuring Jenkins
iii. Testing the Configuration
Now, let us look into each of these steps in more details.
How to configure Nginx ?
The first step is to configure Nginx to use SSL in the /etc/nginx/sites-available/domainname.com file. Replace the domainname.com with the exact domain name.
We need to open this file with any of the available text editors and add the reverse proxy settings.
i. In the server block with the SSL configuration settings, add Jenkins-specific access and error logs:
/etc/nginx/sites-available/domainname.com
. . .
server {
. . .
# SSL Configuration
#
listen [::]:443 ssl ipv6only=on; # managed by Certbot
listen 443 ssl; # managed by Certbot
access_log /var/log/nginx/jenkins.access.log;
error_log /var/log/nginx/jenkins.error.log;
. . .
}
ii. Next, let us configure the proxy settings. Since we are sending all requests to Jenkins, we will comment out the default try_files line, which would otherwise return a 404 error before the request reaches Jenkins:
/etc/nginx/sites-available/domainname.com
. . .
location / {
# First attempt to serve request as file, then
# as directory, then fall back to displaying a 404.
# try_files $uri $uri/ =404; }
. . .
Let us now add the proxy settings, which include:
a. proxy_params: The /etc/nginx/proxy_params file is supplied by Nginx and ensures that important information, including the hostname, the protocol of the client request, and the client IP address, is retained and available in the log files.
b. proxy_pass: This sets the protocol and address of the proxied server, which in this case will be the Jenkins server accessed via localhost on port 8080.
c. proxy_read_timeout: This enables an increase from Nginx’s 60 second default to the Jenkins-recommended 90 second value.
d. proxy_redirect: This ensures that responses are correctly rewritten to include the proper host name.
Be sure to substitute your SSL-secured domain name for domainname.com in the proxy_redirect line below:
/etc/nginx/sites-available/ibmimedia.com
Location /
. . .
location / {
# First attempt to serve request as a file, then
# as directory, then fall back to displaying a 404.
# try_files $uri $uri/ =404;
include /etc/nginx/proxy_params;
proxy_pass http://localhost:8080;
proxy_read_timeout 90s;
# Fix potential "It appears that your reverse proxy setup is broken" error.
proxy_redirect http://localhost:8080 https://domainname.com;
Once we have made these changes, save the file and exit the editor. We will hold off on restarting Nginx until after we have configured Jenkins. But we can test our configuration now with the command below and if all is well, it will return the result below :
$ sudo nginx -t
Output:
nginx: the configuration file /etc/nginx/nginx.conf syntax is ok
nginx: configuration file /etc/nginx/nginx.conf test is successful
How to configuring Jenkins ?
For Jenkins to work with Nginx, we need to update the Jenkins configuration so that the Jenkins server listens only on the localhost interface rather than all interfaces (0.0.0.0). If Jenkins listens on all interfaces, then it is potentially accessible on its original, unencrypted port (8080).
We will need to locate the JENKINS_ARGS line and add –httpListenAddress=127.0.0.1 to the existing arguments in the jenkins configuration file.
$ sudo nano /etc/default/jenkins
. . .
JENKINS_ARGS="--webroot=/var/cache/$NAME/war --httpPort=$HTTP_PORT --httpListenAddress=127.0.0.1"
Save and exit the file.
To use the new configuration settings, we will restart Jenkins and check it’s status with the status command.
$ sudo systemctl restart jenkins
$ sudo systemctl status jenkins
● jenkins.service - LSB: Start Jenkins at boot time
Loaded: loaded (/etc/init.d/jenkins; bad; vendor preset: enabled)
Active: active (exited) since Tue 2017-04-25 22:37:29 UTC; 5s ago
Docs: man:systemd-sysv-generator(8)
Process: 11360 ExecStop=/etc/init.d/jenkins stop (code=exited, status=0/SUCCESS)
Process: 11391 ExecStart=/etc/init.d/jenkins start (code=exited, status=0/SUCCESS)
Finally, we need to restart Nginx.
$ sudo systemctl restart nginx
$ sudo systemctl status nginx
● nginx.service - A high performance web server and a reverse proxy server
Loaded: loaded (/lib/systemd/system/nginx.service; enabled; vendor preset: enabled)
Active: active (running) since Tue 2017-04-25 22:36:08 UTC; 2min 51s ago
Process: 11339 ExecStop=/sbin/start-stop-daemon --quiet --stop --retry QUIT/5 --pidfile /run/nginx.pid (code=
Process: 11349 ExecStart=/usr/sbin/nginx -g daemon on; master_process on; (code=exited, status=0/SUCCESS)
Process: 11345 ExecStartPre=/usr/sbin/nginx -t -q -g daemon on; master_process on; (code=exited, status=0/SUC
Main PID: 11353 (nginx)
Now that we have restarted both servers, we should be able to visit the domain using either HTTP or HTTPS. It should now redirect HTTP requests automatically to HTTPS, and the Jenkins site will be served securely.
How to Test the Configuration ?
The next step is to test the configuration by resetting the administrative password. We will start by visiting the site via http to verify that we reach Jenkins and it redirects to https as we expected.
In the web browser, enter “http://domainname.com”, substituting the domain for domainname.com. The URL should redirect to https and the location bar should indicate that the connection is secure.
We can enter the administrative username and the password that we selected in the Password field. Once logged in, we can change the password to be sure it is secure.
$ sudo cat /var/lib/jenkins/secrets/initialAdminPasswordClick on the username in the upper-right-hand corner of the screen. On the main profile page, select Configure from the list on the left side of the page. Enter and confirm the new password and click “Save”. We can now use the Jenkins web interface securely.
[Need urgent assistance to configure Jenkins with SSL using an Nginx reverse proxy? – We're available 24*7.]
Conclusion
This article will guide you on how to configure #Jenkins with #SSL using an #Nginx reverse proxy. It is important to secure Jenkins with SSL to protect passwords and sensitive data transmitted through the #web interface.
This article will guide you on how to configure #Jenkins with #SSL using an #Nginx reverse proxy. It is important to secure Jenkins with SSL to protect passwords and sensitive data transmitted through the #web interface.


