Are you trying to secure apache with let’s encrypt on centos 8?
This guide will help you.
Apache HTTP Server is a free and open-source web server that delivers web content through the internet.
Here at Ibmi Media, as part of our Server Management Services, we regularly help our Customers to perform Apache security configuration and other Apache related tasks.
In this context, we shall look into the steps to secure Apache.
More information about Let's Encrypt ?
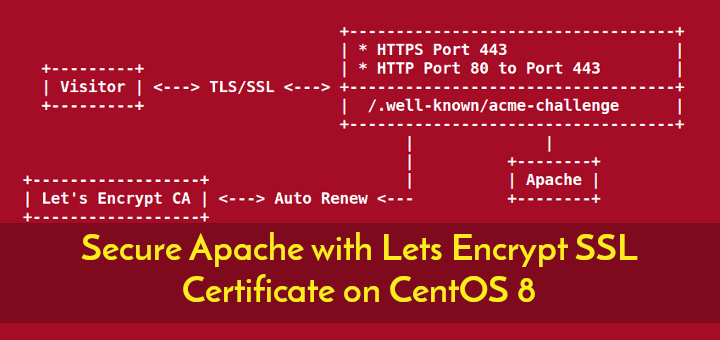
Let’s Encrypt is an open Certificate Authority (CA) that provides free TLS/SSL certificates. These certificates help in encrypting communication between the web server and your users.
To set up a TLS/SSL certificate with the Apache webserver on CentOS 8, we can use the Certbot. Moreover, we can make use of a Cron Job to automatically renew the certificate.
How to secure Apache with Let's Encrypt on CentOS 8 ?
Here, look you will see the process of securing Apache using the Let’s Encrypt certificate.
1. Install the Certbot Let’s Encrypt Client
In order to obtain an SSL certificate to use Let’s Encrypt, first we need to install Certbot and mod_ssl. The mod_ssl is an Apache module that provides support for SSLv3 encryption.
The certbot package is not available through the package manager. For that, we need to enable the EPEL repository to install Certbot.
Run the following command to add the CentOS 8 EPEL repository.
$ sudo dnf install epel-releaseInstall all of the necessary packages as you have access to the repository.
$ sudo dnf install certbot python3-certbot-apache mod_ssl2. Obtain a Certificate
Now that we have installed the Certbot, we can use it to request an SSL certificate for the domain.
The Let’s Encrypt client will automatically obtain and install a new SSL certificate that is valid for the domains you provide as parameters.
Here is the Certbot command which obtains a certificate that covers only a single domain.
$ sudo certbot –apache -d example.comHowever, if you want to install a single certificate for multiple domains or subdomains, you can pass them as additional parameters to the command. For that, you need to just tag each new domain or subdomain with the -d flag. Pass the base domain name as first in the list, followed by any additional subdomains.
$ sudo certbot –apache -d example.com -d www.example.comNote: The base domain in this example is example.com.
The certbot utility has the ability to prompt you to choose a domain based on your existing Apache configuration. In order to use this functionality, call the certbot without specifying any domains:
$ sudo certbot –apacheThe program will provide a step-by-step guide for certificate options customization. It will ask for an email address for lost key recovery and notices, and then prompt you to agree to the terms of service.
You will be prompted for the domain name if you have not specified it in the command line. Also, you will be asked to choose the virtual host file, if your Virtual Host files do not specify the domain they serve explicitly using the ServerName directive.
After a successful installation, you can see a similar message as below;
Output
IMPORTANT NOTES:
– Congratulations! Your certificate and chain have been saved at:
/etc/letsencrypt/live/example.com/fullchain.pem
Your key file has been saved at:
/etc/letsencrypt/live/example.com/privkey.pem
Your cert will expire on 2020-09-24. To obtain a new or tweaked
version of this certificate in the future, simply run certbot again
with the “certonly” option. To non-interactively renew *all* of
your certificates, run “certbot renew”
– Your account credentials have been saved in your Certbot
configuration directory at /etc/letsencrypt. You should make a
secure backup of this folder now. This configuration directory will
also contain certificates and private keys obtained by Certbot so
making regular backups of this folder is ideal.
– If you like Certbot, please consider supporting our work by:
Donating to ISRG / Let’s Encrypt: https://letsencrypt.org/donate
Donating to EFF: https://eff.org/donate-le
The generated certificate files will be present within a subdirectory named after the base domain in the /etc/letsencrypt/live directory.
3. Test the SSL Certificate and Configuration
Now, since the Certbot has created the SSL certificate, open the below link replacing example.com with your domain:
https://www.ssllabs.com/ssltest/analyze.html?d=example.com
This page will automatically start testing the SSL connection to the server. It might take few minutes for the test to complete and show the result.
As a result, it will show the letter grade that rates the security and quality of the server’s configuration.
Now try to reload the website using https:// and verify the browser’s security indicator. Now it will that the website is secured with a green lock icon.
4. Auto-Renewal setup
The Let’s Encrypt certificates are only valid for 90 days. But it is recommended to check for renewal priorly. Because of this, it is a best practice to automate this process.
The certbot Let’s Encrypt client provides a command that will automatically check the currently installed certificates and tries to renew them if they are less than 30 days away from the expiration date. You can make use of –dry-run option to test how the renew works:
$ sudo certbot renew –dry-runThe output must look similar to this:
Output
Saving debug log to /var/log/letsencrypt/letsencrypt.log
– – – – – – – – – – – – – – – – – – – – – – – – – – – – – – – – – – – – – – – –
Processing /etc/letsencrypt/renewal/example.com.conf
– – – – – – – – – – – – – – – – – – – – – – – – – – – – – – – – – – – – – – – –
Cert not due for renewal, but simulating renewal for dry run
Plugins selected: Authenticator apache, Installer apache
Starting new HTTPS connection (1): acme-staging-v02.api.letsencrypt.org
Renewing an existing certificate
Performing the following challenges:
http-01 challenge for example.com
http-01 challenge for www.example.com
Waiting for verification…
Cleaning up challenges
Resetting dropped connection: acme-staging-v02.api.letsencrypt.org
– – – – – – – – – – – – – – – – – – – – – – – – – – – – – – – – – – – – – – – –
new certificate deployed with reload of apache server; fullchain is
/etc/letsencrypt/live/example.com/fullchain.pem
– – – – – – – – – – – – – – – – – – – – – – – – – – – – – – – – – – – – – – – –
– – – – – – – – – – – – – – – – – – – – – – – – – – – – – – – – – – – – – – – –
** DRY RUN: simulating ‘certbot renew’ close to cert expiry
** (The test certificates below have not been saved.)
Congratulations, all renewals succeeded. The following certs have been renewed:
/etc/letsencrypt/live/example.com/fullchain.pem (success)
…
Note: If you have created a bundled certificate with multiple domains then only the base domain name will display in the output. However, the renewal will be valid for all domains included in the certificate.
We recommend to create a cron job that will periodically execute the automatic renewal command for you.
Here is the command using which you can add an appropriate cron job to the /etc/crontab crontab file:
$ echo “0 0,12 * * * root python3 -c ‘import random; import time; time.sleep(random.random() * 3600)’ && certbot renew -q” | sudo tee -a /etc/crontab > /dev/nullThis cron job will execute at noon and midnight every day (0 0,12 * * *). Also, this will reduce the load on Let’s Encrypt's servers.
[Need urgent assistance with Apache related queries? – We'll help you.]
Conclusion
This article will guide you on the process to secure #Apache with Let’s Encrypt by installing Let's Encrypt #Certbot client, downloading #SSL #certificates for the #domain, and setting up automatic certificate renewal.
The objective of Let's Encrypt and the #ACME protocol is to make it possible to set up an #HTTPS server and have it automatically obtain a browser-trusted certificate, without any human intervention.


