Are you trying to install ClamAV on your Linux Server?
This guide is for you.
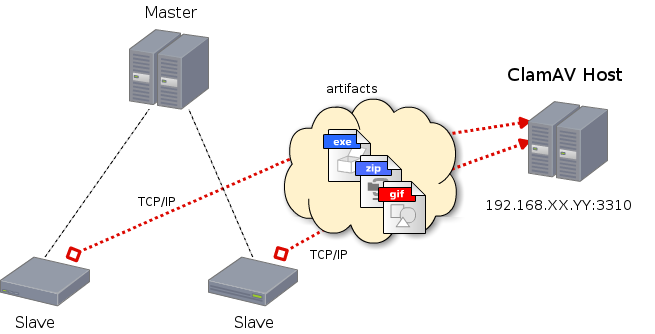
ClamAV is an open source (GPL) anti-virus engine used in a variety of situations including email scanning, web scanning, and end point security.
Here at Ibmi Media, as part of our Server Management Services, we regularly help our Customers to perform ClamAV configuration tasks.
In this context, we shall look into the steps to install and configure ClamAV on Linux servers.
Steps to perform ClamAV configuration on Linux servers ?
As earlier stated, ClamAV is a free antivirus tool used to detect viruses, malware, and malicious software on Linux-based machines.
Now, we will look into how to install and configure ClamAV on CentOS / RHEL 7.
1. Initially, we install the EPEL repository;
yum install epel-release2. Then, we install ClamAV on the server by using the following command;
yum -y install clamav-server clamav-data clamav-update clamav-filesystem clamav clamav-scanner-systemd clamav-devel clamav-lib clamav-server-systemd3. Next, we remove the Example string from the configuration file.
sed -i -e "s/^Example/#Example/" /etc/clamd.d/scan.conf4. Also, we open the configuration file /etc/clamd.d/scan.conf.
5. Then, we set up a path to local socket file the daemon will listen on. For that, we remove the '#' for LocalSocket
LocalSocket /var/run/clamd.scan/clamd.sock6. Again, we remove Example string from ClamAV’s freshclam update engine configuration file.
sed -i -e "s/^Example/#Example/" /etc/freshclam.confFreshclam is the automatic database update tool for Clam AntiVirus.
7. Next, we execute the virus definition database update,
freshclam7. Finally, we start the Clamd service
systemctl start clamd@scan
systemctl enable clamd@scan
That's the process.
How to solve some common errors related to ClamAV configuration ?
Here at Ibmi Media, we have an expertise in managing servers and we help many customers who face Server problems while managing ClamAV errors to resolve their issues.
Here, we will see the major reasons for the ClamAV related errors error and how to fix the top errors.
1. Improper ClamAV update
Recently, one of our customers had a problem with his ClamAV. He installed ClamAV on the cPanel server.
However, the ClamAV was not working.
On checking, we discovered that the ClamAV was not updating properly.
Therefore, we updated ClamAV by running the following command via an SSH session
/usr/local/cpanel/3rdparty/bin/freshclamAfter that, it started to work again without any problems.
2. Issues with clamav-daemon
Similarly, another customer had an error after installing ClamAV on a Webmin server. When he tried to enable ClamAV on the server he got an error like;
ClamAV server scanner : ERROR: Can't connect to clamd: No such file or directoryOn checking, we found out that the clamav-daemon wasn't running on the server.
When we run the command "/etc/init.d/clamav-daemon restart" and the following was the output;
Stopping ClamAV daemon: clamd.
Clamav signatures not found in /var/lib/clamav ... failed!
Please retrieve them using freshclam ... failed!
Then run '/etc/init.d/clamav-daemon start' ... failed!
So, we execute the virus definition database update.
freshclamAfter that, we execute the following command to start the clamav-daemon.
/etc/init.d/clamav-daemon startThen, we login into Virtualmin's web interface, we clicked yes for Run ClamAV server scanner >> Then, click on Next button.
Now Everything worked fine.
[Need urgent assistance to fix ClamAV errors? We'll help you.]
Conclusion
This article will guide you on the steps to install #Clam #AntiVirus which is an open-source #antivirus tool to detect many types of #malicious #software, including #viruses.
This article will guide you on the steps to install #Clam #AntiVirus which is an open-source #antivirus tool to detect many types of #malicious #software, including #viruses.


