Are you trying to create a Production checkpoint in Hyper-V 2016?
This guide is for you.
Production checkpoints are the default for new virtual machines. Standard checkpoints capture the state, data, and hardware configuration of a running virtual machine and are intended for use in development and test scenarios.
Here at Ibmi Media, as part of our Server Management Services, we regularly help our Customers to perform Nagios related tasks.
In this context, we shall learn how to create checkpoint in Hyper-V 2016.
More information about Checkpoint in Hyper-V 2016 ?
Hyper-V checkpoints are mainly used to save the existing state of a virtual machine before any changes are made so that if any problem arises due to the changes, the VM can revert to its previous state.
There are two types of checkpoints: standard checkpoints and production checkpoints.
i. Production checkpoints are "point in time" images of a virtual machine. We can use it to restore later on in a way that is completely supported for all production workloads. We can do this by using backup technology inside the guest to create the checkpoint, rather than using saved state technology.
ii. A standard checkpoint takes a snapshot of the state, data, and hardware configuration of a running virtual machine. But is not a full backup of the VM. However, if we need to recreate a specific state or condition of a running virtual machine then Standard checkpoints are useful.
When a VM checkpoint is created in Hyper-V 2016, by default, new Production Checkpoints are used.
How to Change checkpoints to production or standard checkpoint in Hyper-V 2016 ?
To change the checkpoints in Hyper-V, follow the steps below.
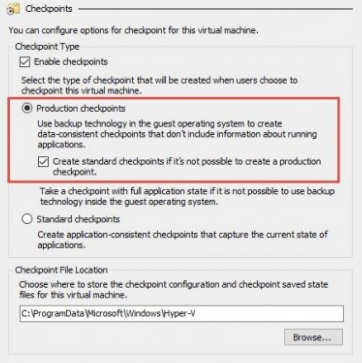
i. First, in Hyper-V Manager, we right-click the virtual machine and click Settings.
ii. Next, under the Management section, we select Checkpoints.
iii. Here we either select production checkpoints or standard checkpoints.
In case, if we choose production checkpoints then we can also specify whether the host should take a standard checkpoint if a production checkpoint can't be taken.
iv. We can change the Checkpoint File Location section if we wish to store the checkpoint configuration files in a different place.
v. Finally, we click Apply to save the changes. Once done, we click OK to close the dialog box.
To switch the modes of Hyper-V checkpoints creation by running the below PowerShell commands:
Set-VM -Name Lon-SQL1 -CheckpointType Disabled
Set-VM -Name Lon-SQL1 -CheckpointType Standard
Set-VM -Name Lon-SQL1 -CheckpointType Production
Set-VM -Name Lon-SQL1 -CheckpointType ProductionOnly
A VM checkpoint is created as usual: in the Hyper-V console or in PowerShell.
CheckPoint-VM –Name Lon-SQL1When creating a Production Checkpoint, in the Application log of the guest VM you can find the events showing the start and finish of creating the application consistent state with VSS.
After rollback to the Production Checkpoint created earlier, we must manually turn on the VM. Both the guest OS and the running application will consider that earlier they shut down correctly.
[Need urgent assistance with Hyper-V checkpoints queries? – We are here to help you. ]
Conclusion
This article will guide you on how to change the checkpoints in Hyper-V. Hyper-V #checkpoints allow IT #administrators to easily save the existing state of a virtual #machine before any changes are made so that if a problem crops up due to the changes, the #VM can revert to its previous state.
Virtual machine checkpoints (formerly known as virtual machine #snapshots) capture the state, data, and #hardware #configuration of a running virtual machine.


