It is vital to have backups of your databases to allow you to restore in the event of a server fault, a user error or —worst-case— a hacking or defacing of your website or applications.
Here at Ibmi Media, as part of our Server Management Services, we regularly help our Customers to perform Linode related queries.
In this context, we shall look into how to properly backup MariaDB Databases to Linode Object Storage with Restic.
More about Restic on Linode ?
Here, you will learn how to configure Restic on Linode to backup MariaDB databases to Linode Object Storage. By doing this we can recover the data even if our Linode is no longer accessible.
Restic is a backup utility written in Go. Each backup is stored as a snapshot in a repository. The repository can be stored on most cloud storage providers, or even in a separate directory on Linode.
All the steps here require root privileges, and commands are run with sudo unless otherwise noted.
To begin, you need to have:
i. A Linode account.
ii. A server with Linode, with sudo privileges and key-based authentication.
iii. MariaDB on Linode.
iv. An Object Storage bucket to hold the backup repository.
How to take Backup MariaDB Databases to Linode Object Storage ?
To do this, follow the steps given below:
1. Create buckets
i. Log in to the Linode Cloud Manager.
ii. Then, in the sidebar -> Object Storage link -> Add a Bucket.
If we have not created an access key or a bucket before, we have to enable Object Storage.
iii. Here, a create a Bucket menu appears.
iv. Then, add a label for the bucket.
v. Choose a cluster location for the bucket to reside in. For example, ap-south-1.linodeobjects.com, or eu-central-1.linodeobjects.com.
vi. Click Submit.
2. Generate Object Storage access keys
i. Log in to the Linode Cloud Manager.
ii. Then click on Object Storage -> Access Keys -> Create an Access Key link.
iii. If this is the first bucket a prompt appears asking to confirm that we would like to enable Object Storage. Click Enable Object Storage.
iv. Then a Create an Access Key menu appears.
v. Enter a label for the key pair.
– This label is how we reference the key pair in the Linode Cloud Manager.
– We can also toggle the Limited Access switch on this panel. This allows us to limit certain permissions on a per bucket level for this access key.
vi. Ensure that Linode has the wget and bzip2 utilities installed.
You can install them with the following commands:
For CentOS/Fedora, execute:
yum install wget bzip2For Ubuntu/Debian, run:
apt install wget bzipHow to Backup MariaDB Databases to Linode Object Storage with Restic ?
Let us now focus on an effective method in order to get the backup.
Install Restic on Server
i. Initially, we download the latest version of Restic from the Github Releases page:
wget https://github.com/restic/restic/releases/download/v0.11.0/restic_0.11.0_linux_amd64.bz2ii. Then we extract the downloaded file:
bzip2 -d restic_0.11.0_linux_amd64.bz2iii. We move the extracted file to our system’s $PATH and make it executable for all users:
sudo mv restic_0.11.0_linux_amd64 /usr/local/bin/restic
sudo chmod ugo+x /usr/local/bin/restic
iv. We can now run Restic using the command:
restic versionThe output will be similar to:
restic 0.11.0 compiled with go1.15.3 on linux/amd64How to Create the Restic Repository ?
i. Configure Restic to use the Object Storage access key pair and to use the bucket.
Replace our-key, our-secret, and us-east-1.linodeobjects.com/our-bucket-name with our own values:
AWS_ACCESS_KEY_ID=our-key AWS_SECRET_ACCESS_KEY=our-secret restic -r s3:us-east-1.linodeobjects.com/our-bucket-name initii. Following the prompt, set a password to encrypt the repository's data.
Enter the password twice, and we see an output confirming that the repository has been created:
enter password for new repository:
enter password again:
created restic repository c3ffbd1ea6 at s3:us-east-1.linodeobjects.com/restic-backups-example
Please note that knowledge of your password is required to access the repository. Losing your password means that your data is irrecoverably lost.
Store this password securely and somewhere other than Linode. The backups are inaccessible without the password.
How to Store the access key ?
i. To keep the credentials secure, using a text editor, create the example script in the root user’s home directory, and run all our Restic scripts as the root user.
The example uses the Nano text editor.
sudo nano /root/restic_paramsCopy and paste the example file’s content and replace our-key and our-secret with our own Object Storage account’s access key credentials:
File: /root/restic_params
export AWS_ACCESS_KEY_ID=our-key
export AWS_SECRET_ACCESS_KEY=our-secret
Whenever we want to use Restic, import this file using the command below or include it in our user’s login script:
source /root/restic_paramsii. Then, create a password file to hold Restic password:
sudo nano /root/restic_pwEnter the Restic password and save the file:
File: /root/restic_pw
OurPasswordGoesHere
How to Backup All Databases ?
The mysqldump utility is to dump the contents of a database to a file on Linode.
The example script loops through all databases on our server and dumps each one to its own SQL file.
i. Create a file in /usr/local/bin directory:
sudo nano /usr/local/bin/backup_mariadbii. Then copy the following contents into the file:
File: /usr/local/bin/backup_mariadb
#!/bin/bash
PATH=”/usr/local/bin:$PATH”
source /root/restic_params
mysql –defaults-extra-file=/root/mysql_cnf -N -e ‘show databases’ | while read dbname; do /usr/bin/mysqldump –defaults-extra-file=/root/mysql_cnf –complete-insert “$dbname” > “/var/backups/mariadb/$dbname”.sql; done
restic -r s3:us-east-1.linodeobjects.com/our-bucket-name -p /root/restic_pw backup /var/backups/mariadb
iii. Make the script executable and create the folder to store the backup files:
sudo chmod u+x /usr/local/bin/backup_mariadb
sudo mkdir -p /var/backups/mariadb/
iv. Line 3 of the script refers to a MySQL configuration file named msql_cnf, which is used to authenticate with our database. Create this file under /root directory and add the username and password for the database:
sudo nano /root/mysql_cnfCopy and paste the contents of the example file and replace the values of our-database-username and our-database-password with our own:
File: /root/mysql_cnf
[client]
user=”our-database-username”
password=”our-database-password”
v. Then run the first backup using the script created:
sudo backup_mariadbWe should see a similar output:
mysqldump: Got error: 1044: “Access denied for user ‘root’@’localhost’ to database ‘information_schema'” when using LOCK TABLES
mysqldump: Got error: 1142: “SELECT, LOCK TABLES command denied to user ‘root’@’localhost’ for table ‘accounts'” when using LOCK TABLES
epository 1689c602 opened successfully, password is correct
Files: 4 new, 0 changed, 0 unmodified
Dirs: 2 new, 0 changed, 0 unmodified
Added to the repo: 470.844 KiB
processed 4 files, 469.825 KiB in 0:01
snapshot 81072f28 saved
vi. On the other hand, verify that the backups have been created. We should see one backup file per database:
ls -al /var/backups/mariadbThe output displays all backup files stored in the backups directory we created:
total 492
drwxr-xr-x 2 root root 4096 Jul 21 19:47 .
drwxr-xr-x 3 root root 4096 Jul 21 19:46 ..
-rw-r–r– 1 root root 479441 Jul 21 19:47 mysql.sql
-rw-r–r– 1 root root 830 Jul 21 19:47 performance_schema.sql
-rw-r–r– 1 root root 1292 Jul 21 19:47 wordpress.sql
vii. Executing the script also creates a snapshot in the Restic repository. Use Restic’s snapshot command to view it:
sudo /bin/bash -c “source /root/restic_params; restic -r s3:us-east-1.linodeobjects.com/our-bucket-name -p /root/restic_pw snapshots”Restic returns a similar output:
repository 1689c602 opened successfully, password is correct
ID Time Host Tags Paths
—————————————————————————
81072f28 2020-07-21 19:47:19 li1356-54 /var/backups/mariadb
—————————————————————————
1 snapshots
How to Set Up Automated Database Backups ?
Linux has several ways to run a job on a defined schedule. However, below are a few methods that we can use to configure the backup script to run periodically.
i. Cron:
System Cron jobs exist as entries in the /etc/crontab file. Open the systems crontab file for editing with the following command:
sudo crontab -eThen we add a line pointing to the backup script. This example runs the backup every hour, on the hour:
0 * * * * /usr/local/bin/backup_mariadb > /tmp/mariadb-backup-log.txt 2>&1ii. Systemd:
Systemd can run commands on a periodic basis using timers. We can use systemd commands to monitor when the timers and commands last ran, and the output from running the commands.
To schedule a command, we need two configuration files: the service file which includes the commands to run, and a timer file which defines when to run the service.
We create the service configuration file and copy and paste the contents of the example:
sudo nano /etc/systemd/system/backup-mariadb.service
File: /etc/systemd/system/backup-mariadb.service
[Unit]
Description=Backup MariaDB databases
[Service]
ExecStart=/usr/local/bin/backup_mariadb
Environment=USER=root HOME=/root
Then we create the timer configuration file and copy and paste the contents of the example.
The OnCalendar line instructs Systemd when to execute the service file’s commands. In the example, the service file’s commands are run on-the-hour, every hour:
sudo nano /etc/systemd/system/backup-mariadb.timer
File: /etc/systemd/system/backup-mariadb.timer
[Unit]
Description=Backup MariaDB databases
[Timer]
OnCalendar=*-*-* *:00:00
[Install]
WantedBy=timers.target
When we are satisfied with the timer’s configurations, enable the timer:
sudo systemctl enable –now backup-mariadb.timerWe can monitor all the system’s timers with the following command:
sudo systemctl list-timersWe should see a similar output:
NEXT LEFT LAST PASSED UNIT ACTIVATES
Mon 2020-07-20 16:00:00 BST 35min left Mon 2020-07-20 15:00:03 BST 24min ago backup-mariadb.timer backup-mariadb.service
The NEXT and LEFT column tells the exact time and how long until the timer executes the service file next. The LAST and PASSED columns display information on when the timer last executed the service file.
How to create Alias and restoring the backup ?
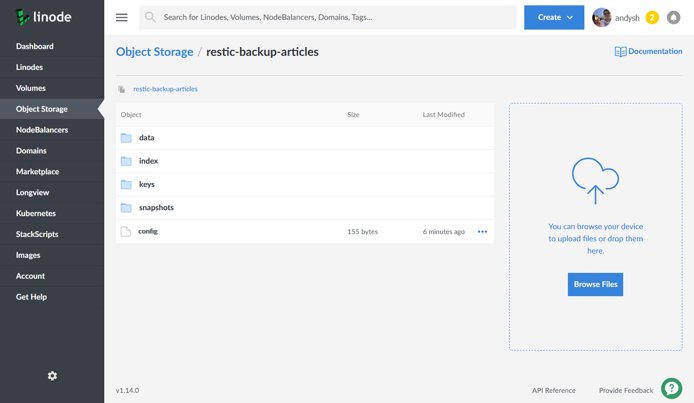
Log in to the Linode Cloud Manager account and view the Object Storage bucket to store Restic backups.
We should see a set of files like the ones displayed in the screenshot below. These files collectively make up the Restic repository; we will not see individual database backup files.
To explore the backups and files held within the Restic repository, we must issue the restic command from the machine that we installed Restic.
How to Create an Alias ?
It can get tedious typing out the arguments to the Restic command. To make life easier for maintenance and daily management, create an alias for the command with the arguments we need.
In the root user’s .profile file, add the lines in the example. For example, on an Ubuntu system, this file is located in /root/.profile.
source /root/restic_params
alias myrestic=’restic -r s3:us-east-1.linodeobjects.com/our-bucket-name -p /root/restic_pw’
After logging out of the system and back in again, we can run restic using aliased command:
myrestic snapshots
How to restore a Backup ?
Backups are not useful if we cannot restore them. To restore the latest useable backup from Restic, run the restore latest command:
restic -r s3:us-east-1.linodeobjects.com/our-bucket-name -p /root/restic_pw restore latest -t /rootTo restore a backup from a particular point-in-time, issue the example command to find the snapshot ID for the specific backup.
sudo /bin/bash -c “source /root/restic_params; restic -r s3:us-east-1.linodeobjects.com/our-bucket-name -p /root/restic_pw snapshots”The output resembles the example, where the first column displays the snapshot ID:
repository 1689c602 opened successfully, password is correct
ID Time Host Tags Paths
—————————————————————————
81072f28 2020-07-21 19:47:19 li1356-54 /var/backups/mariadb
—————————————————————————
1 snapshots
Then, pass the selected ID to the restore command instead of latest. Replace 81072f28 in the example with our own snapshot ID:
sudo /bin/bash -c “source /root/restic_params; restic -r s3:us-east-1.linodeobjects.com/our-bucket-name -p /root/restic_pw restore 81072f28 -t /root”The above commands restore all databases taken in the backup. If we only want a selected backup, pass the filename using the -i option, along with either latest or the snapshot ID:
sudo /bin/bash -c “source /root/restic_params; restic -r s3:us-east-1.linodeobjects.com/our-bucket-name -p /root/restic_pw restore 81072f28 -i wordpress.sql -t /root”How to Maintain Repository ?
The backup repository’s size can grow very quickly, especially if we backup a large database every hour.
Restic can automatically clean-up our backup snapshots according to a flexible policy using snapshot policies.
Consider automatically running a policy using the forget command on a frequent basis (e.g. daily) to keep the backup repository's size down.
We have to pass the –prune option to the forget command or space will not actually be freed from our repository.
[Confused with the Backup procedure? We'd be happy to assist. ]
Conclusion
This article will guide you on how to backup #MariaDB Databases to #Linode Object Storage which helps in restoration in the event of a server fault, a user #error, or a hacking or defacing of #website or #applications.
This article will guide you on how to backup #MariaDB Databases to #Linode Object Storage which helps in restoration in the event of a server fault, a user #error, or a hacking or defacing of #website or #applications.


