Need to Create and Manage User Accounts on oVirt?
This guide will help you.
oVirt is a Web-based, open source data center virtualization platform which requires a hypervisor and a management server.
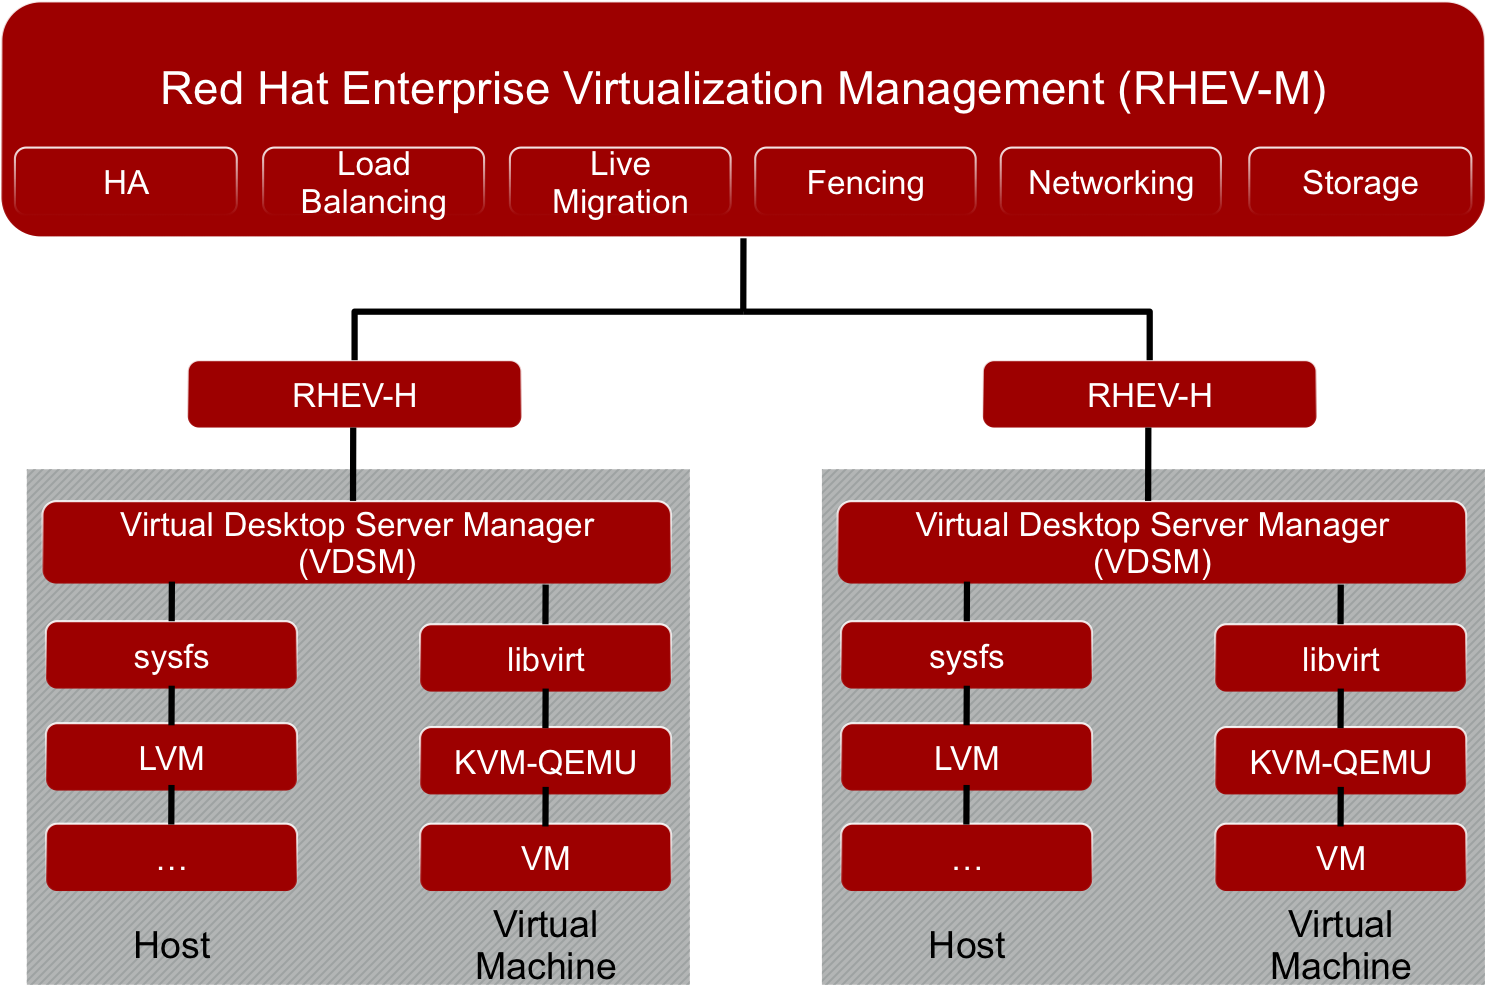
Red Hat Enterprise Virtualization (RHEV), on the other hand, is a server virtualization platform where the underlying KVM hypervisor is integrated into the Linux kernel.
Here at Ibmi Media, as part of our Server Management Services, we regularly help our Customers to perform Red Hat related queries.
In this context, we shall look into the process to Add and Manage User Accounts on oVirt and RHEV.
More about oVirt?
oVirt is an open-source complete virtualization management platform founded by Red Hat as a community project.
oVirt builds on the powerful kernel-based virtual machine (KVM hypervisor) and on the RHEV-M management server.
oVirt includes the following:
i. Rich web-based user interfaces for both admin and non-admin users.
ii. Live migration of virtual machines and disks between hosts and storage.
iii. Integrated management of hosts, storage, and network configuration.
iv. High availability of virtual machines in the event of a host failure.
Steps to Create and Manage User Accounts on oVirt?
Below, you will learn the best methods to create and manage user accounts.
1. Create User Account on oVirt
oVirt / RHEV comes with command line tool located under ovirt-aaa-jdbc-tool that's used to manage user accounts. For a full list of options supported, execute:
# ovirt-aaa-jdbc-tool user --helpUsage: /usr/bin/ovirt-aaa-jdbc-tool [options] user module ...
Perform user related tasks.
Options:
--help
Show help for this module.
Modules:
add
edit
delete
unlock
password-reset
show
helpThe modules available are add, edit, delete, unlock, password-reset, show.
To add a new user to the system, use the syntax:
# ovirt-aaa-jdbc-tool user add <username> --attribute=firstName=<First-Name> \
--attribute=lastName=<Last-Name>
For example:
Example:
# ovirt-aaa-jdbc-tool user add ibmimedia --attribute=firstName=IbmiMedia \
--attribute=lastName=Company
You should get output like below:
adding user ibmimedia...
user added successfully
Note: by default created user cannot log in. see:
/usr/bin/ovirt-aaa-jdbc-tool user password-reset --help.2. Reset User Password on oVirt
By default, the added user cannot log in, you need to set a password for it.
# ovirt-aaa-jdbc-tool user password-reset ibmimedia
Password:
Reenter password:
updating user ibmimedia...
user updated successfully
You’ll be asked for a password, enter and confirm it. The same command is used for resetting lost password.
3. View User details on oVirt
To view user account details on oVirt, use the command:
# ovirt-aaa-jdbc-tool user show josphat
-- User Ibmimedia(03b76cc8-6bbb-4a65-a3e0-b40f257a6878) --Namespace: *Name: ibmimedia
ID: 03b76cc8-6bbb-4a65-a3e0-b40f257a6878
Display Name:
Email: First Name: IbmiMedia
Last Name: Company
Department:
Title:
Description: Account Disabled: false
Account Locked: falseAccount Unlocked At: 1970-01-01 00:00:00Z
Account Valid From: 2018-04-03 07:09:58Z
Account Valid To: 2218-04-03 07:09:58Z
Account Without Password: false
Last successful Login At: 2018-04-11 18:49:09Z
Last unsuccessful Login At: 2018-04-03 09:33:54Z
Password Valid To: 2018-09-30 09:33:54Z
4. Assign User a Role on oVirt
This user account doesn't have privileges to manage all functions of oVirt. We need to assign this user privileges for SuperUser if you want it to work like any admin user account, else assign specific permissions.
Log in to the dashboard as the admin user, and navigate to:
i. Administration > Configure > System Permissions > Add.
ii. On the next window, search for the user added, in my case ibmimedia and click the GO button.
iii. Once the account is shown click on the checkbox to select it.
iv. Change the Role to Assign to “SuperUser”. For other roles, select appropriately. Click the OK button once done. New role should be assigned to the user account.
5. Delete User on oVirt
If the user account is no longer required, it can be deleted using the commands:
# ovirt-aaa-jdbc-tool user delete ibmimedia
deleting user ibmimedia...
user deleted successfully
If you try to view user details, you should get an error message saying user account not found:
# ovirt-aaa-jdbc-tool user show ibmimedia
user ibmimedia not found
6. Disable a user account on oVirt
To lock a user account on oVirt use:
# ovirt-aaa-jdbc-tool user edit <username> --flag=+disabled7. Enable a disabled user account on oVirt
To disable a user account, use the command:
# ovirt-aaa-jdbc-tool user edit <username> --flag=-disabled8. Unlocking locked user account on oVirt
If a user account has been locked for many failed logins, you can unlock it using the command:
# ovirt-aaa-jdbc-tool user unlock <username>For example:
# ovirt-aaa-jdbc-tool user unlock ibmimedia9. Editing User email address
To change email address, use the command:
# ovirt-aaa-jdbc-tool user edit ibmimedia --attribute=email=ibmimedia@example.com[Stuck with any of the above technical steps? We’d be happy to assist. ]
Conclusion
This article will guide you on the steps to Create and #Manage #User #Accounts on #oVirt and RHEV using #PowerShell commands.
ADMINISTERING USER TASKS FROM THE COMMAND LINE:
1. You can use the ovirt-aaa-jdbc-tool tool to manage user accounts on the internal domain.
2. Changes made using the tool take effect immediately and do not require you to restart the ovirt-engine service.
3. For a full list of user options, run ovirt-aaa-jdbc-tool user --help.


