Redis is an open source, advanced key-value store. It is often referred to as a data structure server since keys can contain strings, hashes, lists, sets, and sorted sets.
Redis as a Cache for MySQL with PHP on Ubuntu improves the application performance.
Here at Ibmi Media, as part of our Server Management Services, we regularly help our Customers to perform Redis related tasks.
In this context, we shall look into steps to use Redis to cache MySQL data with PHP on Ubuntu 20.04.
Using Redis as a Cache for MySQL ?
Redis (Remote Dictionary Server) is a fast open-source, in-memory database that we can use as a key-value store for a highly scalable and performance-oriented system.
Since Redis is an in-memory key-value store, its performance makes it suitable for caching data in an application.
Caching is storing data temporarily in a high-speed storage layer to serve data faster when clients make the same future requests.
When we work with PHP and MySQL, using Redis as a cache improves the application performance because it stores data in RAM. Caching also reduces database costs and avoids overloading the backend.
Caching data is an integral design feature when we design web applications with higher reads than writes. Such applications include blogs, online stores, and social media sites.
To begin, get the following ready:
i. An Ubuntu 20.04 server with a non-root user with sudo privileges.
ii. A LAMP stack.
iii. A Redis Server.
How to use Redis as a Cache for MySQL with PHP on Ubuntu ?
Moving ahead, our Support Techs found an effective method to use Redis to cache MySQL data with PHP on Ubuntu. Let us look into it in detail.
Step 1 – Install the Redis Library for PHP
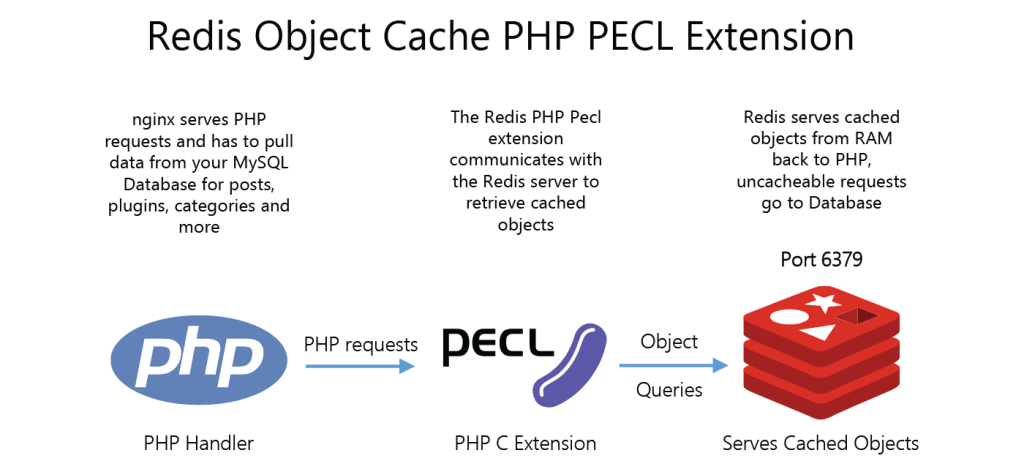
The first step is to install the php-redis extension, which will allow us to use PHP to communicate with Redis.
To update the server and install the extension, we run:
$ sudo apt update
$ sudo apt install php-redis
We confirm the installation and restart the Apache webserver to load the extension:
$ sudo systemctl restart apache2As we have installed the dependencies, we can set up the database.
Step 2 – Set Up a Test Database, Table, and Sample Data
In this step, we will create a MySQL database to store data permanently to disk. We will also create some tables and a user account with full privileges to the database.
Details are given below:
Database name: test_store
Database user: test_user
Table name: products
Column 1: product_id
This column is used to uniquely identify each product.
AUTO_INCREMENT keyword is used to avoid assigning the IDs manually.
Data type: BIGINT
The BIGINT data type can support a large data set, minimum value of -2^63 and a maximum value of 2^63 – 1.
Column 2: product_name
The product_name field will hold the actual names of the items.
Data type: VARCHAR with a length 50
Column 3: price
Data type: DOUBLE
The DOUBLE data type is used to accommodate prices with decimals.
First, we log in to the MySQL server as a root user:
$ sudo mysql -u root -pThen, we enter the root password of the MySQL server and press ENTER to continue.
To create the database test_store:
mysql> CREATE database test_store;We make sure the action is successful by confirming the output:
Query OK, 1 row affected (0.00 sec)To create a user for the database:
mysql> CREATE USER ‘test_user’@’localhost’ IDENTIFIED WITH mysql_native_password BY ‘PASSWORD’;On the other hand, we replace PASSWORD with a strong password as well.
To grant test_user with full privileges to the test_store database:
mysql> GRANT ALL PRIVILEGES ON test_store.* TO ‘test_user’@’localhost’;To reload the grant tables in MySQL:
mysql> FLUSH PRIVILEGES;Ensure we get the following output after each successful command:
Query OK, 0 rows affected (0.01 sec)
End the MySQL root session:
mysql> quit;
We will receive the word Bye and the system will take us back to the server’s command-line interface.
Log back into the MySQL server with the credentials for the test_user that we just created:
$ mysql -u test_user -pEnter the password for the test_user to proceed. Then, we switch to the test_store database when in the mysql> prompt:
mysql> USE test_store;Ensure that we receive the following output:
Database Changed.To create the products table, we run the following command:
mysql> CREATE table products
mysql> (
mysql> product_id BIGINT PRIMARY KEY AUTO_INCREMENT,
mysql> product_name VARCHAR(50),
mysql> price DOUBLE
mysql> ) Engine = InnoDB;
We will receive the following output:
Query OK, 0 rows affected (0.01 sec)Now let us populate the products table with some records for testing purposes.
We do not need to enter data to the product_id column manually since the AUTO_INCREMENT column will complete this.
Run the following commands one by one:
mysql> INSERT INTO products(product_name, price) VALUES (‘Virtual Private Servers’, ‘5.00’);
mysql> INSERT INTO products(product_name, price) VALUES (‘Managed Databases’, ‘15.00’);
mysql> INSERT INTO products(product_name, price) VALUES (‘Block Storage’, ‘10.00’);
mysql> INSERT INTO products(product_name, price) VALUES (‘Managed Kubernetes’, ‘60.00’);
mysql> INSERT INTO products(product_name, price) VALUES (‘Load Balancer’, ‘10.00’);
After running each command, ensure that we get this output:
Query OK, 1 row affected (0.00 sec)Then we verify the data using the SELECT command:
mysql> SELECT * FROM products;We will receive output similar to the following:
+————+————————-+——-+
| product_id | product_name | price |
+————+————————-+——-+
| 1 | Virtual Private Servers | 5 |
| 2 | Managed Databases | 15 |
| 3 | Block Storage | 10 |
| 4 | Managed Kubernetes | 60 |
| 5 | Load Balancer | 10 |
+————+————————-+——-+
5 rows in set (0.00 sec)
End the MySQL session for the test_user:
mysql> quit;Once we have set up the test_store database, products table, and test_user, let us code a PHP script to retrieve data from the MySQL database and cache it to Redis.
Step 3 – Design a PHP Script to Fetch and Cache MySQL Data
In this step, let us create a PHP script to retrieve the sample data.
When we run the script for the first time, it will read the data from MySQL and then cache it to Redis. As a result, subsequent reads of the products’ data will be from Redis.
System memory is multiple times faster than even the fastest solid-state drive, this data will retrieve faster from the Redis cache than reading from the system disk.
While we might not get any performance boost, since we are retrieving just a few records from the MySQL database, several benchmarks prove that retrieving cached data from Redis is several times faster than reading it from MySQL when dealing with several hundred thousand records.
Create a products.php file in the root directory of the website:
$ sudo nano /var/www/html/products.phpTo start, we enter the following information to connect and create an instance of Redis and store it as an object in a $redis variable.
The address 127.0.0.1 connects to the localhost. We may change this value if we are running Redis from a remote server. Remember to replace REDIS_PASSWORD with the specific password for Redis set in the /etc/redis/redis.conf configuration file.
Also, we enter the appropriate port number. By default, Redis runs on port 6379:
<?php
$redis = new Redis();
$redis->connect(‘127.0.0.1’, 6379);
$redis->auth(‘REDIS_PASSWORD’);
Here, the $redis->auth(‘REDIS_PASSWORD’) command sends the password to Redis in plain text.
The next step is initializing a PHP variable we will use as a key in Redis.
Redis acts as a key-value database and therefore we must have a unique key for the data that we intend to store and retrieve from it.
So, define a PRODUCTS key by adding the following information to the /var/www/html/products.php file.
The PHP script will use this key to cache information to Redis once data retrieves from the MySQL database:
…
$key = ‘PRODUCTS’;
Next, include a conditional PHP if…else statement to check if the PRODUCTS key exists in Redis:
…
if (!$redis->get($key)) {
$source = ‘MySQL Server’;
$database_name = ‘test_store’;
$database_user = ‘test_user’;
$database_password = ‘PASSWORD’;
$mysql_host = ‘localhost’;
$pdo = new PDO(‘mysql:host=’ . $mysql_host . ‘; dbname=’ . $database_name, $database_user, $database_password);
$pdo->setAttribute(PDO::ATTR_ERRMODE, PDO::ERRMODE_EXCEPTION);
$sql = “SELECT * FROM products”;
$stmt = $pdo->prepare($sql);
$stmt->execute();
while ($row = $stmt->fetch(PDO::FETCH_ASSOC)) {
$products[] = $row;
}
$redis->set($key, serialize($products));
$redis->expire($key, 10);
} else {
$source = ‘Redis Server’;
$products = unserialize($redis->get($key));
}
echo $source . ‘: <br>’;
print_r($products);
If the key does not exist in Redis, the script connects to the database that we created earlier, queries the products table, and stores the data in Redis using the $redis->set($key, serialize($products)) command.
The $redis->expire($key, 10); command sets the expiration to 10 seconds. We may tweak this value depending on the cache policy.
The $source variable helps to identify the source of the data once it echoes as an array at the end of the script using the echo $source and print_r($products) commands.
Once we have put everything together, the /var/www/html/products.php file will be as follows:
<?php
$redis = new Redis();
$redis->connect(‘127.0.0.1’, 6379);
$redis->auth(‘REDIS_PASSWORD’);
$key = ‘PRODUCTS’;
if (!$redis->get($key)) {
$source = ‘MySQL Server’;
$database_name = ‘test_store’;
$database_user = ‘test_user’;
$database_password = ‘PASSWORD’;
$mysql_host = ‘localhost’;
$pdo = new PDO(‘mysql:host=’ . $mysql_host . ‘; dbname=’ . $database_name, $database_user, $database_password);
$pdo->setAttribute(PDO::ATTR_ERRMODE, PDO::ERRMODE_EXCEPTION);
$sql = “SELECT * FROM products”;
$stmt = $pdo->prepare($sql);
$stmt->execute();
while ($row = $stmt->fetch(PDO::FETCH_ASSOC)) {
$products[] = $row;
}
$redis->set($key, serialize($products));
$redis->expire($key, 10);
} else {
$source = ‘Redis Server’;
$products = unserialize($redis->get($key));
}
echo $source . ‘: <br>’;
print_r($products);
Save and close the file.
We have now set up a PHP script that will connect to MySQL and cache data to Redis.
Step 4 – Test the PHP Script
To test if Redis is caching data from the MySQL database, we will enter the path of the PHP script in a browser window.
Remember to replace your_server_IP with the public IP address of the server, like so:
http://your_server_IP/products.php.
When we run the script for the first time, we will receive the following output that displays data from the MySQL database because, at this point, the PHP script has not yet cached any data in Redis:
MySQL Server
Array ( [0] => Array ( [product_id] => 1 [product_name] => Virtual Private Servers [price] => 5 ) [1] => Array ( [product_id] => 2 [product_name] => Managed Databases [price] => 15 ) [2] => Array ( [product_id] => 3 [product_name] => Block Storage [price] => 10 ) [3] => Array ( [product_id] => 4 [product_name] => Managed Kubernetes [price] => 60 ) [4] => Array ( [product_id] => 5 [product_name] => Load Balancer [price] => 10 ) )Once we run the script again, we will get an output confirming that it is reading data from Redis, which is acting as a cache for MySQL.
Redis Server
Array ( [0] => Array ( [product_id] => 1 [product_name] => Virtual Private Servers [price] => 5 ) [1] => Array ( [product_id] => 2 [product_name] => Managed Databases [price] => 15 ) [2] => Array ( [product_id] => 3 [product_name] => Block Storage [price] => 10 ) [3] => Array ( [product_id] => 4 [product_name] => Managed Kubernetes [price] => 60 ) [4] => Array ( [product_id] => 5 [product_name] => Load Balancer [price] => 10 ) )Remember that the key will expire after 10 seconds and data will again be retrieved from MySQL.
[Failed to set Redis as a cache? Feel free to get in touch. ]
Conclusion
This article will guide you on steps to use #Redis to cache #MySQL data with #PHP on #Ubuntu 20.04. Redis, which stands for Remote Dictionary Server, is a fast, open-source, in-memory key-value data store for use as a database, cache, message broker, and queue.
To Connect to Redis through the SQL Gateway:
1. In MySQL Workbench, click to add a new MySQL connection.
2. Name the connection (CData SQL Gateway for Redis).
3. Set the Hostname, Port, and Username parameters to connect to the #SQL Gateway.
4. Click Store in Vault to set and store the password.


