Setting up client access over private IP address to MySQL on Compute Engine helps advanced usage of parameters and specific performance needs.
Here at Ibmi Media, as part of our Server Management Services, we regularly help our Customers to perform Google Cloud related tasks.
In this context, we shall look into the steps to execute a MySQL database on a private network in Google Cloud.
More information about MySQL on Compute Engine ?
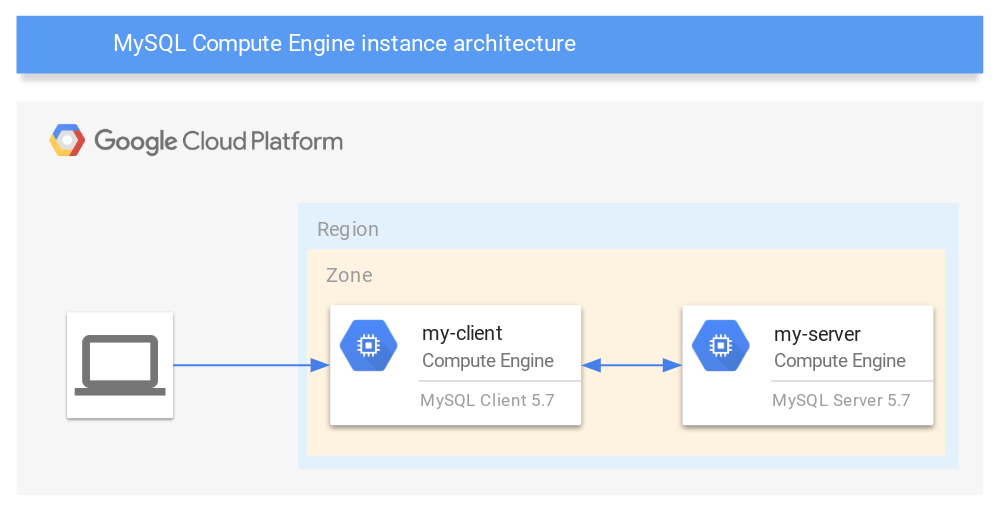
Here, you will learn how to configure the MySQL server app to accept remote traffic from a MySQL client on a Compute Engine instance on the same private network.
Before we start, you need to have knowledge on the following:
i. Basic Linux commands
ii. Ubuntu-server 18.04
iii. MySQL 5.7
iv. Compute Engine
To get started:
a. Sign in to Google Account.
b. In the Google Cloud Console, on the project selector page, select or create a Google Cloud project.
https://console.cloud.google.com/projectselector2/home/dashboard?_ga=2.179525542.361910769.1609997345-535727616.1598437814c. Make sure to enable billing for the Cloud project.
d. Then, enable the Compute Engine API.
https://console.cloud.google.com/flows/enableapi?apiid=compute&_ga=2.179525542.361910769.1609997345-535727616.1598437814How to set up client access over private IP address to MySQL on Compute Engine ?
Here you will see the methods to follow in order to set up client access over private IP address to MySQL on Compute Engine.
1. Creating Compute Engine instances
Here, we will deploy two Compute Engine instances for MySQL:
a. Create a Compute Engine client instance
i. Name the instance my-client.
ii. Set the –zone flag to the zone in which we want to create our instance.
iii. Then Set the –image-project flag to ubuntu-os-cloud.
iv. Set the –image-family flag to ubuntu-1804-lts.
v. Then set the –scopes flag to https://www.googleapis.com/auth/cloud-platform.
gcloud compute instances create my-client –zone [ZONE] –image-project ubuntu-os-cloud –image-family ubuntu-1804-lts –scopes https://www.googleapis.com/auth/cloud-platformb. Create a Compute Engine server instance
i. Name the instance my-server.
ii. Set the –zone flag to the zone in which we want to create our instance.
iii. Then set the –image-project flag to ubuntu-os-cloud.
iv. Set the –image-family flag to ubuntu-1804-lts.
v. Finally, set the –scopes flag to https://www.googleapis.com/auth/cloud-platform.
gcloud compute instances create my-server –zone [ZONE] –image-project ubuntu-os-cloud –image-family ubuntu-1804-lts –scopes https://www.googleapis.com/auth/cloud-platformHow to install MySQL client ?
Follow the steps given below:
1. In the Cloud Console, go to the VM instances page.
https://console.cloud.google.com/compute/instances?_ga=2.189030057.361910769.1609997345-535727616.15984378142. In the list of virtual machine instances, click SSH in the row of the instance that we want to connect to.
3. Update the apt-get package manager.
sudo apt-get update4. If we receive an error “Could not get lock /var/lib/dpkg/lock”, wait another minute for the boot processes to complete and try again.
5. Finally, install the MySQL client package.
sudo apt-get -y install mysql-client-5.7How to install MySQL server ?
Do the following:
1. In the Cloud Console, go to the VM instances page.
2. In the list of virtual machine instances, click SSH in the row of the instance that we want to connect to.
3. Update the apt-get package manager.
sudo apt-get updateIf we receive an error, “Could not get lock /var/lib/dpkg/lock‘”, wait another minute for the boot processes to complete and try again.
4. Install the MySQL server package.
sudo apt-get -y install mysql-server-5.7How to improve MySQL installation security ?
We must establish a root password for MySQL and perform basic security maintenance on MySQL server configuration.
1. In Cloud Shell, improve the security of MySQL installation.
sudo mysql_secure_installation2. Press enter to skip setting up the VALIDATE PASSWORD plugin.
3. Then enter the new root password twice:
To remove anonymous users, enter Y and press enter.
To prevent remote root login, enter Y and press enter.
To remove the test database, enter Y and press enter.
To reload the privilege tables, enter Y and press enter.
How to configure the MySQL server ?
Before we can remotely connect to the MySQL server, we need to configure it to listen to its internal IP address. Then, we create a non-root user account for the MySQL client to connect to the server.
The MySQL commands in this section include the following flags: –user for the username, -p for the password, and -e to execute the given statement and immediately quit.
1. In Cloud Shell, use SSH to connect to the my-server instance.
2. Update the /etc/mysql/mysql.conf.d/mysqld.cnf configuration file with the following information:
LOCAL_IP=$(curl http://metadata.google.internal/computeMetadata/v1/instance/network-interfaces/0/ip \
-H “Metadata-Flavor: Google”)
sudo sed -i “s|bind-address.*|bind-address = $LOCAL_IP|” /etc/mysql/mysql.conf.d/mysqld.cnf
3. Then restart the MySQL service to apply the changes:
sudo service mysql restart4. Verify that the server is running locally. Replace [ROOT_PASSWORD] with the MySQL server root password we established in the previous step.
sudo mysql –user=root -p[ROOT_PASSWORD] -e “show databases”The output appears similar to the following:
+——————–+
| Database |
+——————–+
| information_schema |
| mysql |
| performance_schema |
| sys |
+——————–+
How to Create a MySQL user ?
Remotely connecting as the root user was disabled with the preceding mysql_secure_installation command.
We need to create a new user with the necessary permissions to allow remote connections:
1. In Cloud Shell, we create an environment variable for the my-client internal IP address.
CLIENT_IP=$(gcloud compute instances describe my-client \
–zone=[ZONE] \
–format=’value(networkInterfaces[0].networkIP)’)
2. Create a new MySQL user with a password. Replace [MY_PASSWORD] with the password, [ROOT_PASSWORD] with MySQL root user password:
sudo mysql -uroot -p[ROOT_PASSWORD] \
-e “CREATE USER ‘TESTUSER’@’${CLIENT_IP}’ IDENTIFIED BY ‘[MY_PASSWORD]’;”
3. Then we grant the new MySQL user permission to log on to the server from the internal IP address of my-client:
sudo mysql -uroot -p[ROOT_PASSWORD] -e \
“GRANT ALL PRIVILEGES ON *.* TO ‘TESTUSER’@’${CLIENT_IP}’ \
IDENTIFIED BY ‘[MY_PASSWORD]’;”
To Remove the external IP address for my-server:
The my-server instance does not need an external IP address because the client can access my-server through an internal IP address.
To remove the external IP address, we update the configuration settings in Cloud Shell.
On the other hand, replace [ZONE] with Google Cloud zone:
gcloud compute instances delete-access-config my-server \
–access-config-name “external-nat” \
–zone=”[ZONE]”
How to Verify remote access from the client to the server instance ?
The following steps describe how to connect to the MySQL server on my-server from the my-client instance.
1. In Cloud Shell, we use SSH to connect to the my-client instance.
2. Then we test the connection by listing the databases:
sudo mysql –host=my-server –user=TESTUSER \
–password=[MY_PASSWORD] -e “SHOW DATABASES;”
Output appears similar to the following:
+——————–+
| Database |
+——————–+
| information_schema |
| mysql |
| performance_schema |
| sys |
+——————–+
These steps verify that the MySQL client can successfully connect to the MySQL server over the internal IP address.
Firewall considerations in production environments
The default network configuration in Google Cloud includes a firewall rule, default-allow-internal. It allows internal traffic between Compute Engine instances on a wide range of ports, including the MySQL port, 3306.
In non-default environments with an established security footprint, we might need to create a firewall rule to allow the my-client instance to communicate with the my-server instance over the network.
We can base firewall rules on IP address ranges or tags. IP address ranges are useful if we want to grant access to a wide range of internal IP addresses. Alternatively, if we want to grant access to specific instances on our network, tags provide a more flexible solution.
Tags make it easier to add new clients without granting access to a wide range of IP addresses. We need only assign the appropriate tag to the new MySQL client instance.
For example, we can create a new firewall rule that allows traffic from all client instances that are tagged with mysql-client.
To support firewall rules using tags, we can assign the appropriate tags to the my-client and my-server VMs in Cloud Shell:
gcloud compute instances add-tags my-client –tags mysql-client –zone=[ZONE]
gcloud compute instances add-tags my-server –tags mysql-server –zone=[ZONE]
How to Add a new firewall rule:
In Cloud Shell, create a firewall rule to allow communications from mysql-client to mysql-server:
gcloud compute firewall-rules create “mysql-remote-access” \
–allow tcp:3306 –source-tags “mysql-client” \
–target-tags “mysql-server”
We can now connect to MySQL from my-client.
How to Access considerations from external clients ?
If we need to allow non-Compute Engine access, we modify the following:
1. Initially, add an external IP address to my-server to allow external connectivity.
2. Then add the source IP address of the external client to the firewall rules.
3. Modify the TESTUSER account, or create a user account, that is bound to the source IP address of the external client.
How to Cleanup Google Cloud account ?
To avoid incurring charges to Google Cloud account for the resources used in this article, we can either delete the project or delete the instances.
Delete the project
Deleting a project has the following effects:
Everything in the project is deleted. If we used an existing project for this article, when we delete it, we also delete any other work we have done in the project.
Custom project IDs are lost. When we created this project, we might have created a custom project ID that we want to use in the future. To preserve the URLs that use the project ID, such as an appspot.com URL, delete selected resources inside the project instead of deleting the whole project.
1. Initially, in the Cloud Console, go to the Manage resources page.
https://console.cloud.google.com/iam-admin/projects?_ga=2.122443273.361910769.1609997345-535727616.15984378142. In the project list, select the project that we want to delete, and then click Delete.
Then in the dialog, type the project ID and then click Shut down to delete the project.
To Delete instances:
i. In the Cloud Console, go to the VM instances page.
ii. Click the checkbox for my-server instance.
iii. Then, click Delete.
[Still trying to perform Linux Cloud related Tasks? We'd be happy to assist. ]
Conclusion
This article will guide you on setting up client access over private IP address to #MySQL on #Compute #Engine helps advanced usage of parameters and specific performance needs.
To allow IP to connect to MySQL:
1. Edit MySQL Config File. 1.1 Access mysqld.cnf File.
2. Set up Firewall to Allow Remote MySQL Connection. While editing the configuration file, you probably observed that the default MySQL port is 3306.
3. Connect to Remote MySQL #Server. Your remote server is now ready to accept connections.


